How to explore the maps module in the Zuper mobile app?
The maps module in Zuper provides a comprehensive, geography-based panoramic view that helps you track the exact location of users, routes, jobs, assets, properties, customers, organizations, and service territories on the map. This serves as a centralized hub for location-relevant information across all modules in Zuper, managing and visualizing the geographical aspects of your operations, thereby enhancing efficiency and decision-making.
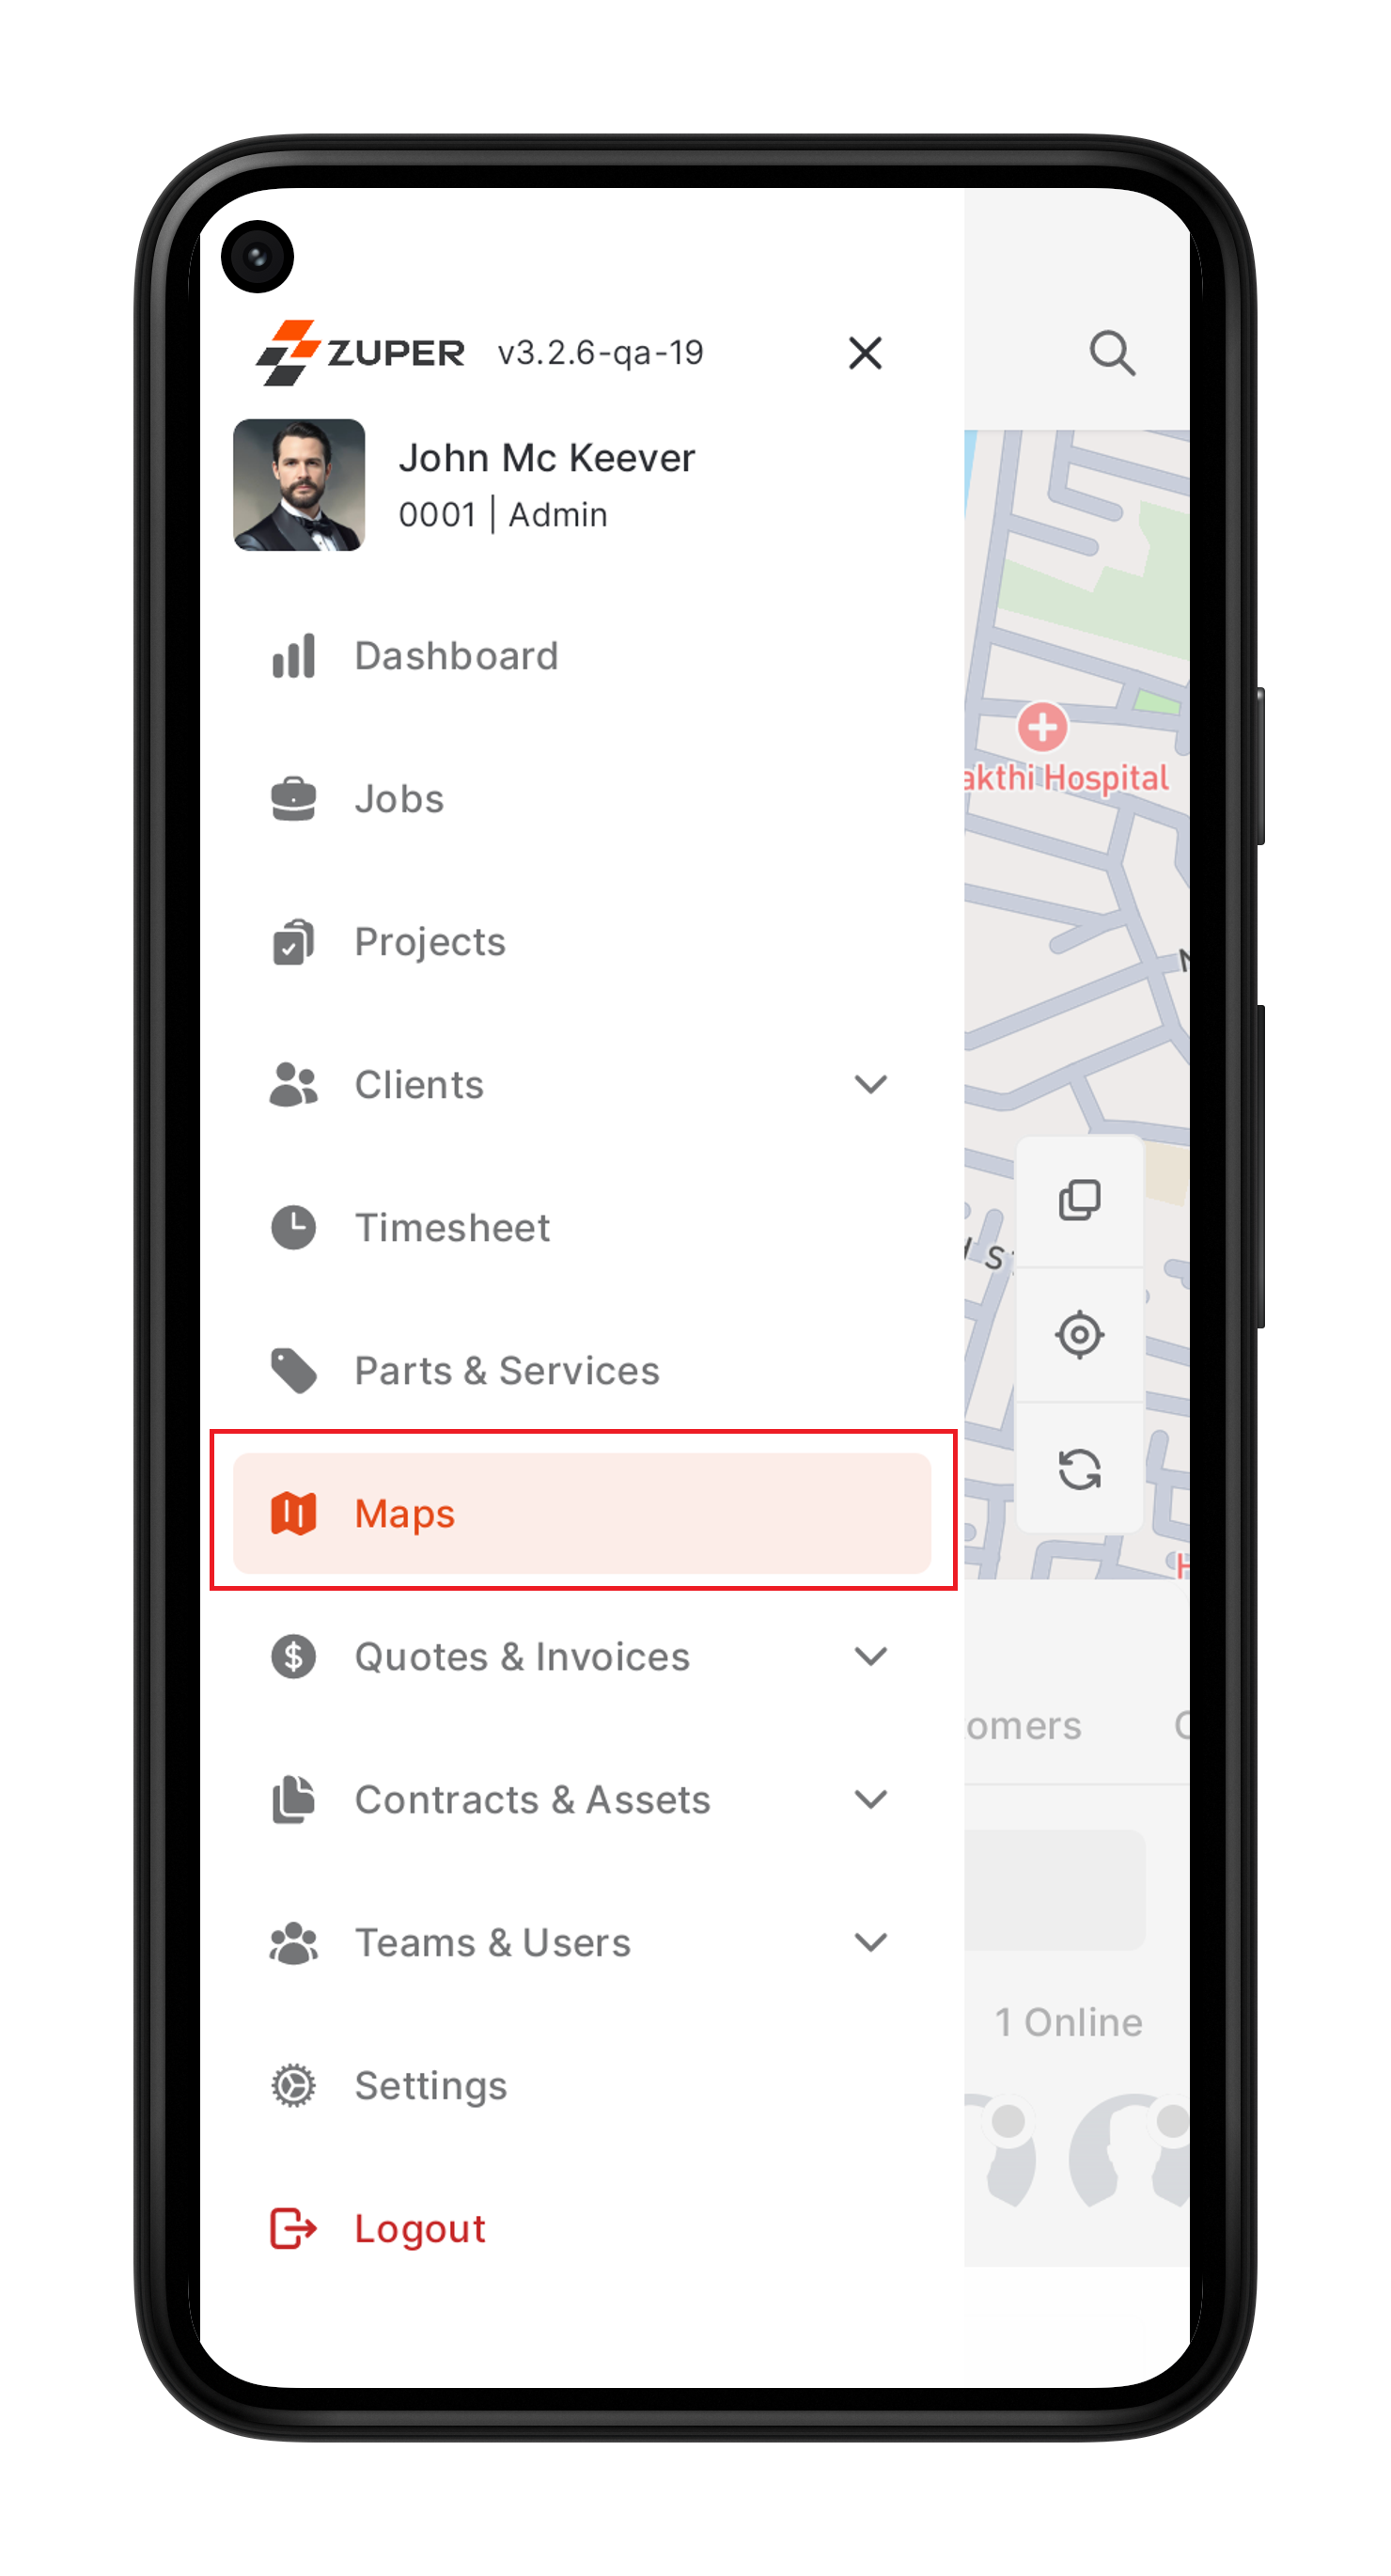
1. Go to the "Maps" module from the top-left hamburger icon .
.
Mobile:
Tab:
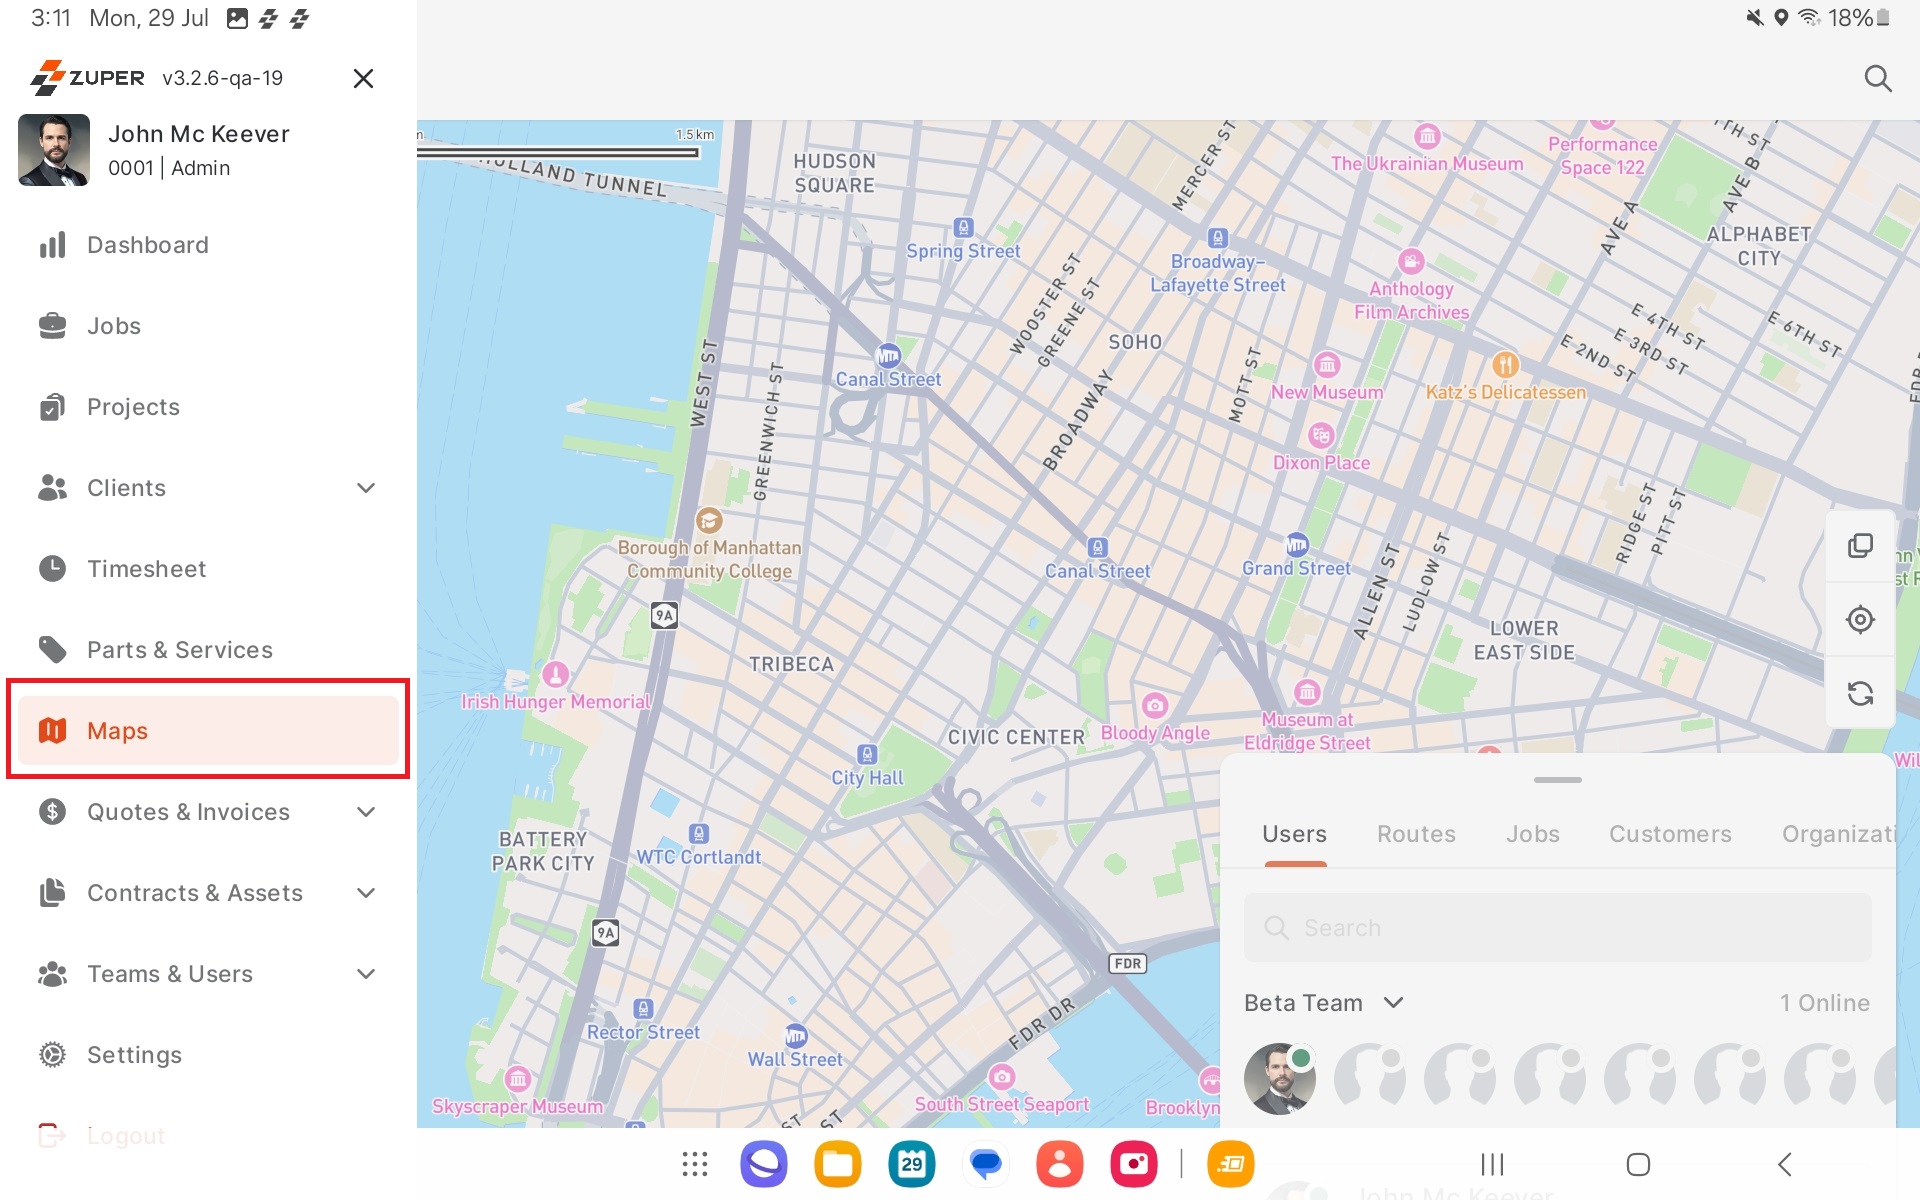
2. You will land on the Maps module listing page.
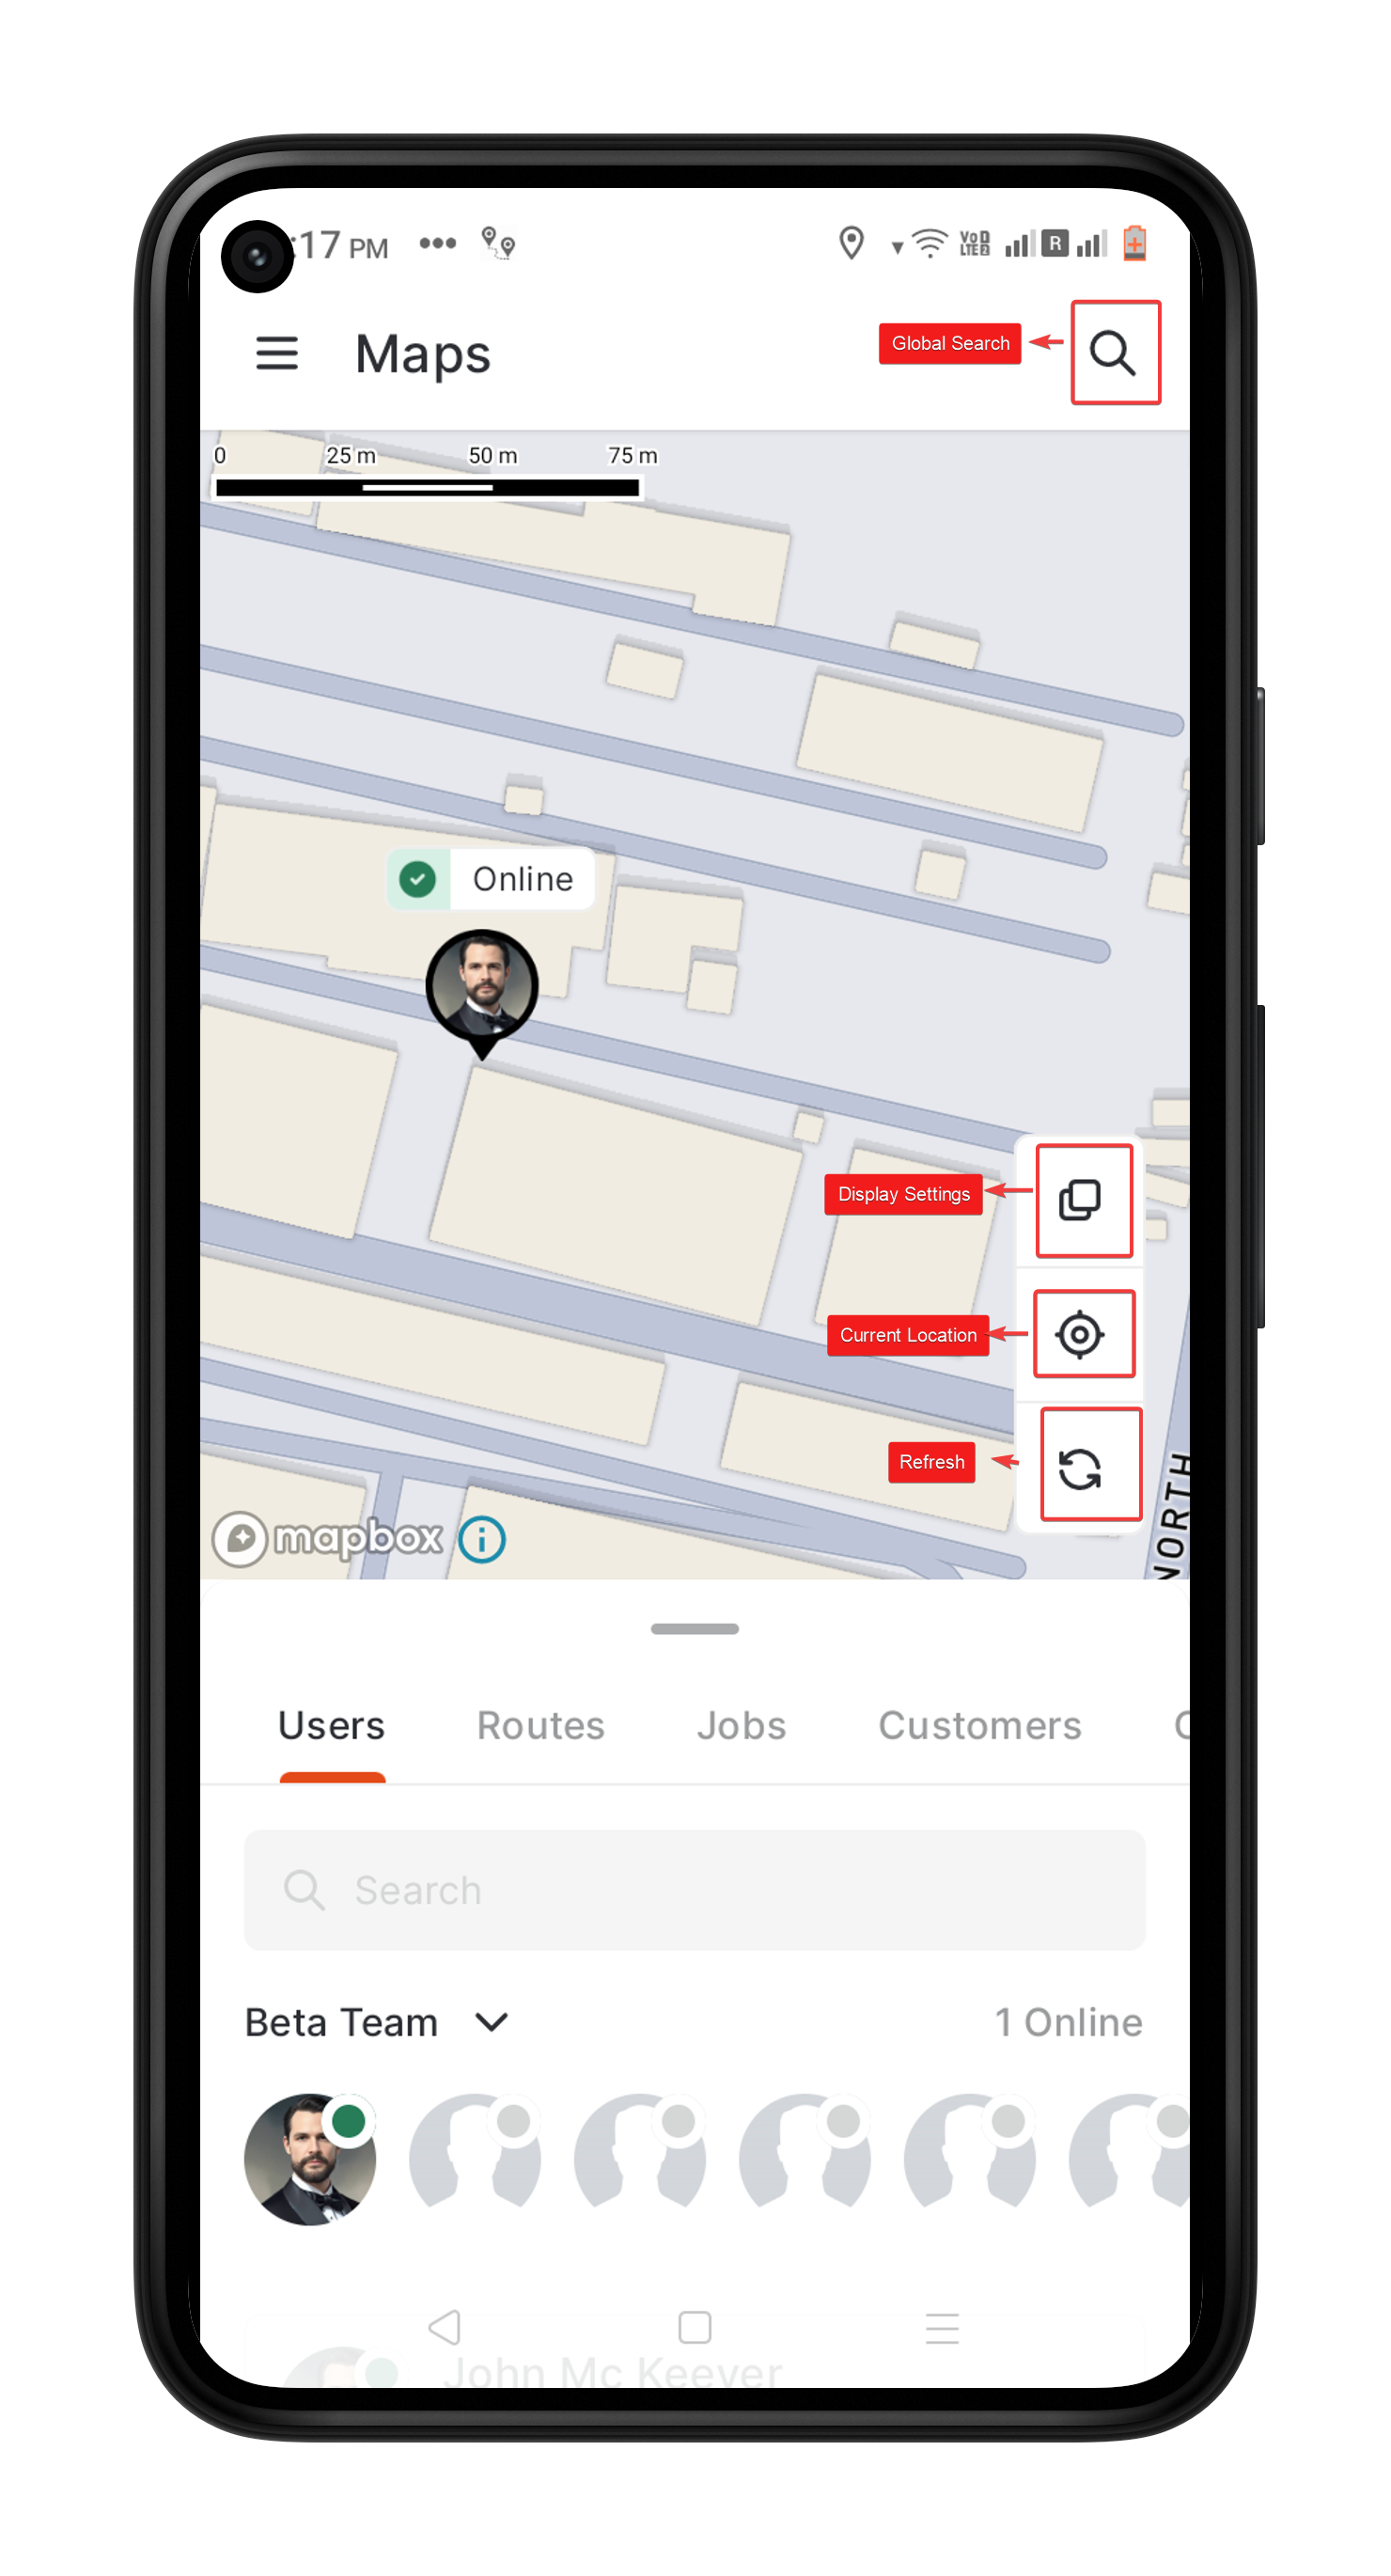
Map Actions
Mobile:
Tab:
Tab:
1. Global search: Click the "Global Search" icon and enter the name of the location. The map will pan to that location and display associated jobs, assets, users, customers, organizations, and more.
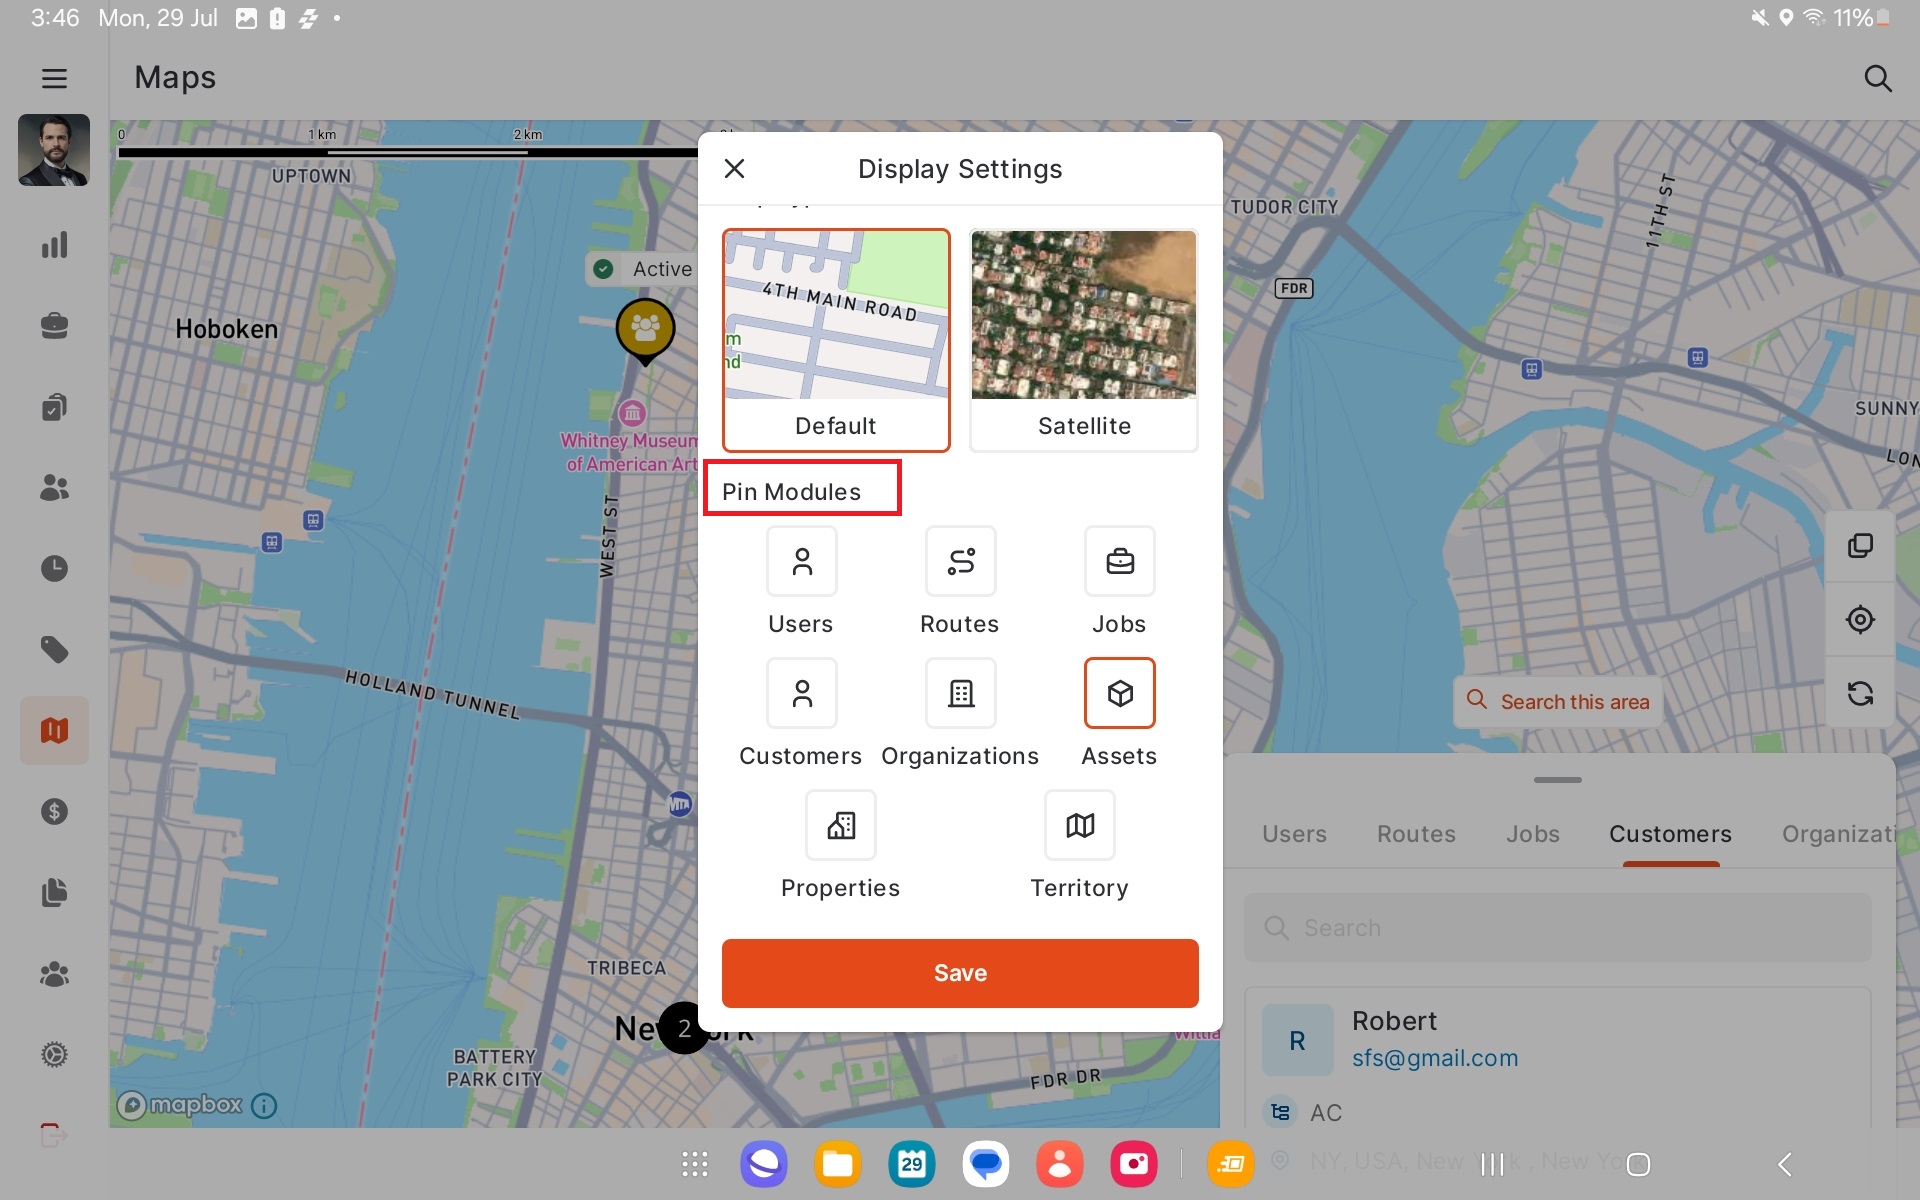
2. Display Settings: Click the "Display Settings" icon to perform the following actions:
a. In the Display Settings page, select the map view as "Default" or "Satellite."
Mobile:
Tab:
b. Additionally, you can pin/unpin the modules.
 Note: When you pin a module, it will remain visible on the map across all tabs. For instance, if you pin the Assets module, the marker will appear even when you switch to any other tab, such as Jobs or Users. Conversely, unpinned modules will not appear in other tabs.
Mobile:

Tab:
Tab:
3. Current Location: Click the "Current Location" icon to navigate to your current location.
4. Refresh: Click the "Refresh" icon to reload or refresh the page.
Users
To track the exact location of users or find nearby users on the map, follow these steps:
- Click
the "User" tab to view a list of all the team users and their online/offline status.
Mobile:
Tab: - Selecting a user
will display their exact live location on the map and provide an overview of job details for that day.
Mobile:
Tab: - Select
the Team from the drop-down
.
Mobile:
Tab: - Use the "Search" icon to find a particular User on the map.
Mobile:
Tab: - Next to
each User’s name, you can view their battery percentage and signal strength.
Mobile:
Tab: - To
view any of the user details, select the User and click "More
Details." The User Detail page will open, allowing you to see more information and perform additional actions.
Mobile:
Tab: - Tabs Detail:
- Under the "Details" tab, you can
view team-related details and user details such as role, email ID, phone
number, skill set, team, etc.
- Under the "Associated" tab, you
can view details of linked modules, such as Job, Customer, and other relevant modules, along with associated information related to the users.
- Under the "Files" tab, you can
view the attachments associated with the users.
- Under the "Activity" tab, you can
view the activities performed by the respective user.
Mobile:
Tab:
To know more, see How do I create a new user in zuper?.
Routes
To track the exact location of
the routes on the map and view the jobs present within those routes, follow these steps:
- On the maps page, click the "Routes"
tab, which lists all the routes created for the date.
Mobile:
Tab: - Click any of the routes to view the exact
location on the map.
Mobile:
Tab: - Use the "Search" icon to search for a particular route.
Mobile:
Tab: - You can view the route’s primary details and the
jobs associated with the route on the map.
Mobile:
Tab: - You can also click on the job card inside that route to view that specific job on the map along with the route. The job sequence number will be displayed on the job marker on the map.
- Click the “Navigate” icon to be redirected to the Map, which will guide you to the location.
- Click the “Optimize
Route” icon to optimize the route. The route will be optimized based on
your current location, which will be set as the start location of the route. It
will show the most optimal order to reach and execute the jobs based on the route optimization method set.
Mobile:
Tab:
Jobs
To track the exact location of
the jobs or to find nearby jobs on the maps, follow these steps:
- Click the "Job" tab, which lists
all the jobs with information such as user assigned, job status, priority, and
more. This view provides a quick
overview of jobs that have yet to start, are in progress, are incomplete, etc.
Mobile:
Tab: - Click any
of the jobs to view their exact location on the map. You can zoom in and zoom
out to adjust the map view.
Mobile:
Tab: - Or, use the "Search
this area" feature to see all jobs available in the specified area.
Mobile:
Tab: - To view any job details, select the Job and click "More Details." The Job Detail page will open, allowing you to see more information and perform additional actions.
Mobile:
Tab: - Quick
Actions:
- Use the “Navigate” to be redirected to the Map, which will guide you to the job location.
- Use "+Add Notes" to create a new note. You can add notes and make them public or private. You can add images, audio, video, and documents as note attachments.
- Use the “+” to link or create new transactions, jobs, assets or products.Mobile:Tab:
- Tabs detail:
- Under the "Details" tab, you can view the job-related details.
- Under the "Task" tab, you can view and edit the existing service tasks. To do so, click the Kebab icon.
- Under the "Associated" tab, you can view the modules linked to the job.
- Under the "Notes" tab, you can view and perform various actions on the associated notes with the job.Mobile:Tab:
- More Actions:
- Use the ”Kebab” icon to “Delete,” “Edit
Custom Field,” “Activity,” “Save as PDF,” and “Share Via Email.”
Mobile:
Tab:
To know more, see Overview of Job Module.
Customers
To track the exact customer
location or find the nearby customers on the map, follow these steps:
- On the Maps page, click the "Customer"
tab, to view the customers' list.
Mobile:
Tab: - Click on any customer to view
their exact location on the map. Use the zoom-in and zoom-out functions to
adjust the map view.
Mobile:
Tab: - Or, use the "Search this area" feature to see all
customers available in the specified area.
Mobile:
Tab: - To view any of the customer details,
select the customer and click "More Details." The Customer Detail page will open, allowing you to see more information and perform additional actions.
Mobile:
Tab: - Quick Actions:
- Use the “Email” option to contact the customer.
- Use "+Add Notes" to create a new note. You can add notes and make them public or private. You can also add images, audio, video, and documents as note attachments.
- Use the “+” to create new transactions, jobs, or assets.
Mobile:
Tab: - Tabs Detail:
- Under the "Details" tab, you can view customer-related details such as email address, service address, account details, attachments, etc.
- Under the "Associated" tab, you can view the modules linked to the job.
- Under the "Notes" tab, you can view and perform various actions on the associated notes with the customer.
- Under the "Activity" tab, you can view the activity performed by the customer.
Mobile:
Tab: - More Actions:
- Use the "Kebab” icon to “Edit Customer,”
“Edit Custom Field,” “Statement,” and “Deactivate.”
Mobile:
Tab:
To know
more, see Overview of Customers in Zuper V3 Mobile App.
Organizations
To track the exact location of
the organization or find nearby organizations on the map, follow these steps:
- On the Maps page, click the "Organization" tab, which lists all the organizations created in Zuper.Mobile:Tab:
- Click any of the organizations to view
their exact location on the map. You can zoom in and out to adjust the map
view.
Mobile:
Tab: - Or, use the "Search this area" function to see the
organizations available in the area.
Mobile:
Tab: - To view any of the organization details, select the organization and click "More Details." The Organization Detail page will open, allowing you to see more information and perform additional actions.
Mobile:
Tab: - Quick Actions:
- Use the "Email" option to contact the organization.
- Use "+Add Notes" to create a new note. You can add notes and make them public or private. You can also add images, audio, video, and documents as note attachments.
- Use the “+” to create new transactions, jobs, or assets.
Mobile:
Tab: - Tabs Detail:
- Under the "Details" tab, you can view organization-related details, such as email address, service address, account details, attachments, etc.
- Under the "Associate" tab, you can view the associated modules with the organization.
- Under the "Activity" tab, you can view the list of activities you performed.
- Under the "Notes" tab, you can view the notes associated with the Organization.
Mobile:
Tab: - More Actions:
- Use the Kebab icon to "Edit," "Deactivate," or
"Delete" the organization.
Mobile:
Tab:
To know more, see Overview of Organizations in Zuper.
Assets
To track the exact location of
the assets or find nearby assets on the map, follow these steps:
- On the maps page, click the "Assets"
tab, which lists all the assets created.
Mobile:
Tab: - Click any of the assets to view their
exact location on the map. You can zoom in and out to adjust the map view.
Mobile:
Tab: - Or, use the "Search this area" function to see the assets
available in the area.
Mobile:
Tab: - To view any of the asset details, select the asset and click "More Details." The Asset Detail page will open, allowing you to see more information and perform additional actions.
Mobile:
Tab: - Quick Actions:
- Use the "Service History" to view the activities.
- Use "Add Notes" to create new notes. You can add notes and make them public or private. You can also add images, audio, video, and documents as note attachments.
- Use "+New Job" to quickly create a new job with this asset, which will then be added to Asset Jobs.
Mobile:
Tab: - Tabs Detail:
- Under the "Details" tab, you can view the asset status, asset code, asset category, owned by, purchase price, and location.
- Under the "Associated" tab, you can view the linked modules.
- Under the "Notes" tab, you can view the notes associated with the asset.
- Under the "Activity" tab, you can view the list of activities you performed.
Mobile:
Tab: - More Actions:
- Use the Kebab icon to "Edit," "Deactivate", "Delete" and so on the asset.
Mobile:
Tab:
Properties
To track the exact location of the properties or find the nearby properties on the map, follow these steps:
- On the maps page, click the "Properties"
tab, which lists all the properties created.
Mobile:
Tab: - Click any of the properties to view their
exact location on the map. You can zoom in and out to adjust the map view.
Mobile:
Tab: - Or, use the "Search this area" function to see the
properties available in the area.
Mobile:
Tab: - To view any of the property details, select the property and click "More Details." The Property Detail page will open, allowing you to see more information and perform additional actions.
Mobile:
Tab: - Quick Actions:
- Use "Navigate" to view the route to reach the location.
- Use "Add Notes" to create new notes. You can add notes and make them public or private. You can also add images, audio, video, and documents as note attachments.
- Use "+New Job" to quickly create a new job with this property, which will then be added to Property Jobs.
Mobile:
Tab: - Tabs Detail:
- Under the "Details" tab, you can view the property status, property code, property category, owned by, purchase price, and location.
- Under the "Associated" tab, you can view the linked modules.
- Under the "Notes" tab, you can view the notes associated with the property.
- Under the "Activity" tab, you can view the list of activities you performed.
Mobile:
Tab: - More Actions:
- Use the Kebab icon to "Edit," "Deactivate," or
"Delete" the property.
Mobile:
Tab:
Service Territory
To track the boundaries of the service territory on the map, follow these steps:
- On the Maps page, click the "Service
Territory" tab to view the territories on the map.
Mobile:
Tab: - Click any of the service territories to
view their exact location on the map. You can zoom in and out to adjust
the map view.
Quick Filters and Search Enhancements (New)
The Maps module now includes enhanced filtering and search
capabilities that allow you to refine results based on distance, date,
and location. Follow the steps below to use the new features.
1. Accessing the Quick Filter Panel
Mobile:
- Select the Maps module from the hamburger menu.
- At the bottom of the screen, you can view the Quick Filter panel.
Tablet:
- Open the Maps module.
- The Quick Filter panel will appear at the bottom of the screen.
2. Filter by Distance (Miles)
Mobile:
- Tap the Miles filter option.
- Choose a distance (e.g., 5 miles, 10 miles, etc.).
- The map will update to show results within the selected radius.
Tablet:
- Tap the Miles filter at the bottom.
- Select a desired distance range.
- The map will highlight only those results within the chosen range.
3. Filter by Date,
All jobs
Mobile:
- Tap the Date filter from the quick filter panel.
- Select a predefined date range from the list:
- Today, Yesterday, Tomorrow
- This Week, Next Week, This Month
- Unscheduled
- Custom Date Range (choose up to 30 days)
- The map view will update based on the selected date range.
Tablet:
- Tap the Date option at the bottom filter panel.
- Choose one of the available date ranges or pick a custom date range (maximum 30 days).
- Results on the map will be filtered accordingly.
4. Use the Search Bar with Result Count
Mobile:
- Tap the Search bar at the top of the map screen.
- Enter a keyword (e.g., customer name, job number).
- As you type, results will appear, grouped by module (Jobs, Users, etc.), with a count of results for each.
- Scroll down to the bottom of the search results.
- Tap "Search in Location" to limit the results to the currently visible area on the map.
Tablet:
- Tap the Search field located at the top of the screen.
- Enter your search keyword.
- The results will be displayed by module, along with the number of matches found.
- Scroll to the bottom of the list and select “Search in Location” to refine results by visible map area.
Related Articles
How to navigate and explore maps and location tracking in the Zuper web app?
The maps module in Zuper provides a panoramic view that helps you track the exact location of users, jobs, routes, assets, properties, customers, and organizations on the map. Additionally, you can perform various actions such as creating routes, ...How to access and manage organizations in the Zuper mobile app?
The organizations module in Zuper is designed to streamline the management of organization details. It allows you to efficiently handle organization information, map organizations to customers, and create new jobs associated with an organization. ...How to access and manage timesheet in the Zuper mobile app?
The timesheet module in Zuper is designed to streamline the management of employee work hours. It allows you to efficiently track and document time entries, making it easy to monitor work hours for auditing purposes. This module is essential for ...How to access and manage contracts in the Zuper mobile app?
The contracts module in Zuper is designed to streamline the management of service agreements. It allows you to efficiently create, modify, and manage contracts, ensuring they are properly mapped to the right organization. This module is essential for ...How to access and manage customers in the Zuper mobile app?
The customer module in Zuper is designed to streamline the management of customer information. It allows you to efficiently handle customer details, facilitating easy communication via email or phone and providing quick access to service addresses. ...