How to navigate and manage projects listing page in the Zuper web app?
The projects listing page provides an overview of the projects you have access to with summarized information like project number, name, status, and other records. (For step-by-step instructions on how to create a project, click here).
Once
created, you can access and manage projects from the listing page, where you
can view more detailed information and make any necessary changes or deletions
as needed.
 Navigation: Projects --> Projects listing page
Navigating the projects listing page
1. Click the "Projects" icon in the left navigation menu. You can view the list of projects with columns such as project name, customer, category, project address, status and so on.
Note: If you are unable to access the Projects module from the menu, please contact your account administrator to grant access to the module.
In addition to accessing these details, you can navigate and manage various other actions from the projects listing page, including:
Customize
You can add, remove, or reorder the columns as needed. To do so, click the “Customize” button at the top right corner and check or uncheck the checkbox next to a field to add or remove them.
To reorder table field columns, just drag and drop the fields in the preferred order using the  icon.
icon.
View/Delete Project
You can delete or view any of the project details. To do so, click the "ellipsis" icon under Actions and choose "View Details" or "Delete Project" as needed.
Export report
You can preview and download the Project Master Report as an Excel file. To do so, click the "Export" button at the top right, select the start and end date, and click the "Generate Report" button.
You can also choose the preferred date range and use the "Advanced Filter" option to filter specific projects. Once you have set the preferred date range and filters, click on “Generate Report.” A preview of the report will be generated on the right. You can download it by clicking on “Download Report” at the top-right of the preview.
Apply filters
You also have the Filter option, which allows you to apply multiple filters based on specific fields. To do so, follow these steps:
1. Click Filter>> Add Filter.
2. Choose the specific field type>> apply conditions and click the "+" icon to add this filter.
3. You can also add multiple filters by clicking the "+ Add Filter" button. Once added, click the "Apply Filter" button to view the result.
4. To remove the applied filter, click Filter>> Clear Filter.
5. You can also save the applied filter, which will be added to the quick filters section at the top left corner. To do so, check the "Save applied filter" checkbox.
A small dialog box appears.
6. Enter the "Filter Name" and "Filter Applicability" in the pop-up.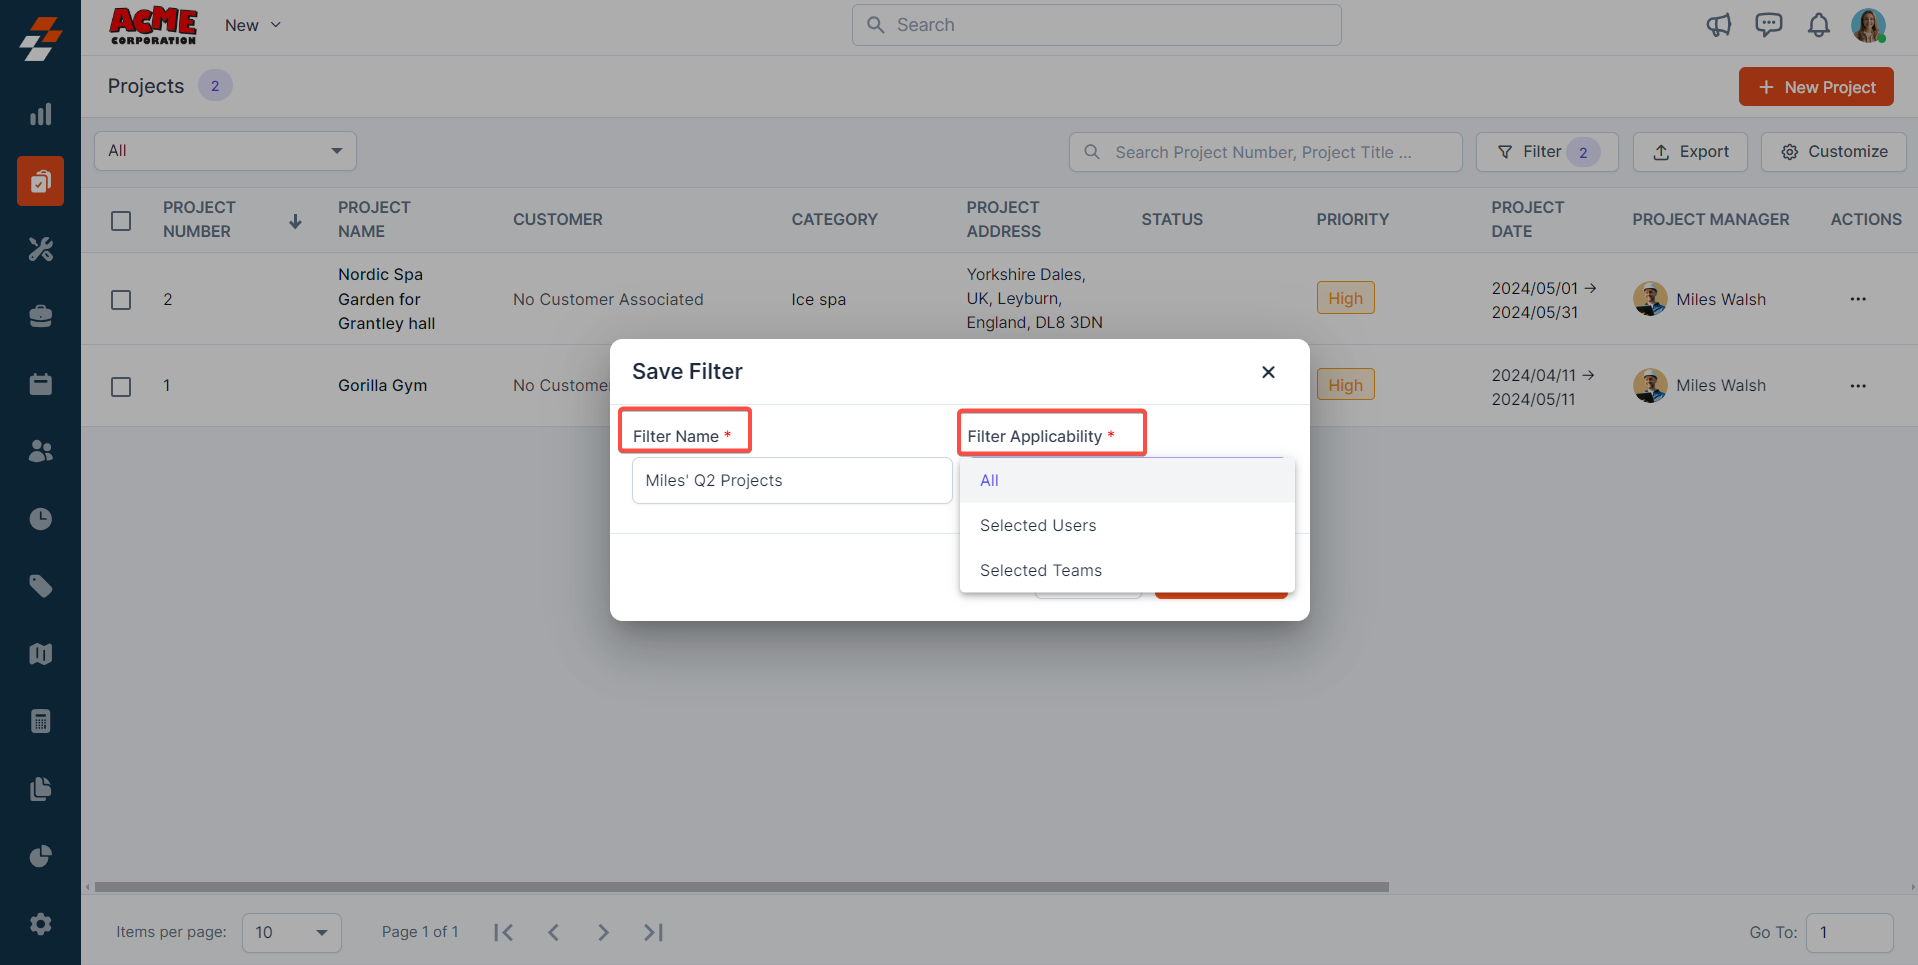
7. If you choose the filter applicability as selected teams or users, enter the team name or names in the box below. Once done, click the "Save Filter" button.
8. A new quick filter will be created successfully and added to the quick filters section at the top left corner.
9. To access and manage quick filters you added, click the dropdown menu in the quick filter at the top left corner and select 'Manage Filter' option. This allows you to view and add/delete filters as needed.
Quick search
There is a search bar that allows you to search for a specific project using project name, number, category, and so on from the listing.
Create new project
You can also create a new project from here. To do so, click the "+ New Project" button at the top right corner. For detailed step-by-step instructions on how to create a new project, click here.
Navigate & adjust page display
1. The bottom panel allows you to navigate and adjust page display, i.e., you can choose the number of items to be displayed per page and navigate between pages using the left and right arrows.
2. You can also quickly navigate to a specific page instead of using arrows. To do so, enter the page number in the "Goto" option at the screen's bottom right corner.
So, that's a comprehensive overview of the projects listing page in Zuper web app. With these step-by-step instructions, you can efficiently navigate and explore the listing page to manage all projects effectively, from customizing fields and applying filters to exporting reports and managing quick filters.
Related Articles
How to manage your customers' assets / installed base in the Zuper web app
Any item purchased by a company as a product and, when distributed to a customer service location to fulfill a job, contract, or service agreement, is referred to as an asset. Additionally, the asset can either be owned by the customer or by the ...How to create a project and add jobs in the Zuper web app?
Projects module in the Zuper web app allows you to create and manage multiple complex projects namely construction, interior designing, cleaning, and more. These projects often involve multiple jobs within it and can take several months to complete. ...How to navigate and manage your AR invoice listing page in the Zuper web app?
An invoice is a document for the parts & services rendered by your business. Zuper enables you to manage the complete lifecycle of invoicing including sending to your clients, receiving payments, etc,. Navigation: Invoices -> Invoice Listing Page ...How to navigate and manage the Jobs listing page in the Zuper web app?
Zuper's robust job management system lets you effortlessly oversee every aspect of your jobs in one centralized platform. Quickly create and assign jobs, set priorities, and schedule service tasks with our intuitive interface. With our powerful ...How to manage timelogs in projects from the Zuper web app?
The timelogs section in the projects module allows you to view the timelogs of all users/technicians who have worked on the project, providing a detailed record of each user’s work hours spent on assigned jobs within the project for specific dates. ...