Product Bundles in Zuper web app
Overview
Product Bundles in Zuper allow your business to
streamline operations by grouping multiple parts, products, or services into a
single unit. Whether you need to sell a collection of items together or offer a
package of services as one, product bundles simplify the process by allowing
you to create bundle level or Roll-Up items,
giving you flexibility in pricing and managing products.
Using product bundles, you can customize how grouped
items appear to customers as a single line item or with a detailed breakdown,
ensuring transparency where needed. Additionally, these bundles can be
incorporated into Quotes, Invoices, Proposals, Contracts, Jobs, and Projects,
allowing seamless workflows across various transactions.
This article will guide you step-by-step through the
process of creating, managing, and integrating product bundles into your
transactions for seamless workflows.
Prerequisites
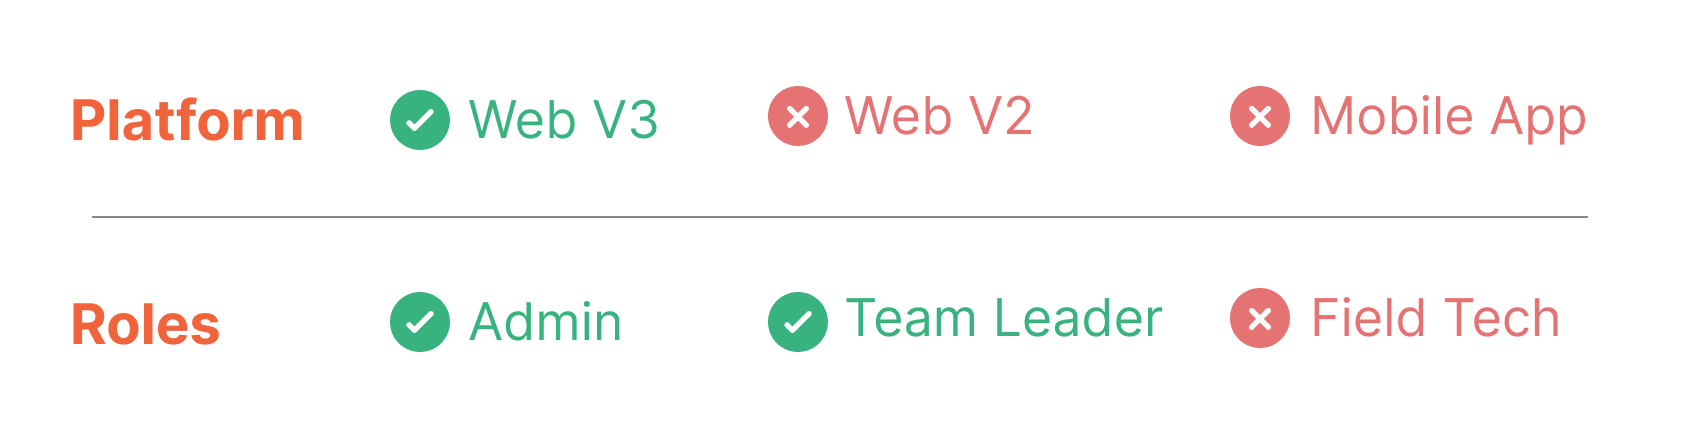
- Product Bundle is only available on the V3
Web app. If you are using V2, you can get started with V3 using the link below.
Your login credentials will be the same as those for V2: V3 Live
(Production) - https://web.zuperpro.com/login.
- To enable the Parts & Services module
for your account, please contact the account admin or email support@zuper.co.
- Ensure you have configured the following
settings under Settings > Organizations > Parts & Services
Settings:
- Default pricing level for Bundle?
- This setting allows you to choose between Bundle price (fixed price for the entire bundle) or Roll up price (automatically sums individual item prices).
- Display the Bundle to the Customer as
- One
Item: Display the entire bundle as a
single line item in transactions.
- All
Items: Shows a
detailed breakdown of each component within the bundle.
This setting determines how individual items within a bundle are displayed to customers in transactions.
 Note: Even with the default pricing
setting configured, you can still select the pricing method—either Bundle level price or Roll
up item prices—when creating a new product bundle.
Note: Even with the default pricing
setting configured, you can still select the pricing method—either Bundle level price or Roll
up item prices—when creating a new product bundle.Creating a Product Bundle
Now, let's get started with creating the Product
Bundle. Follow these steps to group your parts, services, or products into a
single unit:
- Click
the "Parts & Services" module from the left navigation menu and
Select "Parts & Services."
- In
the action bar, click “+ New Part/Service."
- Select
“Bundle” as a Type under the "Parts & Services Details" section.
- The Product Bundle
creation page appears.
- Provide a descriptive Bundle Name.
- Provide a unique identifier for the Bundle
Number.
- Assign
the bundle to a relevant Category.
- Specify whether the item is Billable or Non-Billable:
- Billable: The cost of the bundle will be included in the transaction document.
- Non-Billable: The bundle will be shown as a non-billable line item, which is excluded from the total amount billed but will still be tracked for reference.
- Choose pricing options—either a “Set Bundle Price” (with a set price for the group) or a “Roll-Up Item Price” (with individual item prices adding up).
 Info: Let's break down what these means:
A. Bundle Price:
The Bundle level price allows you to set a fixed selling price for the entire bundle of items. This price is defined at the bundle level, and it represents the total cost for all the included parts, products, and services, regardless of the individual item prices.
Example:
If "Product X" costs $50 and "Service Y" costs $100, and you set the Bundle selling price to $200, the customer will see $200 as the total price for the entire bundle.
B. Roll-Up Item Price:
With a Roll-Up Item bundle, the final price is determined by adding the prices of each item within the bundle. This is useful when you want customers to see how much each component costs but still sell it as a package.
Example:
If you offer "Product X" for $50 and "Service Y" for $100, the bundle will automatically calculate to $150. - Adding Bundle Items:
- In the "Bundle Items" section, click "Add" and select parts, products, or services.
- Specify the Quantity of each item to be included in your bundle.
- After specifying the parts and products, click "Add Product".
- Enter pricing details.
- For Set bundle price
- Bundle Cost Price: Specify the total cost of the entire bundle.
- Markup (optional): Apply a markup percentage, which will automatically adjust the final price based on the cost price.
- Bundle Sell Price: This is the total price at which the bundle will be sold to the customer, calculated based on the cost price and the markup you set.
- For Roll-Up item prices
- The system will automatically calculate the price of the bundle based on the sum of the individual prices of the parts, products, and services included in the bundle. Markup is not applicable for Roll-Up pricing.
- Enter the relevant tax codes for the bundle. If the bundle has a Set Price (i.e., a fixed price for the entire bundle), tax will be applied to the total price of the entire bundle. If the bundle consists of individual Roll-Up Items (components with separate prices), the tax will be automatically calculated for each item based on its individual price and tax rate.
- Now, click "Save Part / Service."
- Your new Product Bundle is now ready to use!
Info: If you haven't set Bundle as Billable in the master level, when you use it in transactions (e.g., a Job or Quote), the "Non-Billable" status will be reflected in all subsequent transaction documents. However, you can choose to edit it in the transaction, allowing you to modify the status on a case-by-case basis.
Adding Product Bundles to a Transaction
When creating a transaction such as a Quote, Invoice,
Proposal, Contract, Job, or Project, follow these steps to add Product Bundles:
- During
the transaction creation, Under the "Parts/Services" tab.
- Click the "Add" button and select “Bundle”
to open the Product Bundle selector.
- A list of available product bundles will
be displayed on the left-hand side. You can search for specific bundles and
filter by category, availability, or pricing using the
filter options at the top.
- After
selecting a product bundle, the Primary Details section on the right
side will show key information. The fields available in this section depend on
the pricing level configured for the bundle.
- Description:
Description will be auto-populated. However, you can choose to modify.
- Quantity:
Enter the bundle quantity to add the desired number of bundles to the
transaction.
- Bundle
Cost:
Specify the total cost of the entire bundle.
- Markup(optional):
You can apply a markup percentage, which will automatically adjust the final
price based on the cost price.
- Bundle
Sell Price: The price for the entire bundle.
Note: For Roll-Up item bundles, the system calculates the total price based on the individual prices of the parts, products, or services included in the bundle. - Billable: Specify whether the product bundle is billable or not.
- Under
the Bundle Items section, you will see the components included in the
bundle:
- Line
Item: The name of each part or product in the bundle.
- Description: A brief description of the item. You can update the description of the item.
- Type: Indicates whether the item is a part, product, or service.
- Location: Specify the item’s location of each item in the bundle during the transaction.
- After selecting and reviewing the bundle,
click "Add Bundle" to include it in your transaction.
Note that only one bundle can be added to a transaction at a time since the location for each component needs to be specified individually. - The bundle will now appear in your
Parts/Services list on the transaction. The visibility of the grouped items is
based on the setting configured in Settings > Organizations > Parts
and Services Settings > “Display Bundle to Customer as."
Note: The visibility of product bundles as either a single line item or a detailed breakdown of each item within the bundle will not apply to existing templates (e.g., Quotes, Invoices, Proposals, or Jobs in the Customer Portal). Existing templates will continue to display bundles based on their original configuration, regardless of changes to the bundle display settings. To reflect these changes, new templates must be created for Quotes, Invoices, Proposals, or Jobs.
Adding Product Bundles to a Service Package
The following procedure describes how to add product bundles to a Service Package. The steps are
similar for adding product bundles to a Contract Package.
Steps to Create a Service Package:
- Select the Settings icon from the left navigation menu.
- Under Configuration Settings, click the Quotes & Invoices section.
- Select Service Packages and click the + New Package button.
- Fill in the Service Package Details:
- Name: Enter the name of the service package.
- Description: Provide a brief description of the service package.
- Remarks: Add any additional notes or remarks.
- Add items to the package:
- Click the + Add Item button to include individual parts, products, and services. Note that bundles will not appear in the Product Type filter menu; you can add them separately.
- Alternatively, use the dropdown menu next to the + Add Item button to:
- Add from Group: Select a predefined group of items to add to the package.
- Bundle: Include a product or service bundle.
Once all details are added, the Service Package is created successfully.
FAQs
- What is the difference between an Item Group and a Product Bundle in Zuper?
A Product Bundle in Zuper combines multiple items into a single package for streamlined pricing and sales, with options to display as a single item or with itemized details in transactions. An Item Group is used grouping items without impacting pricing or how they appear to customers. - How can I update the billable status for a bundle item while working on a transaction?If you are logged in with Admin access or your role permits, you can update the billable status of a bundle item directly on the Update Line Item page. If you are experiencing issues updating the expense policies, please reach out to us at support@zuper.co.
- What should I know about syncing product bundles with QuickBooks Online (QBO)?
For product bundles to sync correctly with QuickBooks Online (QBO), ensure the bundle is first created manually in QBO. If a bundle doesn’t exist in QBO, the sync will fail, and an error message appears in the Sync History.
Note that: - Bundle Level Pricing is currently not supported by QBO.
- Roll-Up bundle will sync using the combined item costs.
- Discounts and markups may not sync properly due to integration limitations.
- If an invoice with bundles fails to sync, the entire transaction will not be processed.
What’s Coming Next?
We are excited to announce that support for product bundles will soon be available on additional integration platforms, such as Zoho Book, Zoho Inventory, Xero, Sage, Cin7, and QBD-Desktop. Stay tuned for updates!
Related Articles
How to create a new proposal in the Zuper web app?
Before providing an official price quote or estimate, a business or service provider may send a preliminary document or communication to a potential client. This is called a "Proposal," and it is usually used when the project or service scope needs ...How to add product bundles to transactions in the Zuper mobile app
Product Bundles in the Zuper Mobile App allow you to streamline transactions by grouping multiple parts, products, or services into a single bundle. When creating a Quote, Invoice, Proposal, or Job in the Zuper mobile app, you can add product bundles ...How to create a new part/service in the Zuper web app
The part and Services module is critical to creating and managing all the products and performing all the inventory management actions. Navigation: Parts and Services --> + New Part & Service Creating a new part/service 1. Select the “Parts & ...How to access and manage time off requests in the Zuper web app?
Time-off requests are submitted by users when they need to take leave for reasons such as illness or personal matters. As an admin in Zuper, you can not only view and manage these requests but also submit time-off requests on behalf of users. You can ...How to create a new AR (Account Receivable) invoice in the Zuper web app
An invoice is an accounting document that a field service business sends to its clients to request payment for the services rendered. Navigation: Accounting --> Invoices --> + New Invoice 1. Select the “Invoices” icon from the left navigation menu ...