How to create and manage recurring routes in dispatch board?
The 'Recurring Routes' feature in Zuper enables dispatchers to create multiple instances of routes with predefined frequencies and associate them with recurring jobs of the same cadence.
This means you may have repeated jobs that need to be done at the same route regularly, such as daily, weekly, or monthly. These recurring routes ensure efficient route planning and management, leading to improved productivity and consistent service delivery.
 Navigation: Dispatch Board --> Routes
How to create a recurring route
Creation of a recurring route carefully considers multiple aspects automatically - technician availability, route's available duration, frequency of job recurrences along with geographical proximity of these jobs to the route etc. This will enable you to create routes that not only optimize travel time and efficiency but also, ensure frequent jobs are completed on time and to a high standard by the assigned technician by virtue of familiarity with both customers and routes.
Creating a recurring route series involves specifying the start and end locations, as well as the frequency of repetition. This can include daily, weekly, or monthly schedules, with specific hours of the day, days of the week, or dates of the month. Based on the chosen frequency (recurrence), multiple route instances will be created within the Recurring Route Series.
Once the recurring route series is created, you can add an eligible recurring job series containing multiple job instances and assign it to a technician. This allows the assigned technician to efficiently manage their schedule and ensure consistent job completion on the assigned route in the designated slot and frequency every time.
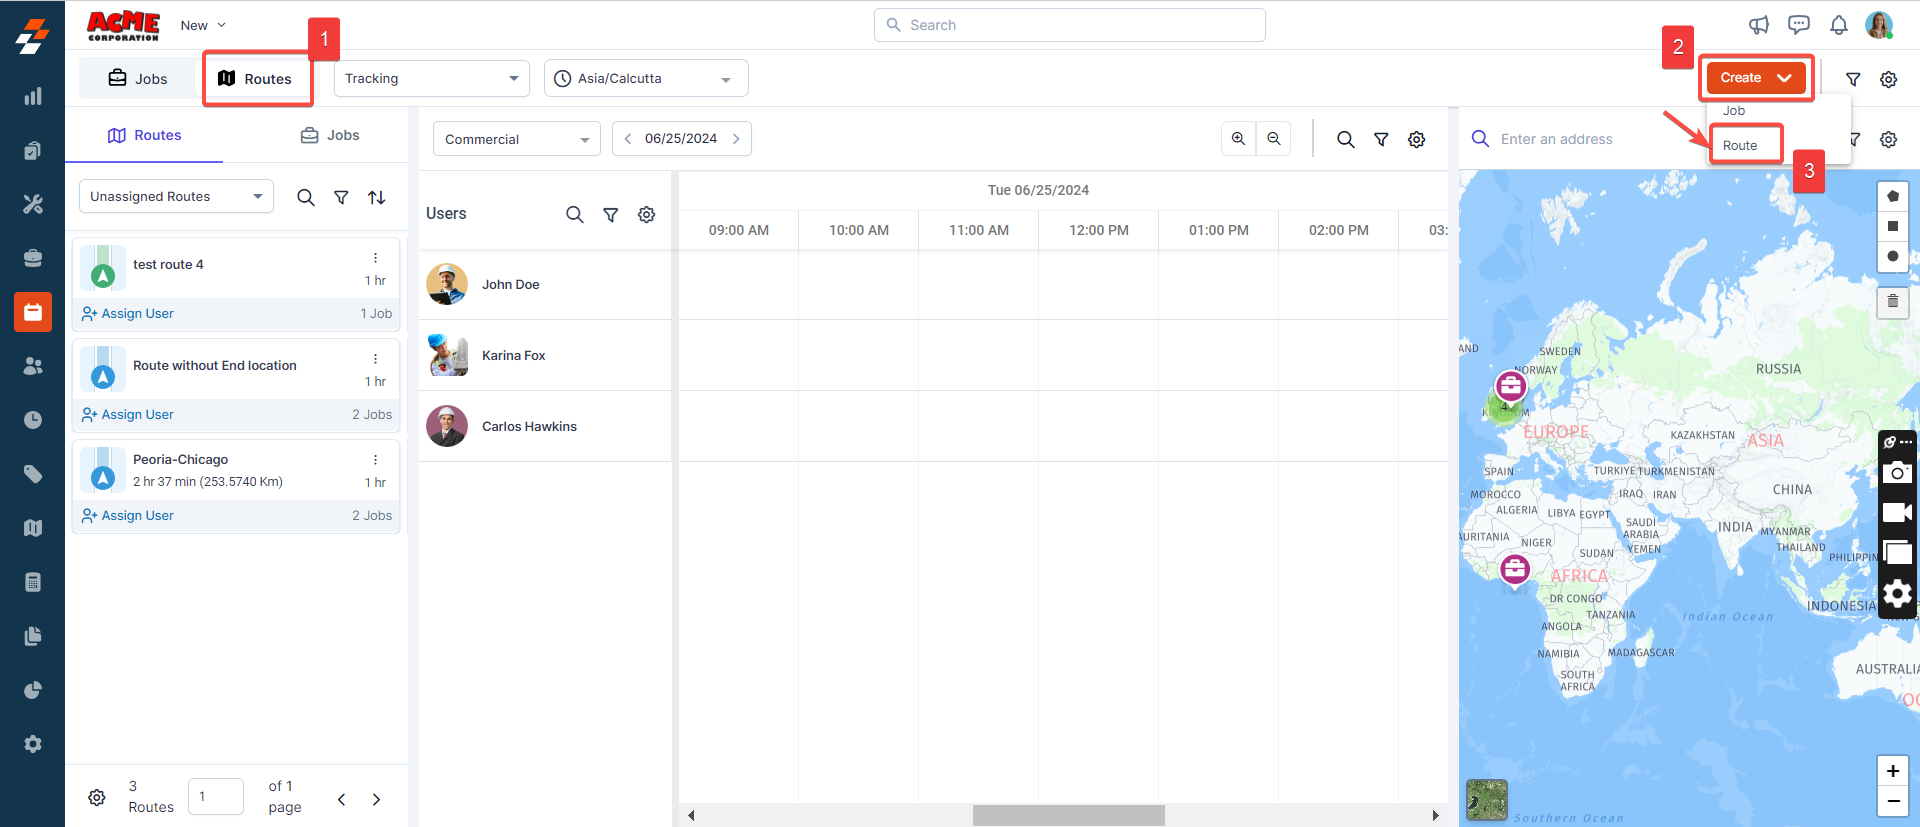
To create a recurring route from the dispatch board, you first need to select the “Routes” stream, as shown below:
Once landed in the routes stream, follow these steps to create a recurring route:
1. Click the “Create” button at the top right of the page and choose "Route' from the drop-down menu.
2. A quick sidebar appears on the right to create a route. Specify the following details in each of these sections:
Primary Details
- Route Title (Mandatory): This is where you provide an identifiable name for the route.
- Route Description: Provide additional details or instructions related to the route.
- Assigned to: Here, you can specify the individual for this route.
Note: Since you’re creating a recurring route, the selected technician will be assigned to all the route instances (and the jobs within them).
- Start Location (Mandatory): Provide the starting point or address from where the route begins its journey using the map.
- End Location: Provide the final destination or address where the route concludes (this is optional). If it’s not provided, the last job will be considered as the last location of the route.
Schedule
- Duration (Mandatory): This is the Planned duration (total duration of travels + total duration of accomplishing jobs) for every instance of the route.
- Date & Time (Mandatory): Set the start date and time for the route.
- Recurrence: Choose how often this route will occur, whether it's a one-time event (does not repeat) or repeats daily, weekly, monthly, or on a custom schedule.
Note: Since we are creating a recurring route series, you need to select every day, every week, every month, or every year from the chosen date or day. Alternatively, you can provide custom dates.
- Ends (Mandatory): Set either the specific end date and time or specify after how many occurrences the route should end. Based on your input, the route will take place with the total number of route instances determined.
Additional Details
- Route Color: Choose a unique color for this route to make it easily identifiable on the map.
- Mode of Transport: Choose the method of transportation used for this route, such as car / semi-truck, truck, or pedestrian.
- Route Type: Choose an ideal route type: Fastest Travel Time, Shortest Distance.
Once you have filled in all of these details, click the “Create” button to create a route.
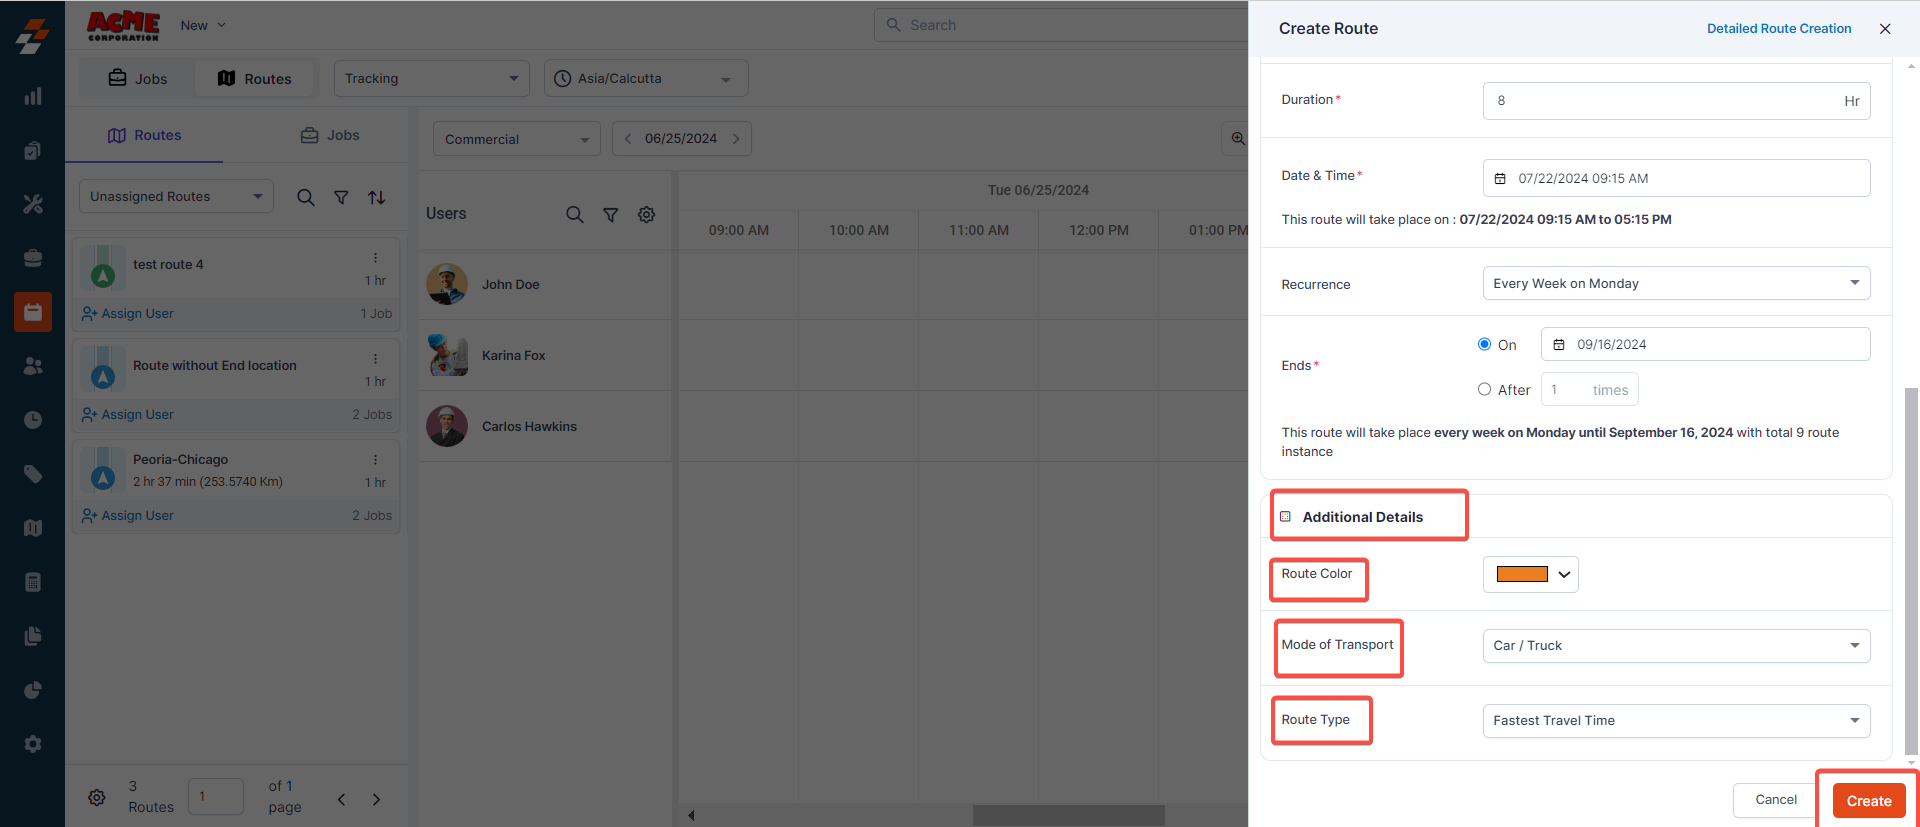
Note: If you want to add more details to the route, click the "Detailed Route Creation" button at the top right corner. This will expand the route creation with additional surfaces that enables provision not only to add jobs but also, view the route on the map as shown below.
How to add recurring jobs to recurring routes
If you haven't leveraged the Detailed Route Creation option to add the jobs during the initial route creation, consider doing so. This option allows for a more comprehensive setup by adding jobs at the outset, ensuring all relevant factors are considered from the beginning.
So, once the recurring route has been created, our system's intelligent matching technology makes it easy for you to identify the right set of recurring jobs by considering multiple attributes such as route capacity, job schedule and cadence, required skillsets, and technician availability. By associating these jobs with the appropriate recurring routes, our system ensures that the recurring job instances are efficiently allocated.
Note: To add a recurring job, make sure while creating a route, you’ve selected an option from the dropdown menu under recurrence: every day, every week, every month, or every year.
To add a recurring job series to a recurring route series, follow these steps:
1. Click the “+ Add Job” button under the Route itinerary. A sidebar will appear, displaying the right set of recurring jobs series that:
- Has the overall time span that is lesser that of the route (route span must be > job's)
- Has the number of job instances lesser than the number of route instances. (route's count must be > job's)
- Has job cadence lesser than the route's (e.g., a daily route can be associated with a weekly job, but not vice versa).
- Has valid Geo Coordinates.
Additionally, you can view any conflicts associated with the existing Recurring Route Series. To view the associated conflicts, click the dropdown menu next to “Δ” icon.
The conflicts that may occur include User Conflict, Frequency Conflict, Date Conflict, Duration Conflict, and Skill Conflict.
 Conflicts are the list of potential exceptions while associating recurring jobs to routes. While you can always override them, intent is to enable you take informed business decisions while planning the routes.
Conflict Type | Description |
User Conflict | This conflict occurs when the job is assigned to a technician different from that of the recurring route series/instance. For example, you have a recurring maintenance route scheduled every Monday and assigned to Technician A. In such case, a job to this route that is scheduled and assigned to Technician B instead of Technician A will be highlighted as a user conflict. However, you can override this conflict. Doing so, the route technician will be assigned to all the job instances. |
Frequency Conflict | This conflict occurs if both the recurring route & job series do not have synchronized frequency. For example, if a recurring route is scheduled every Tuesday, but a job meant for this route recurs every alternate Tuesday, this conflict will occur. If you override this conflict, the job will be assigned to the route instance based on the job frequency. |
Date Conflict | A date conflict occurs when the job's date differs from any of the route instances under the recurring route series. For example, if a route is scheduled for every Monday, and a job is scheduled for every Wednesday, this difference in scheduling days causes a date conflict. This type of conflict typically arises when recurring jobs are scheduled on a different day of the week compared to the recurring route instances. In such cases, we will auto-align the schedules of all future job instances with the recurring route instances. This means that when you select jobs that do not exactly match the route's schedule/dates, they will be automatically adjusted to match. |
Duration Conflict | This conflict occurs when the total number of hours spent by a technician on jobs and travel overshoots the overall allocated ‘Duration’ of the route instance. For example: A technician is allocated 8 hours for a day's route, but the combined time for the jobs and travel amounts to 10 hours, exceeding the allocated duration causes this conflict. However, you can supersede this conflict, doing so, the route duration exceeds based on the job duration. |
Skill Conflict | This conflict occurs when there is a mismatch between the skill set of the assigned route technician and the skill set required to complete the job. For example: A job requiring advanced electrical skills is assigned to a route technician specializing in plumbing, leading to a skill conflict. However, you can override this conflict. Doing so, the route technician will be assigned to all the job instances. |
2. Select the recurring job(s) series that you want to this recurring route series.
3. Once chosen, click the “Choose Job” button. The recurring job series (master job) will be added to the recurring route series.
4. From here, you can also perform actions such as viewing the added job location on the map or removing the job by clicking the "kebab" (three-dot) icon next to it. Additionally, you can add more jobs to this route using the "+ Add Job" button and to reorder the jobs within the route so as to achieve the optimal route, avoiding unnecessary travel.
5. Once added, click the "Create" button. The recurring route series will be created successfully along with the recurring job series. This means, each future job instance within the recurring job series (master job) will be associated with the corresponding recurring route instances, as shown below:
From the above image, you can see that the first job instance within a recurring job series is associated with the start of the route instance. Subsequently, based on the job frequency, it continues to associate with the route instances accordingly.
Certainly! Here's an example that showcases the associations between jobs and route:
Example:
Suppose you have a biweekly job that starts on 2024/08/15 (Thursday) and weekly routes that start on 2024/08/09 (Friday). The job is scheduled to occur every two weeks, while the route follows a weekly schedule. In this case, here's how the association would be:
Associations:
- The job on 2024/08/15 will be associated with the route on 2024/08/09.
- The job on 2024/08/29 will be associated with the route on 2024/08/23.
From this example, you can understand that each job instance within the biweekly job series is directly associated with the start of the weekly route instance and continue to align correctly to the route based on their respective frequencies. In other words, job scheduled on 15th of Aug is rescheduled to 09th Aug and the job scheduled 29th of Aug is automatically rescheduled to 23rd Aug.
How to manage recurring routes
Beyond typical functions such as List, Edit, Delete, Lock, etc., you can manage movement of jobs between routes by delicately balancing the intricacies of target route’s capacity (Scheduler View) and geographical proximity of a job to the target route (Map View).
1. To manage recurring routes, choose the “Planning” section in the dispatch board from the "Routes" Stream as shown below:
2. Once navigated to the “Planning” section, choose the “Recurring Routes” option from the dropdown menu under the Routes section. You can view the list of recurring route series with details such as the number of route instances and jobs within each series, travel time, distance, and assigned users.
3. Choose any of the recurring route series. On the next page, you can view the following details on the left.
- Recurring route series name.
- Recurring route description (if added).
- Assigned users to the route.
If users are not assigned, you can also assign a user by clicking the “Assign User” button. Once assigned, you can assign/unassign the user directly from here. To do so, click the user profile icon in the recurring route series card. A scrolling pop-up appears with the list of users. You can either choose to assign or unassign the user from the route.
Note: Any changes made to the recurring route series will apply to all route instances within it.
- Route frequency.
- Jobs within the recurring route series (if added). This includes the master job, which is linked to all recurring route instances at the right. If you remove any of the job instances within recurring route series, all the job instances will be removed.
Note: Any One-Off jobs (non-recurring) added to individual route instances will not be visible here.
4. You can also add or remove a master job from the left. To add a job, click the “Add Job” button at the bottom left. To remove the job from the route series, click the “Kebab” icon under “Jobs” at the left and select “Remove Job.”
Note: When you remove the master job, it will be removed from all the route instances.
5. On the right, you can view and manage all upcoming and past route instances. This includes actions such as adding or removing users, viewing conflicts, locking or deleting route instances, adding one-off jobs to the recurring route instance, viewing or removing jobs, and moving jobs from the route instance.
This in turn helps you handle the day-to-day details at the route instance level rather than at the master level, ensuring each route instance is managed with precision, enhancing overall scheduling efficiency and operational flexibility.
1. To view and manage any of the route instances within a route series, click the specific route instance. You can view details such as route instance name, occurrence date and time, associated user, jobs and conflicts (if any).
Add/Remove users
You can directly add or remove a user from any route instance to manage assignments effectively. Here’s how:
1. Click the user profile icon in the recurring route instance.
2. A scrolling pop-up will appear with the list of users. You can then choose to assign or unassign the user from the route instance. Once done, click the “Save” button.
3. The selected user will be successfully added to the instance.
Note: Any action taken will affect this specific route instance only and not the complete recurring route instances within a recurring route series. This feature is handy for managing ad-hoc situations, such as when the designated technician for the recurring route is unavailable and it's necessary to allocate a particular recurring route instance to a different technician.
View conflicts
Identify and resolve conflicts associated with the route instance (if any).
1. To view the associated conflicts, click the “View” button next to “Conflicts in this Instance.”
2. A pop-up appears listing the conflicts associated with the specific route instance. Based on the conflicts, you can choose to continue with them (or) make necessary changes to the route instance, such as assigning a different user, rescheduling job from the instance, moving jobs, and so on.
Lock/Delete route instances
You can also lock or delete any of the route instances within the recurring route series. When you lock a route instance, you won't be able to update it. This means you cannot assign or unassign users, edit jobs within it, move jobs, add jobs to the route, or reorder them until it is unlocked.
1. To lock or delete a route instance, click the “kebab” icon next to the route instance. From there, you can choose either “Lock Route” or “Delete Route Instance.”
Note: Deleting the route will only remove the route, but the jobs will be there with the schedule (without assignment though)
Add One-off jobs to the recurring route instance
For a recurring route instance, you can add one-off jobs, but not recurring jobs, since the instance is part of a recurring route series. One-off jobs are jobs that occur only once, rather than being part of a regular schedule.
You can add one-off jobs by considering factors such as route instance duration, technician availability, geographical proximity of these jobs to the route, and the current job schedule. Here’s how:
1. Click the "Edit Route" button under the route instance.
2. An "Edit Route" sidebar will appear where you can make necessary changes to the route, such as adding one-off jobs, assigning or unassigning users, changing the route start and end locations, adjusting the route schedule, and more.
3. After making the necessary changes, click the "Update" button to save them.
Note: Any changes made here will affect this route instance only and not the entire recurring route series containing multiple instances. View/Remove job
1. Based on the conflicts, if you need to make necessary changes to a job in this instance, click the “kebab” icon under Jobs and select either “View Job” or “Remove Job.”
2. When you click "View Job," a sidebar appears with job details, allowing for quick field edits. From this sidebar, you can also view full details, clone the job, or delete it using the "ellipsis" icon at the top right.
Move route jobs
There will be situations when a job must be off-loaded from one of the instances of a recurring route to another due to unforeseen circumstances such as technician unavailability, customer preference, equipment failure, or urgent high-priority tasks arising unexpectedly.
In such cases, you can move jobs efficiently and seamlessly between routes by carefully considering various aspects such as proximity and travel time to the job location, current workload of the destination route, along with technician's skills and availability. This ensures that the movement of the job is done with minimal disruption and maximum efficiency.
You can move route jobs from the source to the destination using any of the following options:
- Directly choosing the destination route
- Using the Map view
- Using the Scheduler view
Note: When moving one of the job instances from a recurring job series that satisfies the condition, you will have an additional option to move not just the current instance but all future instances of the recurring job series to the target route. Whereas if you move one-off jobs or recurring jobs whose schedule range exceeds that of the target route, only the selected job instances will be moved to the target route.
Directly choosing the destination route
Use this option only if you are quite sure about the destination route to which you want to move the job(s) to, and the user assigned to the destination route has the same skill set to complete the job.
To move route jobs, follow these steps:
1. Click the “Move Jobs” button under the route instance.
2. The Move Route Jobs screen appears, displaying the source route, its date and time, and the associated jobs on the left.
3. To move the job from the existing route (source) to another (target or destination), on the right, under “Destination route,” click the dropdown menu and choose either a "one-off route," or a "recurring route."
4. Based on your selection, you can view the available routes. Choose the destination route that is near the source route.
5. Once the destination route has been chosen, simply drag and drop the job from the source route to the destination route and click the "Save" button to update the changes.
Use the map view
If you're unsure which destination route to move the job to, switch to the Map view. The Map view also helps you find a destination route that is proximate to the current route (source). Here's how:
1. Select "Map” on the right and click “Show all routes” at the top. This will display all created routes on the map for the selected date, including recurring and one-off routes.
3. From the filtered routes, choose the closest route to the source route of your choice by considering- the overall route duration, jobs already assigned to the route, and travel time necessary between jobs and choose it as the destination route by clicking the “Set as Destination Route” button.
4. After choosing the destination route, simply drag and drop the job that you want to move from the source route to the destination route and click the "Save" button to update the changes.
Use the scheduler view
If you need to move a route job to another route based on the customer's preferred date and time, the “Scheduler” view is your best choice. Here, you can simultaneously view both the technician availability and capacity of each route on a selected date. Based on this data, you can choose the destination route. Here's how:
1. Click "Scheduler" on the right. You will see all available routes with their duration based on the source route date by default.
2. You can also change the date according to the customer’s preference using the "date picker" on the top right. This allows you to view the selected date's routes along with their duration and associated jobs on the scheduler.
Note: You can also apply other filters such as skill sets, and users to refine the routes displayed on the scheduler. After setting the filters, click the “Apply” button.
Set as Destination Route
3. Based on the routes available, choose the right destination route by considering the overall route duration, jobs already assigned to the route, technician availability at the customer's preferred time, and proximity and travel time to the job location and “Set as Destination Route” by right clicking the route on the scheduler.
4. Once the route is set as destination route, you can then simply drag and drop the jobs that you want to move from the source route to the destination route and click the "Save" button. The job will be moved from the source route to the destination route successfully.
So, that's a comprehensive overview of the "Recurring Routes" feature within the dispatcher module. With these step-by-step instructions, you can now leverage the recurring route feature completely to create recurring routes with predefined frequencies and associate them with recurring jobs, and ensure all recurring jobs are managed regularly within the recurring routes.
Related Articles
Dispatch board- Deep dive into dispatcher queue
A dispatcher queue is one of the important layouts on the dispatch board that helps you (dispatchers) identify and prioritize pending jobs/routes, assign them efficiently, and monitor their progress. Navigation: Dispatch Board --> Settings In Zuper, ...Overview of dispatch board
The dispatch board module in the Zuper web app provides a centralized overview of unassigned routes and all jobs, including those that are unscheduled, assigned, unassigned, and overdue, in one place, allowing you to act on them with a single click. ...Detailed overview of users, scheduler, and map layouts in dispatch board
In addition to the dispatcher queue, the dispatch board includes several other interconnected layouts: Users, Scheduler and Map. These layouts work together seamlessly to provide a comprehensive view of operations and enhance the efficiency of task ...Dispatch board settings
The Settings section in the Dispatch Board allows you to customize and optimize the dispatching process to meet your business needs. Navigation: Dispatch Board --> Settings Key settings include: Dispatcher Queue Settings The settings allow you to ...Understanding job visibility on the Dispatch Board
Managing and overseeing jobs effectively is crucial, and understanding why certain jobs appear on your Dispatch Board can be challenging. This article clarifies how specific settings influence job visibility, helping you understand what you see and ...