How to Access the Assets Details Page in V3 Zuper Web App?
Any item purchased by a company as a product and, when distributed to a customer service location to fulfill a job or contract is referred to as an asset. It can either be owned by the customer or by the company itself.
You can explore the asset details page directly after saving an asset or from the asset listing page. Here's how:

Navigation: Assets--> Assets Listing page--> Asset Name
Accessing Asset Details Page
1. Click the Assets icon from the left navigation menu and choose the “Assets” module. You will view the list of assets (both active and inactive) on the asset listing page.
2. Click any of the "Asset code" or "Asset name" from the Asset listing page. The selected asset details page appears.
3. The Asset details page has a three-column layout with information & actions available in each pane for quick access.
Left Panel:
The left pane contains the asset name, serial number and its current status.
Following this information, you can notice the quick actions bar that allows you to quickly view the asset history (activity log), create a job, add note and print a barcode of that asset.
Below the quick actions bar, you can also view the asset details, asset parts, notes, asset history and jobs.
History
1. Click the "History" icon to view the activity log that shows the history of actions performed on the asset.
New
The "+ New" icon allows you to quickly create a new job with this asset, which will then added to Asset Jobs. To do so, click the "+ New Job", you will be redirected to the Jobs page. For step-by-step instructions on how to create a new job in V3 Zuper Web App, click here.
Add Note
Click the "+ Add Note" icon to create a new note. Notes are comments or information that are added to an asset module over its course. These notes add more context to the Asset.
1. You can use the rich text editor to enter the note details.
2. Your notes can be anything ranging from a simple text reminder to an image, video or document. To attach files such as Image, Video, Audio, PDF, DOC, XLS, Zip, click "Attach files" at the bottom of the note.
3. You can also associate the notes with other modules such as customer, property, etc.
To do so, click the “+” option under "Associated with" and choose the job, customer, organization etc., to which the notes to be associated. Once chosen, click "Proceed" to associate the notes with the selected module.
Note Visibility:
This gives you an option on how you’d like to have these notes.
- Internal (Default) – By choosing this privacy setting, you can make your notes visible to all your Zuper users in your account.
- Only me– When you choose this, the notes will be visible only to the user (You) who created the note.
- Public - This will help you make the notes public to all, including the Customer.
4. Click the "Post Note" button to post the notes.
5. Once the notes have been posted successfully, you can edit/delete or change the privacy settings from public to internal or private and vise vera by clicking the "Kebab" icon next to the note.
6. You can also sort the notes based on the newest or oldest of creation.
Barcode
1. Click the "Barcode" icon to view and print the specific asset barcode. Once printed, you can download and paper-paste the barcode into the asset to keep track of it.
Asset Details
1. Click "Details" to view all the asset-related details that cover primary details. asset information, asset location and other details (This will have asset-specific custom fields).
Asset Parts
1. Click "Asset Parts" to view all the parts associated with the asset. To add new parts to the asset, click "+ Add item."
2. Select the parts with quantity and click "Add Part." The parts will be updated successfully to the asset.
Notes
1. Click "Notes" to view all the notes created for the asset. You can also create new notes and manage them from here. This means, you can change "Notes Privacy, Edit Note, and Delete Note."
 INFO: The edit and delete options are available only for the user who created the note.
 Asset History
1. Click "Asset History" to view the activity log that shows the history of actions performed on the asset.
Asset Jobs
1. Click "Asset Jobs" to view all the associated Jobs with the asset.
Note: To view the job in detail, click the "JOB TITLE" or "JOB NO." Right Pane
The right pane contains the other module details that are interlinked with the Assets module.
View the Organization linked to the Asset
1. You can view the organization associated with the asset.
Add Customers to the Asset
To associate a customer to the asset, follow these steps:
1. Click the "+" icon next to the "Customer." A side panel appears on the right.
2. Choose any of the existing customers associated with the organization from the "Existing Customers" tab. Once chosen, click the "Choose Customer" button. The customer will be added to the asset successfully.
Note: If you want to create a new Customer, click "New Customer" tab.
Add Property to the Asset
To associate a property to the asset, follow these steps:
1. Click the "+" icon next to the "Property." A side panel appears on the right.
2. Choose any of the existing properties associated with the organization from the "Existing properties" tab. Once chosen, click the "Choose Property" button. The property will be added to the asset successfully.
Note: If you want to create a new property, click the "New property" tab.
Asset Product
Here, you can view the asset product, which is the product that you've chosen from the inventory as an asset. 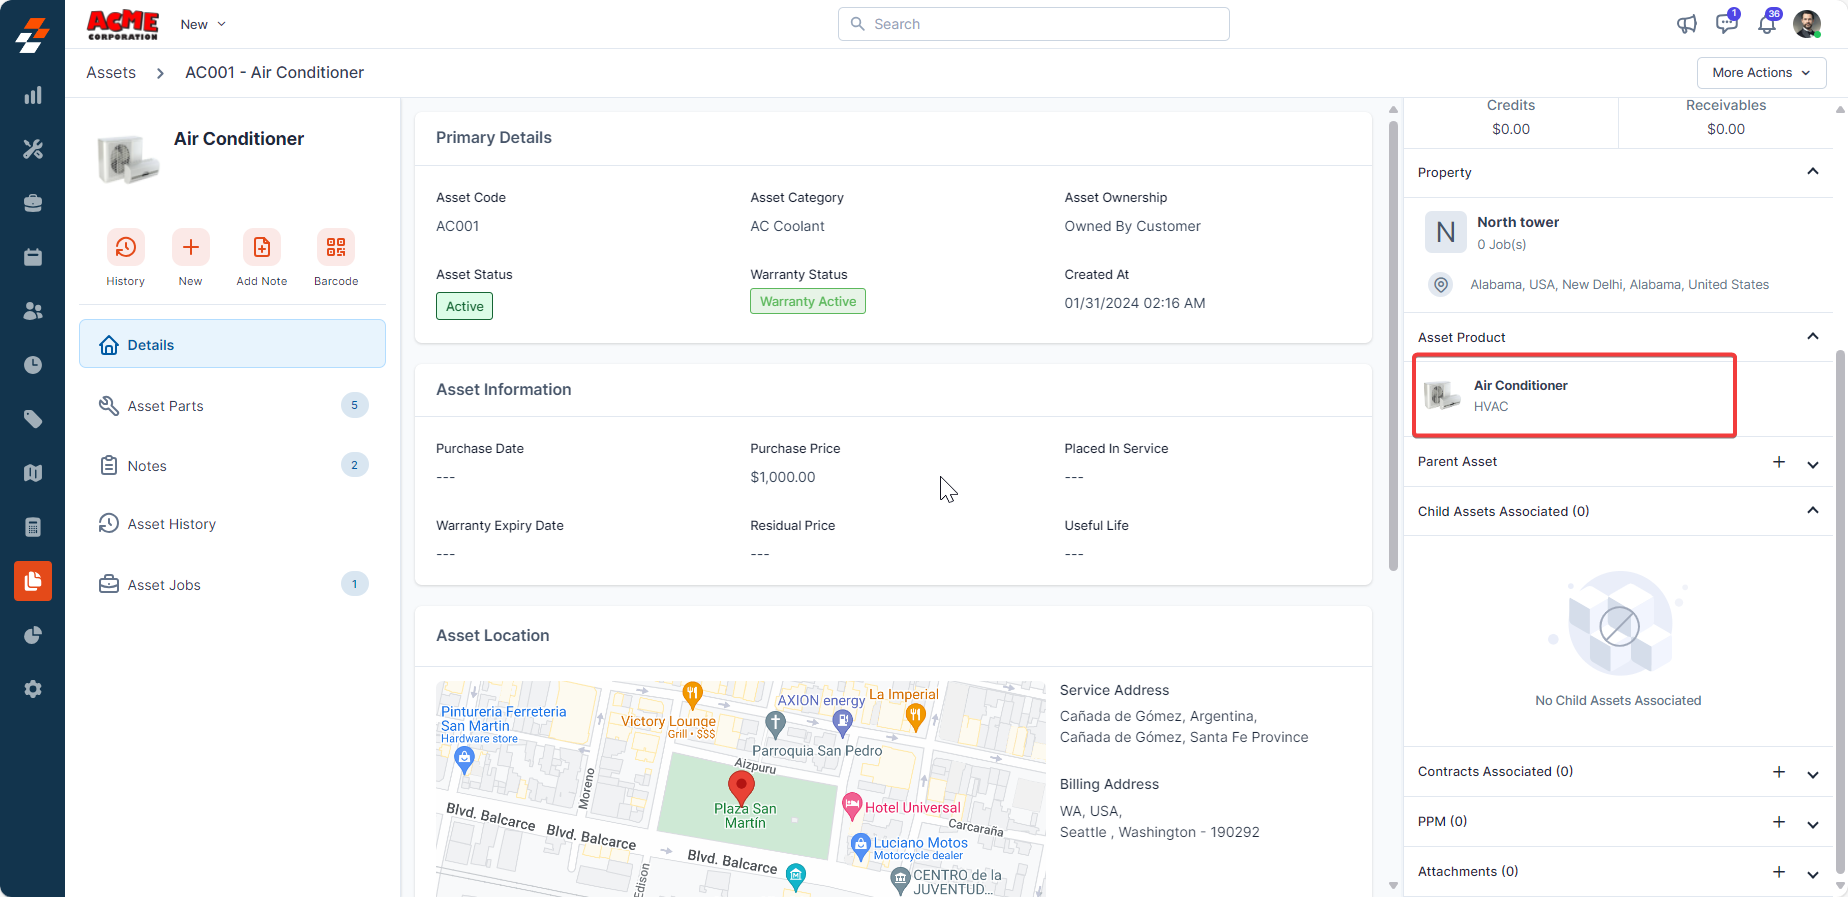
Add Parent Asset
Parent Asset refers to an existing asset that serves as a reference or basis for creating this asset (child asset). If this is a creation of a follow-up asset. Here's how you can associate a parent asset:
1. Click the "+" icon next to the "Parent Asset." A side panel appears on the right. 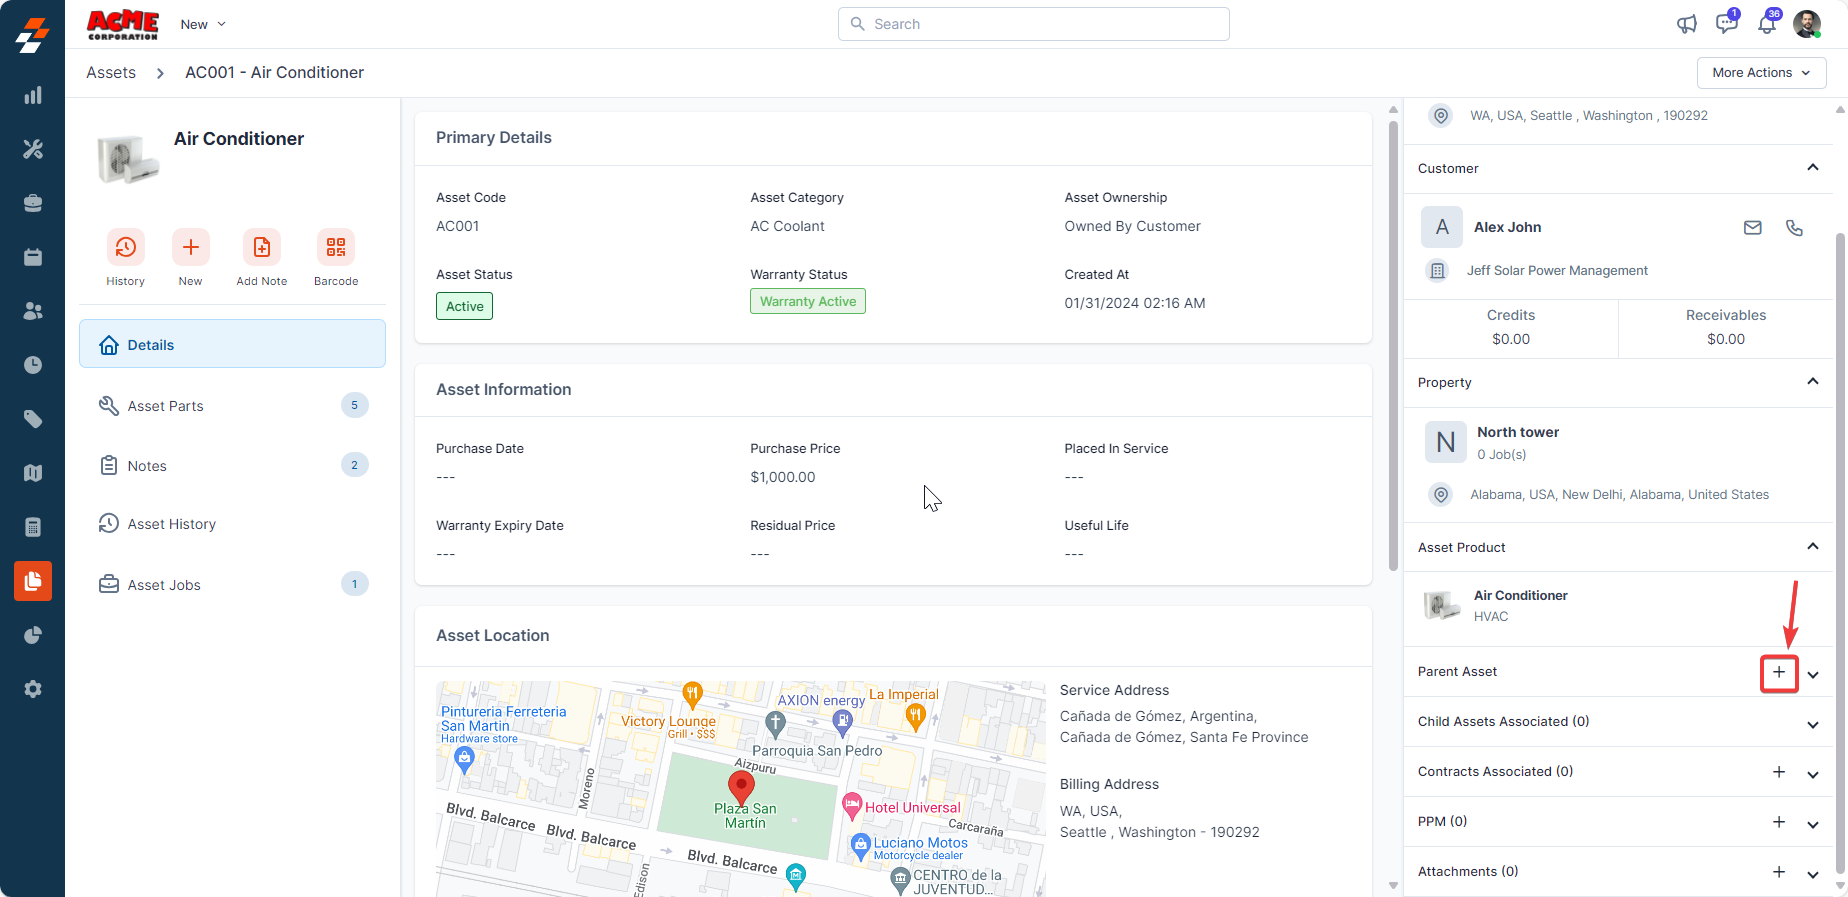
2. Choose any of the existing assets from the "Existing Assets" tab. Once chosen, click the "Choose Asset" button. The asset will be added successfully as a parent asset to this follow-up asset.
Note: If you want to create a new Asset, click "New Asset" tab.
Child Asset
Child Asset refers to an asset that is related to a parent asset. Here, you can view any of the child asset associated with this asset.
Add Contract
A contract associated with this asset will appears here. To add a new contract, follow these steps:
1. Click the "+" icon next to the "Contracts Associated." A page appears to create a new contract.
2. Fill the contract details such as contract package, contract period, contract type and so on records. Once done, click the "Save contract" button. The contract will be added successfully to the asset.
For detailed instructions on how to create a new contract in V3 Zuper Web App, click here.
Add PPM
Planned Preventative Maintenance in short known as "PPM" refers to regular cadence performed on an asset to ensure proper functioning. If you're looking to add a PPM for the asset, follow these steps:
1. Click the "+" icon next to PPM. A side panel appears.
Primary Details
1. Fill in the following primary details:
- Choose Contract (Optional Field): Select the relevant contract from the drop-down list.
- Choose Part / Service (Optional Field): Select the relevant part/service from the drop-down list.
- Priority (Mandatory Field): Select the priority from the drop-down list. The priorities can be Low, Medium, and High.
- Auto Generate Job (Optional Field): If you want to auto generate a Job based on the PPMs, choose "Yes" or "No."
2. When you choose "Yes" for the “Auto Generate Job,” the following details will be required:
- Generate Job Before: Enter the number of days before you want the job to be auto generated.
- Job Category: Choose the category of the Job from the drop-down list.
- Street Address: To fill in the street address information, click "Pick from Map." and use the address.
- Once filled in the primary details, click the "Next" button. You'll be moved to the next step of scheduling PPM.
PPM Schedule
1. Provide the following details to schedule. Once done, click the “Create PPM” button.
- Frequency: Select the relevant frequency (Days, Weeks, Months, or Years) from the drop-down list.
- Frequency Period: Select the relevant frequency period from the drop-down list.
- PPM Start Date: Select the start date of the PPM.
- PPM End Date: Select the end date of the PPM.
- Schedule Dates: These are the dates for the upcoming schedules based on the frequency period.
2. A new PPM will be created and added to the asset successfully.
Attachments
An attachment can either be an image, video, audio, PDF, DOC, XLS, or Zip file that you can attach to the asset for more clarity. To add an attachment, follow these steps:
1. Click the “+” icon next to the Attachments.
2. Click to upload or drag and drop the file from your computer. Once uploaded, click "Close". You can also preview or remove attachments as needed.
Note: The maximum file size should be 20 MB.More Actions
You can find "More Actions" at the top right corner of the details page. Under More actions, you can perform various actions such as edit asset, clone asset, print/save as pdf. share via email, deactivate/activate and delete an asset.
Edit Asset
To update any of the asset details, click "Edit Asset". Make necessary changes to the asset and click "Update Asset" to save the changes.
Clone Asset
Clone asset refers to creating a duplicate or copy of an existing asset. When you clone an asset, you essentially replicate all the data, and attributes of the original asset to create a new asset. This in turn, saves your time and effort by eliminating the need to manually recreate the asset from scratch.
To do so, click "Clone Asset". A new page appears with existing data to create a new asset. Make necessary changes, if needed and click the "Save Asset" button to create a new asset.
Print/Save as PDF
To print/save the asset as PDF, follow these steps:
1. Click "Print/Save as PDF" under More Actions. 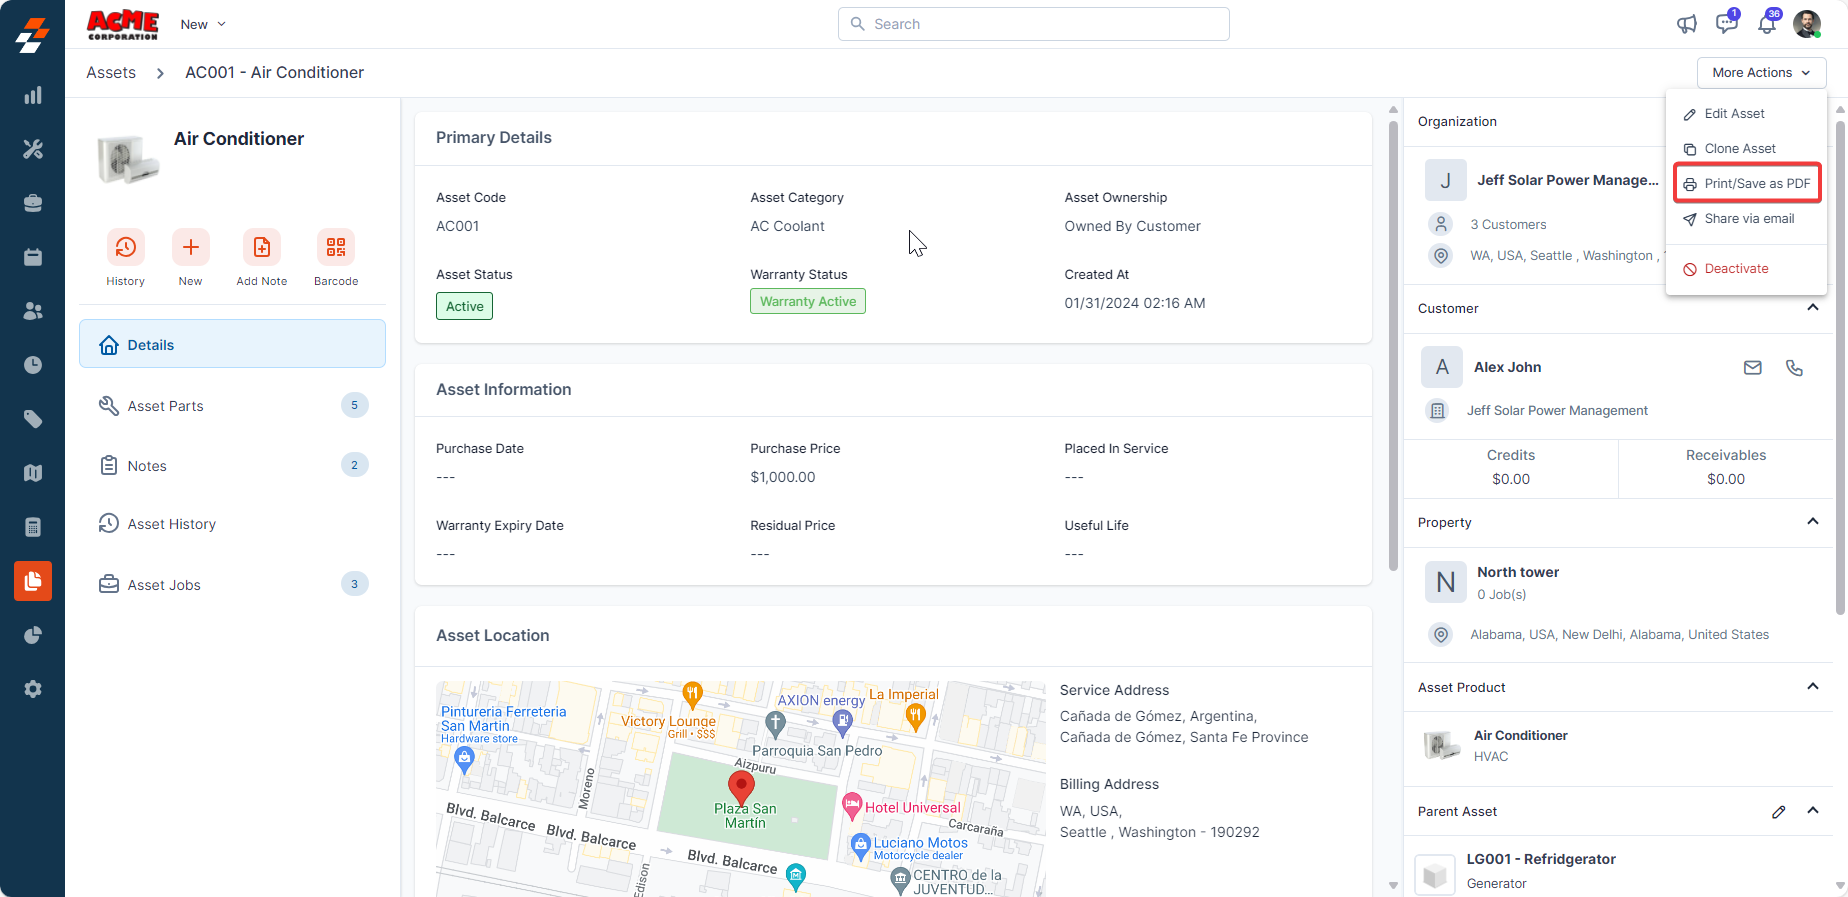
2. A pop-up appears. Choose the required template from the dropdown and check the "Save Asset card As PDF" checkbox. Once done, click the "Print" button. The Asset will be printed/saved as PDF in your computer.
Share via email
You can also share the asset details via email to the customer/organization or your email address for records. To do so, follow these steps:
1. Click "Share via email" under More Actions. A pop-up appears.
2. Provide necessary details such as email id, email subject, email body, and template. Once completed, click the "Share" button to send the asset details to respective email addresses.
Deactivate/Activate
When an asset is deactivated, it cannot be added to a new job or contract until it is reactivated. To deactivate and activate an asset again, follow these steps:
1. Click "Deactivate" under More Actions.
2. The asset will be deactivated successfully. To reactivate it, click "Activate."
Delete
You can also delete an asset if no longer needed. However, to delete an asset, you first need to deactivate it. Once deactivated, click "Delete" under More Actions. The asset will be forever deleted from the inventory.
So, that's a comprehensive overview of the Assets details page in the V3 Zuper Web App. From this page, you can efficiently review asset history, add notes, and associate contracts, customers, or properties, enabling effective monitoring and maintenance of asset records. Furthermore, features like asset cloning, PPM generation, and email sharing contribute to enhanced productivity and streamlined asset management processes within the application.
Related Articles
How to Access the Assets Listing Page in V3 Zuper Web App?
Any item purchased by a company as a product and, when distributed to a customer service location to fulfill a job, contract, or service agreement, is referred to as an asset. Additionally, the asset can either be owned by the customer or by the ...How to Create, Edit and Delete an Asset in V3 Zuper Web App?
Any item purchased by a company as a product and, when distributed to a customer service location to fulfill a job, contract, or service agreement, is referred to as an asset. It can either be owned by the customer or by the company itself. Here's ...How to Create and Manage PPM in V3 Zuper Web App?
Planned Preventative Maintenance in short known as "PPM" refers to regular cadence performed on an asset to ensure proper functioning. If you're looking to create and manage PPM in V3 Zuper Web App, follow these steps. Navigation: Assets --> Assets ...How to access the Parts & Services listing page in V3 Zuper Web App?
The products are the most significant part of the field service, and especially for the field technicians, those who gain end-to-end details about the product can quickly solve the issues / do service. Navigation: Parts & Services -> Parts & Services ...How to access the part/service details page and update stock in V3 Zuper Web App?
You can modify the product once you create a product/part/service. Select any one of the line items to view the details page. 1. Select the "Parts and Services" module from the left navigation menu. Click any one of the line items to view the details ...