Dispatch board settings
The Settings section in the Dispatch Board allows you to customize and optimize the dispatching process to meet your business needs.
 Navigation: Dispatch Board --> Settings
Key settings include:
Dispatcher Queue Settings
The settings allow you to customize the following in the dispatcher queue job card according to your preferences.
- Color: You can choose primary and secondary colors to highlight the essential elements of the job.
- Job per page: Specify the number of jobs to be displayed per page.
- View: Decide how you want to view the job card information (table or list).
- Job card details: Determine how many attributes must be shown in a single job card.
To do so, follow these steps:
1. Click “Settings” at the top right corner.
2. Select “Dispatcher Queue” at the left.
3. Choose the element from the dropdown for which you’d like to provide primary & secondary colors and click the “Save” button.
Based on the selection made, the job card will display highlighted elements. You can choose “None,” if you don't want to highlight any specific elements.
Here's an image of the job card that displays the primary color for the "Job Category' and the secondary color for the "Job Priority."
4. Select the number of jobs to be viewed per page from the dropdown menu.
Jobs will be listed on the page based on your selection, and any remaining jobs will be moved to the next page.
5. Select how you'd like to view job card information: "List view" or "Table view."
A list view displays information in a list, while a table view displays it in a table. Below is an image showing both the list and table views as selected.
Note: When you choose Table View, you can even select the position where the table needs to be displayed, whether at the left or bottom.
6. Select the attributes that need to be displayed on a job card. By default, “Job #” and “Job Title” will be selected and cannot be removed from the job card information. Once done, click “Save.”
Below is the image that shows how the job card looks for the selected attributes- Job #, Job Title, Job Category, and Current Job Status.
Additional Elements in Dispatcher Queue
In the Dispatcher Queue, there are additional options such as Search, Filter, and Sort. You can use these options to look up or filter specific jobs/routes and sort jobs/routes in the dispatcher queue. 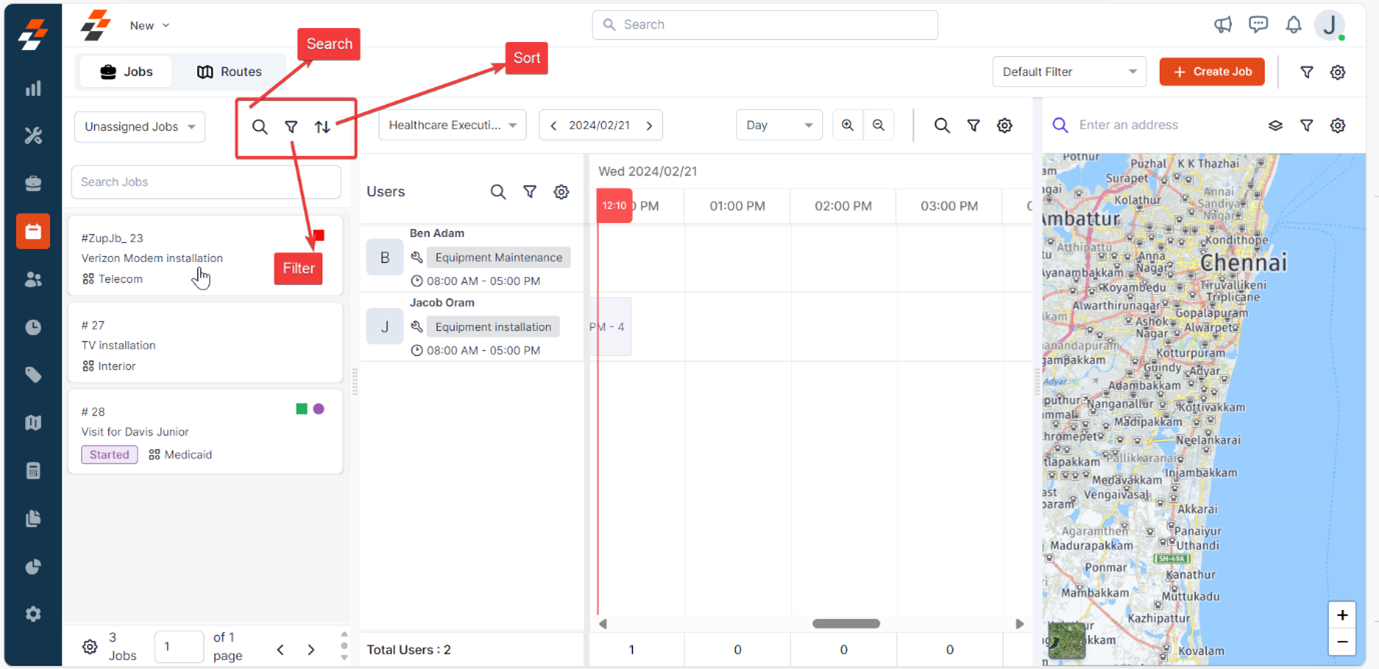
Search
With the search option, it is easy to search for specific unassigned routes and jobs under the chosen job type.
Filters
1. With the advanced filter option, you can easily apply filters and view accurate jobs/unassigned routes in Dispatcher Queue. You can also save the filter used by clicking the “Save as Filter” checkbox for a quick search.
2. After saving the filter, it will be added to the quick filter box located at the top right corner. By default, it will be displayed as a “default filter.” You can then choose or add filters based on your choice.
3. To manage the filters you added, click the 'Manage Filter' option. This allows you to view or add/delete filters as needed.
Sort
Using the “Sort” option, you can sort the unassigned routes/jobs based on the Scheduled Date, Due date, Job #, and Job priority for the selected job type (Assigned, Unassigned, Overdue, and Unscheduled).
You can also select whether you want to view the results in ascending or descending order. After making your selections, click the "Apply" button to view the sorted jobs/unassigned routes in the dispatcher queue.
Users Settings
The settings provide the ability to customize the user card information in the user's layout according to your preferences. This can be achieved in two ways:
1. In the first way, you can access "settings" directly from the user’s layout by clicking on the settings icon and in the second way from the top right corner.
2. When you choose the settings from the user’s layout, you will be directly landed to the users, whereas if you access settings from the top right corner, click “Users” to customize the following in the user’s card information.
- Card Details: You can choose what information needs to be shown on the user’s card.
- More Details: You can choose more details that you’d like to view when hovering over the user.
The actual customization can be done by following these steps:
1. Click “Settings” and choose “Users” on the left panel.
2. Under Card details, add attributes such as skill set, role, work hours, and designation that should be displayed on a user card. By default, “Technician Name” will be selected and cannot be removed from the user card information. You can also choose how you want to view the user “Plain or With Avatar.” Once done, click “Save.”
3. Under “More Information," select details that you’d like to show when hovering over the user.
Here's how the user card information appears for the selected attribute "Technician Name," and the elements such as skillset, role, and work hours are chosen under more information in settings.
Additional Elements in Users
In the Users layout, there are additional elements such as Search and Filter. You can use these options to look up or filter specific users on the team.
Search
With the search option, it is easy to search for specific users under a team.
Filters
With the filter option, you can easily search users by name and skillset. Once chosen, click “Apply,” you can view the user under the team accurately as per the filter applied. You can also save the filter used by clicking the “Save as Filter” checkbox for a quick search.
Scheduler Settings
This settings provide the ability to customize the scheduler job card according to your preferences.
1. You can access "settings" either directly from the scheduler’s layout or from the top right corner.
2. When you choose Settings from the scheduler layout, you will be directly landed to the scheduler, whereas if you access settings from the top right corner, click “Scheduler” at the left to customize the following in the scheduler job card information:
- Job Card Color: You can choose the elements that need to have primary and secondary colors on the scheduler job card.
- Card Details: You can choose what information needs to be shown on the job card.
- Display: You can choose how the scheduler needs to be displayed.
3. Under Job card information, choose the element for which you want to provide primary and secondary colors.
To do this, simply select the desired element from the dropdown menu next to the primary and secondary colors and click the “Save” button.
Note: The primary color will be displayed on the background of the job card, while the secondary color will appear as a vertical line on the left side of the job card. Alternatively, you can choose not to highlight any specific elements by selecting “None.”
3.a. Additionally, there's a provision to set custom colors and icons for entities displayed on the map, such as Jobs, Customers, Assets, and Properties directly from here. Here's how:
1. Next to Primary Color under the Job Card Information, click “Custom.” A sidebar will appear. This allows you to customise colours and icons.
1. Next to Primary Color under the Job Card Information, click “Custom.” A sidebar will appear. This allows you to customise colours and icons.
4. Choose the attributes that need to be displayed on the Job Card. By default, “Job #” and “Job Title” will be selected and cannot be removed from the job card information. Once done, click “Save.” You can also preview how the job card looks with the selected attribute on the right.
5. Choose how the scheduler needs to be displayed and click the “Save” button.
- Business Hours- When this is checked, the scheduler shows only the business hours and does not show out-of-business hours to schedule a job.
- Weekends- When this is checked, the weekend (Saturday) is also included in addition to week days while scheduling a job.
- Week Numbers: When this is checked, week numbers in a year will be included in the scheduler to schedule a job.
- Job Summary- Displays job summary (count of jobs) for a day, week, or month in the scheduler.
Additional Elements in Scheduler
In the Scheduler, there are additional options such as Search and Filter. You can use these options to look up or filter specific jobs in the scheduler.
Search
With the search option, it is easy to search for specific jobs in the scheduler.
Filters
1. By using the filter option, you can easily search/shortlist jobs or routes in the scheduler according to their category, due dates, customer/organization, property priority, skills, and tags.
Once you have applied a filter, click the “Apply” button to view the jobs/routes that match the selected criteria.
2. You can also save the filter you have used by selecting the “Save as Filter” checkbox, which will enable you to use that filter for quick searches in the future. To remove any filters that have been applied, click the “Reset” button.
3. After saving the filter, you can use it for a quick search from the box located at the top right corner. By default, it will be displayed as a “default filter.” You can then choose or add filters based on your choice.
Map Settings
The map settings allow you to choose which entities locations to be displayed on the map and customize the colors and icons for entities such as Jobs, Customers, Assets, and Properties. For more information on how to set custom colors and icons for entities displayed on the map, see Map.
1. You can access "Settings" directly from the map layout or from the top right corner.
2. When you choose Settings from the map, you will be directly landed on the map, whereas if you access settings from the top right corner, click “Map” at the left to do the following:
- Enable/Disable Map View
Note: When you disable it, you cannot view map on the dispatch board.
- Choose the default layers to display on the map. Once chosen, click the “Save” button.
Note: You can choose the layer only if you enable the map view.
Additional Elements in Map
In Map, you additionally have a filter option.
1. By using the filter option, you can easily filter routes. Once the route has been chosen, click the “Apply” button to view the routes location on the map.
So, that's a comprehensive overview of the settings in the dispatch board. With these step-by-step instructions, you can now use the settings section to optimize the dispatching process to meet your business needs.
Related Articles
Dispatch board- Deep dive into dispatcher queue
A dispatcher queue is one of the important layouts on the dispatch board that helps you (dispatchers) identify and prioritize pending jobs/routes, assign them efficiently, and monitor their progress. Navigation: Dispatch Board --> Settings In Zuper, ...Detailed overview of users, scheduler, and map layouts in dispatch board
In addition to the dispatcher queue, the dispatch board includes several other interconnected layouts: Users, Scheduler and Map. These layouts work together seamlessly to provide a comprehensive view of operations and enhance the efficiency of task ...Overview of dispatch board
The dispatch board module in the Zuper web app provides a centralized overview of unassigned routes and all jobs, including those that are unscheduled, assigned, unassigned, and overdue, in one place, allowing you to act on them with a single click. ...How to create and manage recurring routes in dispatch board?
The 'Recurring Routes' feature in Zuper enables dispatchers to create multiple instances of routes with predefined frequencies and associate them with recurring jobs of the same cadence. This means you may have repeated jobs that need to be done at ...Understanding job visibility on the Dispatch Board
Managing and overseeing jobs effectively is crucial, and understanding why certain jobs appear on your Dispatch Board can be challenging. This article clarifies how specific settings influence job visibility, helping you understand what you see and ...