How to plan and manage a project in the Zuper web app?
From the jobs section within the project module, you can manage the entire project schedule using either the Gantt or List view. Specifically, you can:
- Plan and manage project schedule by creating or adding jobs
- Create milestones to mark significant events as the project progresses
- Create and manage dependencies between jobs and milestones
- Group jobs and milestones into phases
Creating Jobs, Milestones and Phases
You can create jobs, milestones and phases in a project from either the Gantt or List view. Additionally, you can add existing jobs to a project.
How to create and add jobs to a project
You can create a new job or add an existing job to the project.
To create a new job, follow these steps:
To create a new job, follow these steps:
1. Click the "Create Job" button at the top right corner of the page.
2. A sidebar appears on the right with prefilled details such as customer/organization name, service and billing address. You will need to fill in the remaining details, such as the job title, category, due date, assign user to the job, and other fields.
3. Click the "Create" button to create a new job after filling in all the necessary details.

Note: If you want to add more details to the job, click the "Create Detailed Job" button at the top right corner. This will redirect you to a detailed job creation page
4. Add additional information, such as service tasks, parts/services, assets, contracts, and any attachments to the job, in the job creation page and click the "Create Job" button.

To learn more about job creation, see How to create a job in the Zuper web app
5. A new job will be created successfully and associated with the project. This job can then be accessed from the ‘Not added to any phase’ section in either the Gantt view or the List view.
To add an existing job, follow these steps:
1. Navigate to the "Create Job" button at the top right corner of the page and select "Add Existing Job" from the dropdown menu.
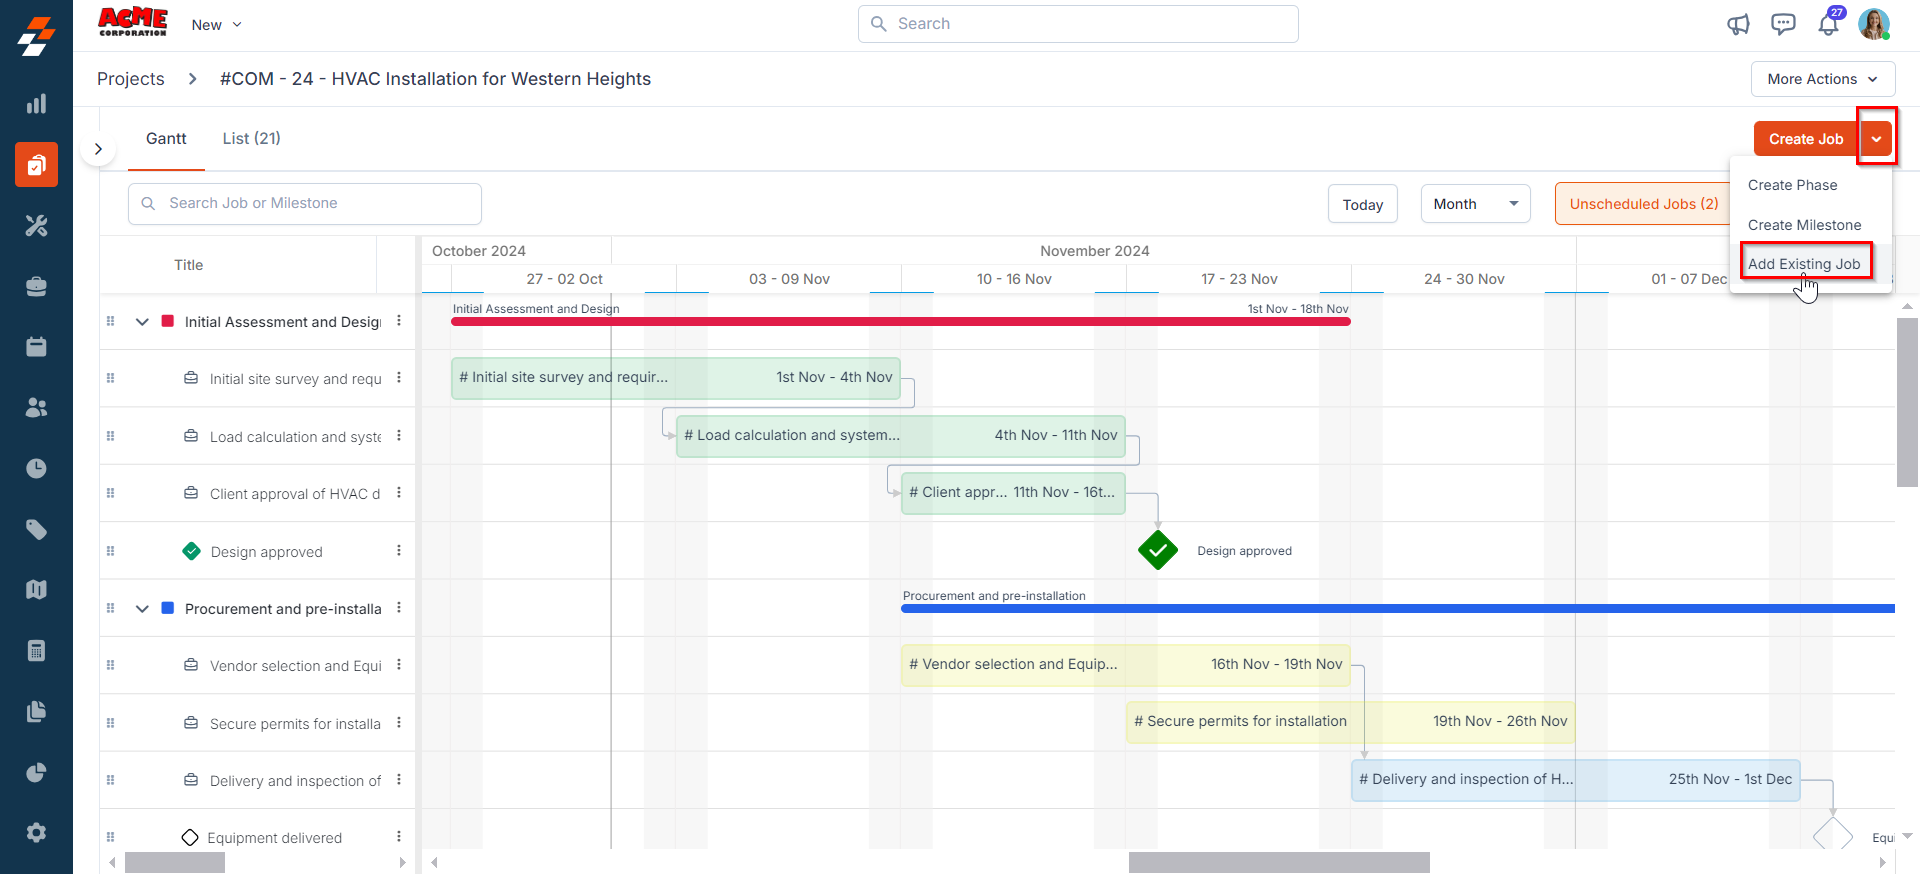
2. A sidebar appears on the right with the existing jobs. Choose one of the required jobs from the list and click the "Choose Job" button.
3. The existing job will be added to the project successfully and can be accessed from the ‘Not added to any phase section’
Note: You can add up to 50 jobs to a project.
How to create a milestone
Milestones can be used to mark significant events or achievements throughout the project. To create a milestone, follow these steps
1. Navigate to the "Create Job" button at the top right corner of the page and select "Create Milestone" from the dropdown menu. A dialog box will appear.
1. Navigate to the "Create Job" button at the top right corner of the page and select "Create Milestone" from the dropdown menu. A dialog box will appear.
2. Enter the following details and click the “Create” button to create a milestone.
- Phase (Optional): Select the phase you want to add the milestone to from the dropdown.
- Name (Mandatory): Enter the name of the milestone.
- Due Date (Mandatory): Specify the due date for the milestone.
- Description (Optional): Provide a brief description to the milestone.
How to create a phase
A phase is a group of jobs and milestones and can be thought of as a sub-project. It is represented as a thick line in the timeline. To create a phase, follow these steps:
Note: Jobs and milestones not added to any phase can be accessed from the ‘Not added to any phase’ section in the Gantt and List view.
1. Navigate to the "Create Job" button at the top right corner of the page and select "Create Phase" from the dropdown menu. A dialog box will appear.
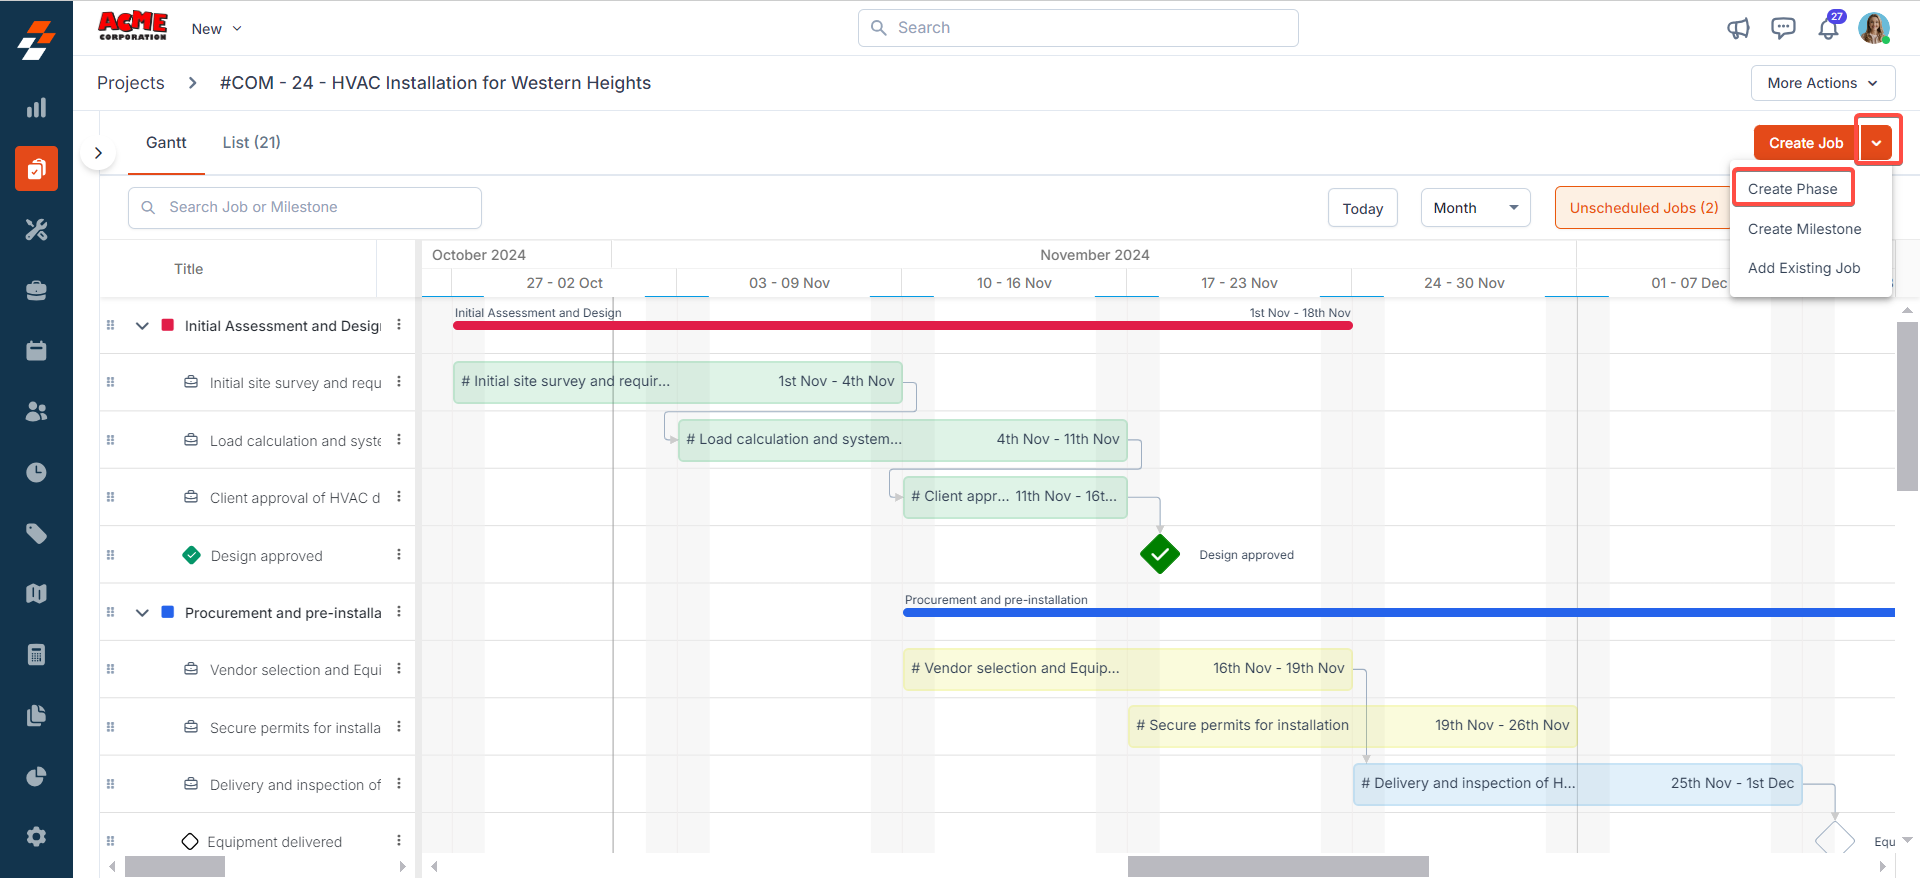
2. Enter the following details and click the “Create” button to create a phase:
- Phase Name: Enter the name of the phase.
- Phase Color: Choose the color to the phase to visually differentiate it from other phases in the timeline.
3. Once the phase has been successfully created, you can create job, add existing jobs or drag and drop existing jobs and milestones from the "Not added to any phase" section or from other phases, as shown below.
Note: The duration of a phase is calculated based on the start date or due date of the earliest job or milestone and the end date or due date of the latest job or milestone in that phase.
After creating jobs, milestones and phases in a project, you can access them from either the "Gantt view" or the "List view". Each has its own benefits:
1. The Gantt view is great for planning your project since you get a clear view of the timeline and dependencies.
2. List view on the other hand is great if you want to quickly take a look at all the jobs in the project with information such as status, priority etc easily accessible.
1. The Gantt view is great for planning your project since you get a clear view of the timeline and dependencies.
2. List view on the other hand is great if you want to quickly take a look at all the jobs in the project with information such as status, priority etc easily accessible.
Gantt view
Gantt view provides a bird's eye view of how the project progress over time. It features a horizontal timeline where each job is represented by a bar, milestones are depicted as diamonds, phases appear as thick lines, and dependencies are shown as arrows connecting two jobs or milestones.
Accessing jobs, milestones and phases
To view jobs, milestones and phases, simply click on the desired phase from the left-hand panel. The selected phase, along with its jobs and milestones, will be displayed in the Gantt view.
- A job is represented as a bar. A job bar's length corresponds to the job's duration, and the bar's position along the timeline indicates when the job starts and ends. The color of the bar indicates the job status. Additionally, you can reschedule the job, create a new note, or detach the job from its phase directly from the Gantt view by right-clicking on it.
- Milestones are represented as diamonds in the Gantt view. You can create a milestone directly from the Gantt view, add it to a phase, and create dependencies for it. Additionally, you can edit the milestone, update its status (either "open" or "completed"), or delete it by right-clicking on it.
- A phase is a group of jobs and milestones and can be thought of as a sub-project. It is represented as a thick line in the timeline. You can create a phase, add jobs and milestones to it, edit or delete a phase by right-clicking on it.
Managing dependencies
Dependencies are relationships between jobs based on the order of execution. E.g., Consider if there are two jobs A and B, Job B cannot be started unless Job A is completed, they are dependent on each other. Here, Job B is said to be the ‘Successor’ and is ‘Waiting on’ Job A, while Job A is said to be the ‘Predecessor’ and is said to be ‘Blocking’ Job B.
Dependencies are indicated by arrow connecting jobs or milestones. The arrow originates from the predecessor and points to the successor.
1. To create a dependency between jobs or milestone in the Gantt view, simply drag from one edge of the job bar/milestone to another as shown below. This action visually links the jobs, establishing the sequence and indicating that succeeding jobs cannot start until the preceding jobs are completed.
2. To remove a dependency, simply click on the arrow, then confirm by clicking ‘Remove’ in the pop-up.
3. After creating a dependency, you can also reschedule the job/milestone by simply dragging the job bars or milestone diamonds to a new start or end points as shown below.
Note: Additionally, when rescheduling, you have the option to manage whether the schedule of the succeeding jobs should be changed or remain unchanged. Here’s how:
1. Click the “Configure” button at the top right corner and choose “Dependency Management”
2. A Dependency Management dialog box appears, where you can choose either of the following. Once done, click the “Save” button.
- Maintain Interval: This option ensures that the time interval between the dependent jobs remains the same when rescheduling the preceding job.
- None: This option reschedules only the intended job without rescheduling the succeeding jobs.
- You can also enable/disable the “Allow scheduling during weekends” when the dependency management is set to "Maintain Interval." When disabled, scheduling on weekends will not be permitted.
3. Based on the settings, when rescheduling in the Gantt view, the dependent jobs will be adjusted accordingly.
Note: When rescheduling the preceding job, if the dependent job is scheduled to start before the preceding job ends, the dependency will be highlighted in red indicating a violation as shown below. Technicians can clock-in to a succeeding job only after the preceding job is completed even if the succeeding job starts before the preceding job ends.
More actions
You can perform various other actions from the Gantt view.
Changing the timeline view in Gantt view
For improved visibility, you can adjust the view between month, week, and day by clicking the dropdown on the top-right of the Gantt.
View job details
To view any of the job details, click the job in the timeline. A sidebar will appear on the right, displaying the job's primary details and any associated notes.
You can also perform various actions, such as viewing more details about the job, cloning a job, or deleting a job by clicking the "ellipsis" icon at the top of the sidebar.
Access and schedule unscheduled jobs
You can also quickly access and schedule unscheduled jobs from this view. To do so,
1. Click the "Unscheduled Jobs" button at the top right corner. You can view the list of unscheduled job(s) associated with the project.
1. Click the "Unscheduled Jobs" button at the top right corner. You can view the list of unscheduled job(s) associated with the project.
2. Simply drag and drop the unscheduled job onto the timeline to schedule the job. Once scheduled, the job would be reflected in the "Not added to any phase" section.
Customize columns
You can also customize the columns according to your preferences. To do this, click the "Configure" button at the top right, select "Customize Columns," and choose the fields you want to add or remove. The selected fields will then appear in the left column.
Search
The search bar on the top-left in the Gantt and list view, allows you to search for a specific job or milestone. You can also search for a job by its title or work order number and a milestone by its name. The search results would be grouped under the respective phases.
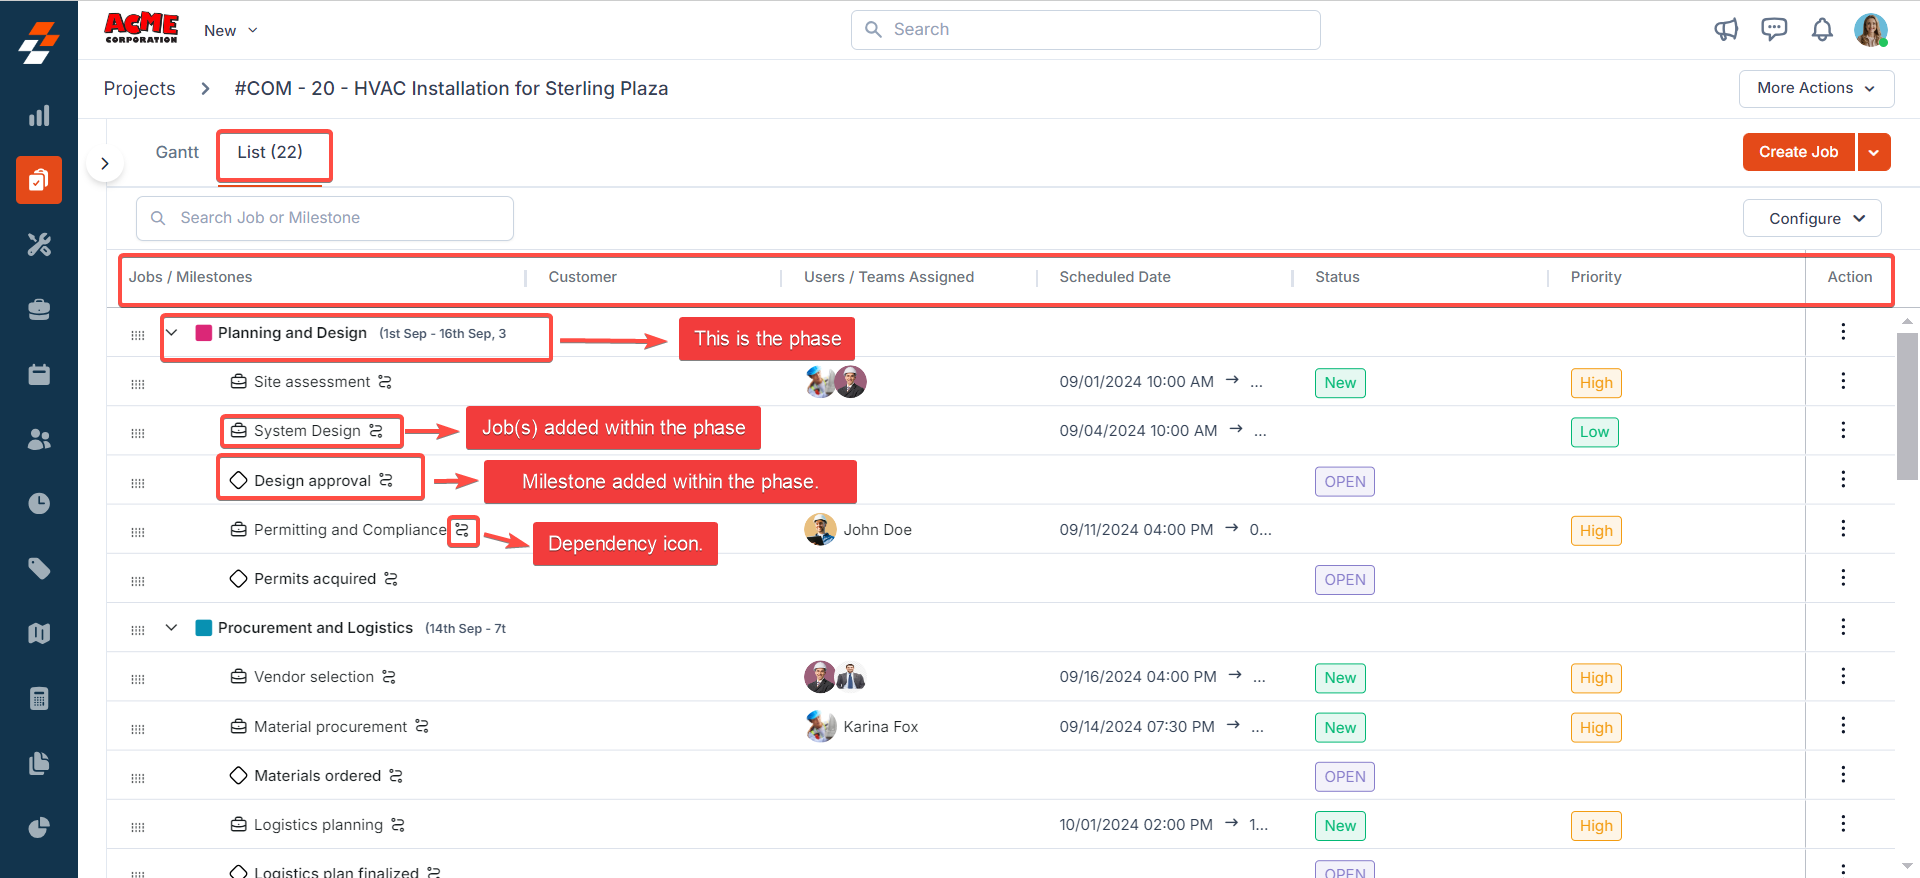
List view
The list view displays information in a tabular format, with jobs and milestones grouped under phases.
Quick actions
Using the quick actions available under the “Actions” column, you can perform various actions for phases, milestones, and jobs. Below are the quick actions available for each within the project:
- Phases: Create Job, Add Existing Job, Add Milestone, Edit and Delete Phase.
- Milestones: Edit, Update status, View dependencies, Delete milestone.
- Jobs: View Details, Reschedule Job, View Dependencies and Detach a job.
Detaching a job does not mean permanent deletion. You can still access the job from the “Jobs” module. Also, when detaching a job, you'll be prompted to choose whether to:
- Detach the job and keep the associated parts & services, or
- Detach the job and delete its associated parts & services from the project.
- If you choose to detach the job and keep the parts & services, the job will be removed from the project, but the parts and services consumption will remain in the project under the "Used Quantity." This is helpful if the parts or services were used for other jobs within the project.
- If you choose to detach the job and delete the parts & services, the job will be removed, and the parts and services will be replenished back to the available quantity, making them available for other jobs within the project.
Customize column
You can also customize the columns according to your preferences. To do this, click the "Configure" button at the top right, select "Customize Columns," and choose the fields you want to add or remove. The selected fields will then be added as columns.

Note: You can also drag the columns to adjust the field name visibility.
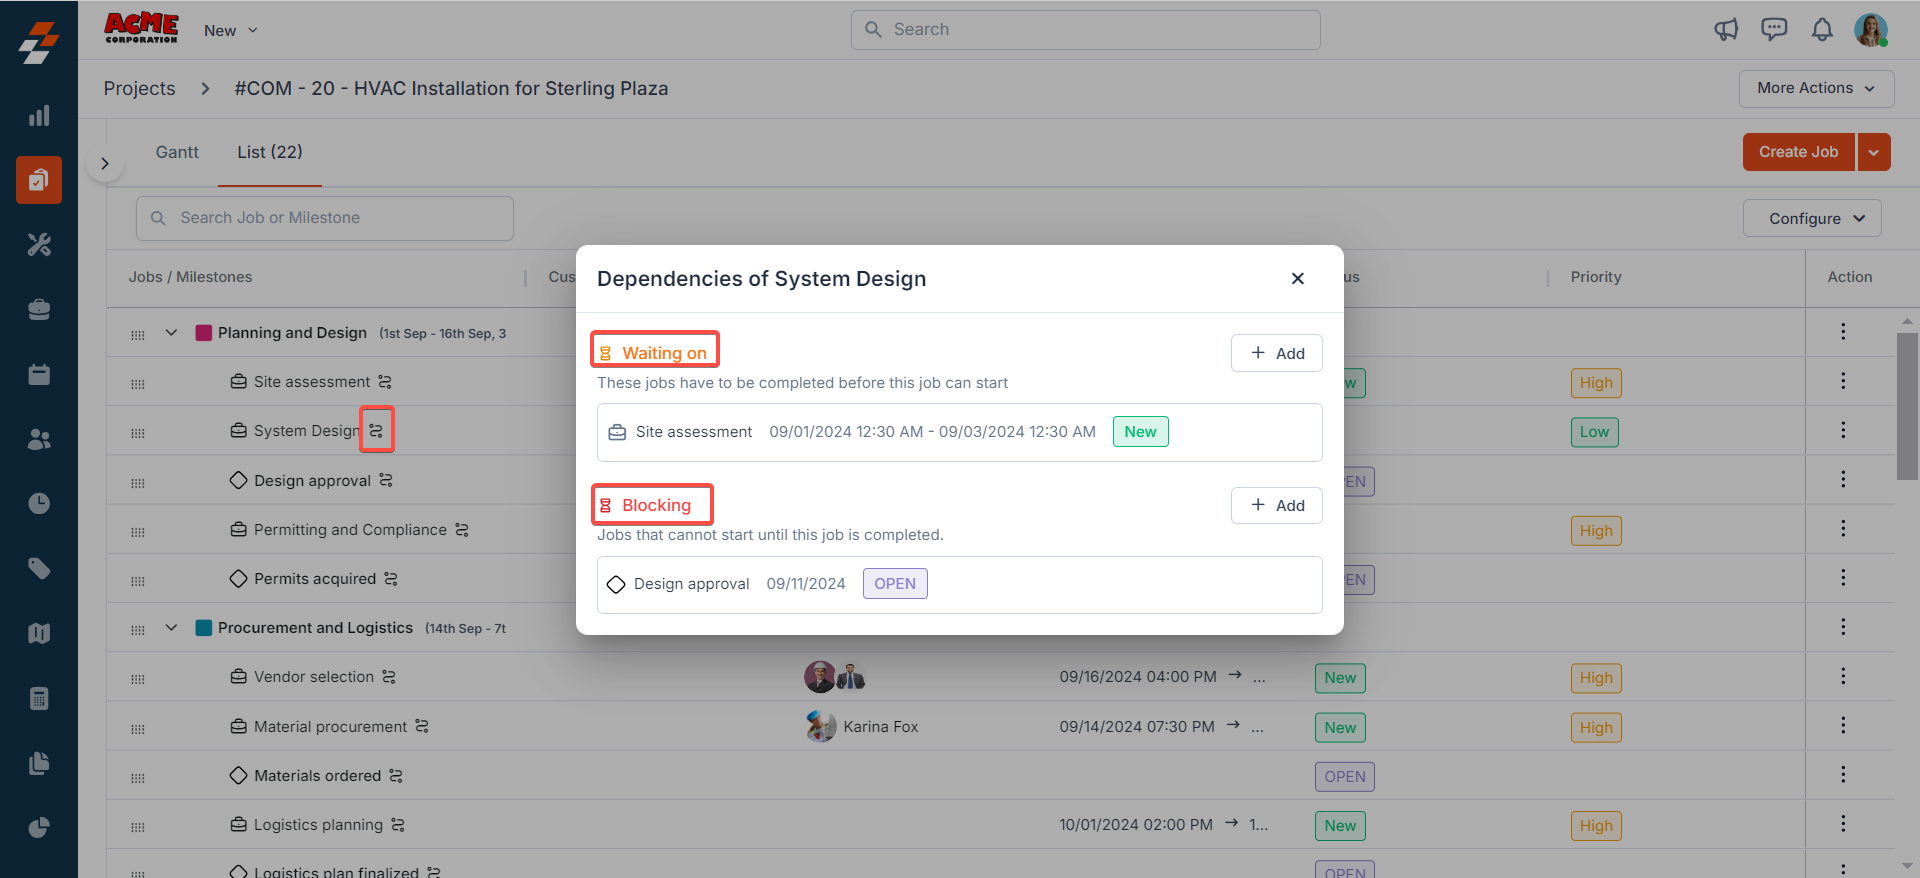
Managing dependencies
In the list view, jobs or milestones with dependencies are marked with a "dependency icon." To manage dependencies, click on the dependency icon next to the job or milestone, or select "Dependencies" from the quick actions menu.
1. A pop-up will appear, allowing you to view or modify the dependencies.
You can view the predecessors to the job or milestone under "Waiting on" (these jobs/milestones need to be completed, cancelled or closed for the current job to start). Successors to the job or milestone are listed under "Blocking" (these jobs can start only if the current job is completed, cancelled or closed).
You can view the predecessors to the job or milestone under "Waiting on" (these jobs/milestones need to be completed, cancelled or closed for the current job to start). Successors to the job or milestone are listed under "Blocking" (these jobs can start only if the current job is completed, cancelled or closed).
2. You can even create dependencies to a job or milestone by clicking the “+ Add Job” button next to the "Waiting on" and "Blocking" sections.
Note: When creating dependencies in the list view, jobs or milestones that could result in a dependency violation would not be listed.
3. To remove a dependency, hover over the job or milestone you want to remove and click on the "X" icon near the right edge.
Rescheduling a job with dependencies
To reschedule a job with dependencies from the list view, follow these steps:
1. Click "Reschedule Job" next to the job with a dependency under the "Actions" column.
If dependency management is set to “Maintain interval,” a pop-up will appear, prompting you to choose between “Reschedule This Job Only” or “Reschedule All Dependent Jobs.”
1. Click "Reschedule Job" next to the job with a dependency under the "Actions" column.
If dependency management is set to “Maintain interval,” a pop-up will appear, prompting you to choose between “Reschedule This Job Only” or “Reschedule All Dependent Jobs.”
When you choose “Reschedule All Dependent Jobs,” you will also be able to view the rescheduled dates and times for the dependent jobs as a result of this change.
Deleting a phase
When deleting a phase, you will be prompted with the below options:
1. Detach jobs from the project and delete milestones- This option deletes the phase, detaches jobs from the project (the detached jobs can still be accessed from the Jobs module) and deletes any milestones in the phase.
2. Retain jobs and milestones in the project- This option deletes the phase and retains jobs and milestones in the project. The retained jobs and milestones are moved to the "Not added to nay phase" section.
Phases, Milestones and Dependencies on mobile
Technicians and other users can access jobs and milestones grouped into Phases in the “Jobs” section of a project.
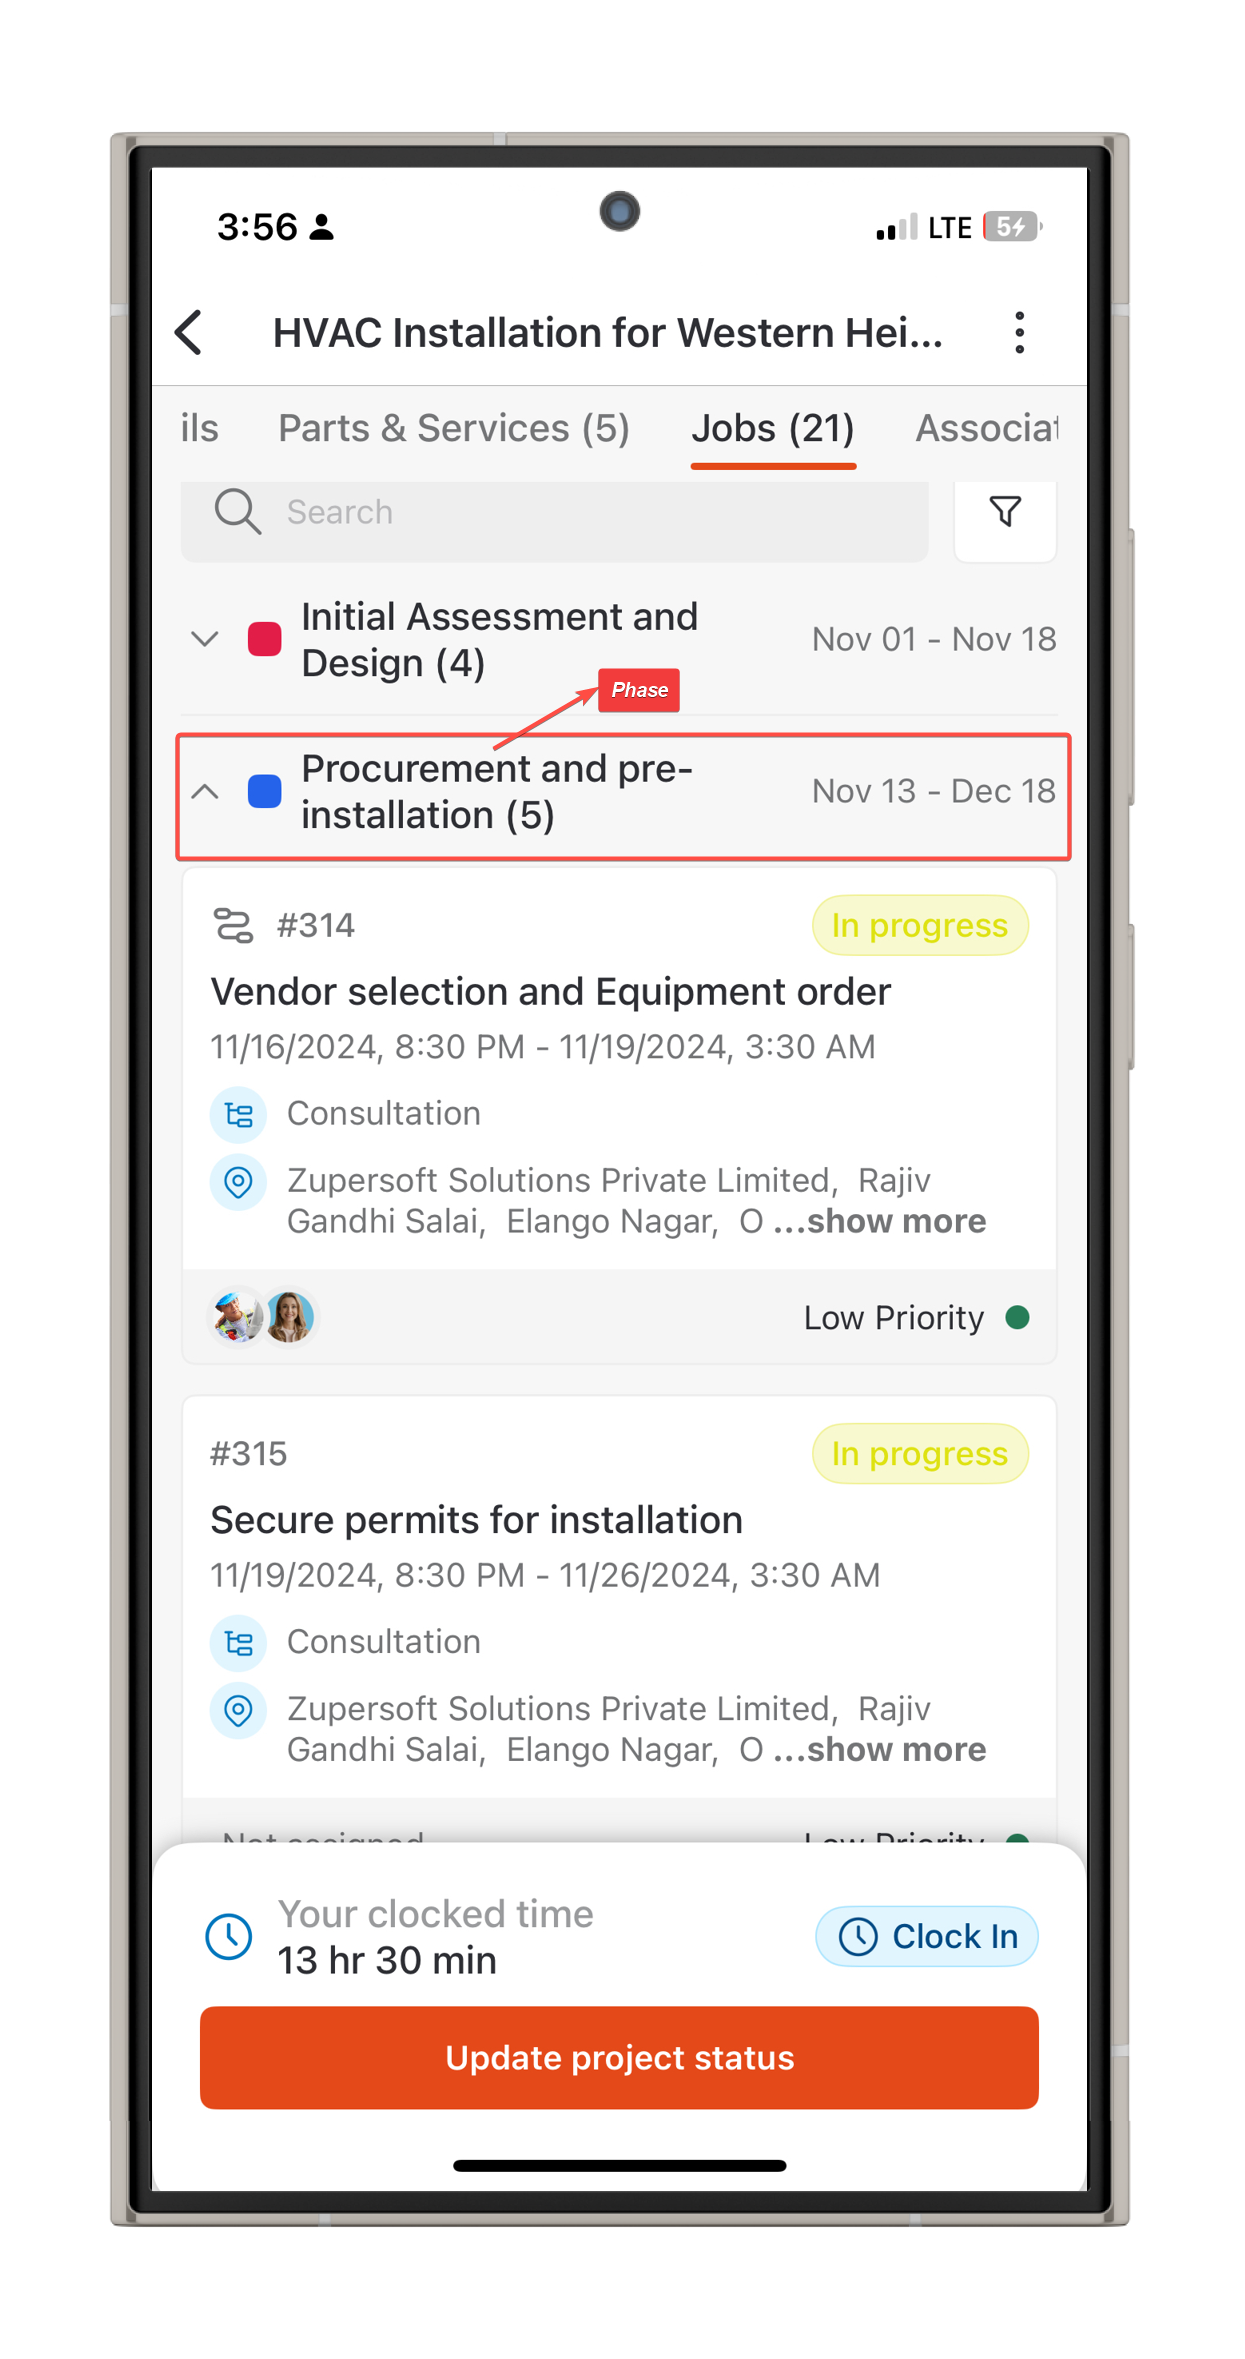
When a job has predecessors that are not yet completed, users cannot clock in to the job and it will be indicated that the job has dependencies that need to be completed.
Related Articles
How to create a project and add jobs in the Zuper web app?
Projects module in the Zuper web app allows you to create and manage multiple complex projects namely construction, interior designing, cleaning, and more. These projects often involve multiple jobs within it and can take several months to complete. ...How to create and manage your PPM in the Zuper web app?
Planned Preventive Maintenance (PPM) is a proactive approach to maintaining equipment, machinery, or systems by scheduling regular inspections, servicing, and repairs before any issues arise. The goal of PPM is to minimize the risk of unexpected ...How to create a new AR (Account Receivable) invoice in the Zuper web app
An invoice is an accounting document that a field service business sends to its clients to request payment for the services rendered. Navigation: Accounting --> Invoices --> + New Invoice 1. Select the “Invoices” icon from the left navigation menu ...How to create a Job on the Zuper Mobile app?
Jobs are the heart of the Zuper Mobile App. It is the core of all field service operations. In Zuper Mobile App, you can create a new job. Create a new Job: 1. Select the "Jobs" module from the top-left hamburger icon . 2. Select the "+“ icon from ...How to create & manage an asset inspection form in the Zuper web app?
An asset inspection form serves as a checklist for the field technician to conduct asset inspections and record maintenance activities. These forms also play a crucial role in streamlining the inspection process and improving overall efficiency. For ...