How to create and manage a non-job event in Zuper
A non-job event refers to any activity that a field technician or other employees engage in that is not directly related to a specific job or work order. Creating these event(s) informs dispatchers that the technician is unavailable for job assignments during this period, enabling better scheduling and resource management.
You can create a non-job event from either the Dispatch Board or the Calendar.
You can create a non-job event from either the Dispatch Board or the Calendar.
Steps to create a non-job event
1. Select "Calendar" or "Dispatch Board" from the left-navigation menu.
2. Click the drop-down menu next to the "Create Job" button located at the top-right corner of the page and select “New Non Job Event”. A Create Non Job Event sidebar will appear.

Note: Alternatively, you can create a non-job event for a specific period in the Dispatch Board by simply clicking and dragging the cursor from left to right in the scheduler, then selecting "Create a Non Job Event" from the options shown.
3. Fill in the following details to create a new non-job event.
Primary Details
- Event Name (mandatory): Provide a name for the event, with a maximum limit of 200 characters.
- Category (mandatory): Choose the category for the event from the list. If needed, you can also create a new category directly from here.

To create a new category:
1. Click "Create New Category".
1. Click "Create New Category".
2. Provide the category name, color, and description.
3. If you want to set the default availability for the event to busy, check the “Mark Attendees as busy” checkbox. This will set the availability to ‘Busy’ for any event in the category by default and can be changed at the event level.
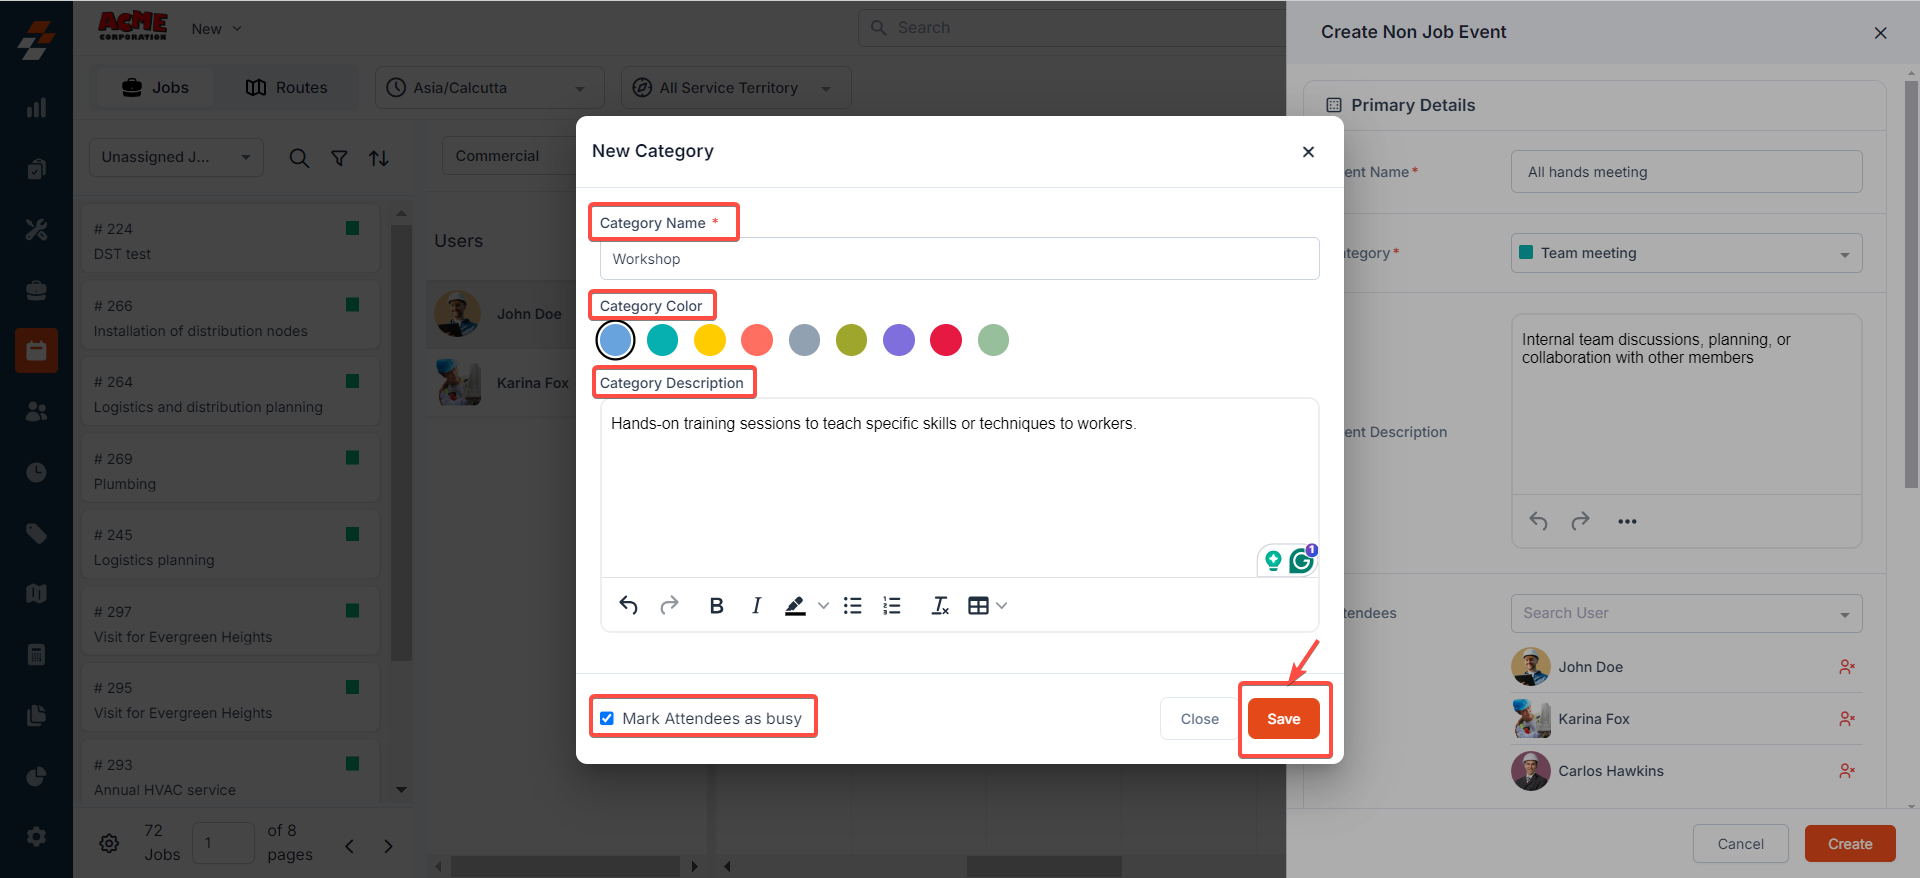
4. Click the "Save" button. The new category will be created and added to the existing list.
- Event Description (optional): Provide a description of the event, with a maximum limit of 8000 characters.
- Attendees (optional): Select the user(s) who will be engaged in this non-job event.
- Event Address (optional): Select and add the event address using the map.
Schedule
- Schedule On (mandatory): Set the start and end times for the selected date along with the preferred time zone.
- Optionally, toggle 'All Day' on or off at the top right. When enabled, the start and end times default to business hours in the selected time zone, which can be adjusted as needed.
Note: Non-job events can only be scheduled for a single day, not multiple days.- Availability: Select whether the attendees will be marked as "Busy" or "Free" for this event.
A. Busy: The scheduled time will be blocked for the attendees in Assisted Scheduling. The dispatcher will be notified if there is a conflict between a job and the non-job event.
B. Free: The scheduled time will not be blocked, allowing the dispatcher to schedule jobs for the attendees during the non-job event. The Dispatcher will not be notified of any conflicts with the non job event.
B. Free: The scheduled time will not be blocked, allowing the dispatcher to schedule jobs for the attendees during the non-job event. The Dispatcher will not be notified of any conflicts with the non job event.
- Notify Attendees: If checked, attendees will be notified via push messages on both mobile and desktop.
Note: Notifications will also be sent when there is a change in event schedule, assignment and address.
- Repeat: Select how often this non-job event will occur:
A. None (one-time event).
B. Repeats: Set the event to repeat daily, weekly, monthly, or yearly based on the scheduled date or day. If you choose to repeat the event, you will be prompted to specify when the recurrence should end.
B. Repeats: Set the event to repeat daily, weekly, monthly, or yearly based on the scheduled date or day. If you choose to repeat the event, you will be prompted to specify when the recurrence should end.
- Ends (mandatory): Choose either an end date or the number of occurrences after which the recurrence will stop.
4. After filling in the details, click the “Create” button. A new non-job event will be successfully created for the selected date and time, visible on the dispatch board and calendar next to the attendees.
Manage non-job event
Once the non-job event is created, you can view, edit, or delete it as needed. The event will appear in grey, with a ribbon on the left that is either striped or unstriped. The colour of the ribbon indicates the event’s category.
- A striped ribbon indicates the attendees are available.
- No stripes indicate the attendees are busy.
Edit non-job event details
To view and edit a non-job event, follow these steps:
1. Select the specific event on the calendar or dispatch board. This will open the non-job event details on the right, showing all relevant information.

2. Click the ellipsis icon (three dots) at the top right of the page and select "Edit” to update the event details. Alternatively, you can right-click on an event and choose the ‘Edit’ option.

2.a. If the event is part of a recurring series , a pop-up will appear, prompting you to choose one of the following options:
2.a. If the event is part of a recurring series
- Update this event only: If you choose this option, the changes will apply only to this particular instance.
- Update this and upcoming events: If you choose this option, all subsequent events in the series will be updated accordingly.
3. After selecting the appropriate option, click the “Proceed” button to continue editing the event details.
4. Once you’ve made the necessary changes, click the “Update” button to save the updated event details. The changes will also be notified to the relevant attendees.
Note: When you update a single instance of a recurring event, that instance will no longer be part of the recurrence and will become a single event.
Delete non-job event
To delete a non-job event, follow these steps:
1. Select the specific event on the calendar or dispatch board. This will open the non-job event details on the right, showing all relevant information.
2. Click the ellipsis icon (three dots) at the top right of the page and select "Delete.” A confirmation pop-up will appear. Click “Delete” to proceed. Alternatively, you can also right-click on an event and choose the “Delete” option.
2.a. If the event is part of a recurring series  , a pop-up will appear, prompting you to choose one of the following options:
- Delete this event only: Deletes only this specific instance.
- Delete this and upcoming events: Deletes this event and all future occurrences in the series.
3. After selecting the appropriate option, click the “Delete” button to proceed with deleting the event.
Non-job events on mobile
After creating a non-job event, attendees will receive a notification on their mobile device. From the mobile app, they can view the event details and delete the event as needed. Recurring events are indicated with a ‘recurring’ icon.
Note: If the event is part of a recurring series, users can only delete a specific instance and cannot delete the entire series.
Related Articles
How to access the Calendar/Schedule board in the Zuper web app?
Zuper's powerful calendar module provides a unified view of your entire schedule, including one-time and recurring jobs, non-job events, technician time-offs, and holidays. With its intuitive interface, you can easily navigate through different time ...How to create a Job on the Zuper Mobile app?
Jobs are the heart of the Zuper Mobile App. It is the core of all field service operations. In Zuper Mobile App, you can create a new job. Create a new Job: 1. Select the "Jobs" module from the top-left hamburger icon . 2. Select the "+“ icon from ...How to create and manage your PPM in the Zuper web app?
Planned Preventive Maintenance (PPM) is a proactive approach to maintaining equipment, machinery, or systems by scheduling regular inspections, servicing, and repairs before any issues arise. The goal of PPM is to minimize the risk of unexpected ...How to create a new job in the Zuper mobile app
Jobs are a critical part of field service operations. They involve step-by-step job creation and completion, providing significant relief for end users through on-time service. The Zuper mobile app makes it easy to create a new job. 1. Select the ...How to create a new AR (Account Receivable) invoice in the Zuper web app
An invoice is an accounting document that a field service business sends to its clients to request payment for the services rendered. Navigation: Accounting --> Invoices --> + New Invoice 1. Select the “Invoices” icon from the left navigation menu ...