How to access and manage timesheets in the Zuper web app?
The timesheets module in Zuper is designed to help track and manage field technicians’ work hours accurately and efficiently. This allows you to confirm when a technician reached the location and whether they navigated to the correct place.
Within the timesheet's module, the admins can perform various actions such as creating manual time entries, exporting timesheet reports, managing approvals, locations, enrollments, and more.
Creating manual time entry

Navigation: Timesheet -> + New Entry
To create a manual time entry, follow these steps:
- Click the “Timesheet” module from the left navigation menu and select “Timesheets."
2. By default, the list view displays attendance details for all field technicians, including the authentication picture and location of the activity, based on the selected date on the left.
3. Alternatively, you can switch to the summary view, which allows you to view attendance details for the selected team's users for up to seven days, as shown below:
4. However, to create a manual timesheet entry, return to the list view and click the "+ New Entry" button on the top right. A pop-up appears to create a new timesheet.
5. Fill in the following details in the pop-up and click "Create."
- Type of Entry*: Select the appropriate type of entry (Punch In, Take Break, Resume Work, Punch Out).
- Location*: Choose the predefined location from Zuper.
- Date: Pick the date using the date picker.
- Time: Specify the time for the entry.
- Assign Users*: Select the field technician to add the entry.
Note: The symbol (*) indicates that the field is mandatory.
6. The timesheet will be successfully created for the user(s).
7. After creating the timesheets, you can view details and edit or delete them. To do so, click the "ellipsis" icon under Actions and choose "View Details," "Edit Timesheet," or "Delete Timesheet" as needed.
Note: When you choose to edit the user timesheet, you can only update the date and time of entry as shown below.
Exporting timesheet reports
Navigation: Timesheets --> Export
You can preview and download the timesheets master report as an Excel file. To do so, follow these steps:
1. Click the "Export" button at the top right. You will be redirected to the Reports page.
2. Use the date picker to select the preferred start and end dates and, if necessary, use the "Advanced Filter" option to filter specific entries based on type, team, and location.
3. Once you have set the preferred date range and applied filters, click “Generate Report.”
A preview of the report will be generated on the right.
A preview of the report will be generated on the right.
4. Click “Download Report” at the top-right of the preview. The report will be exported successfully to your computer as an Excel file. 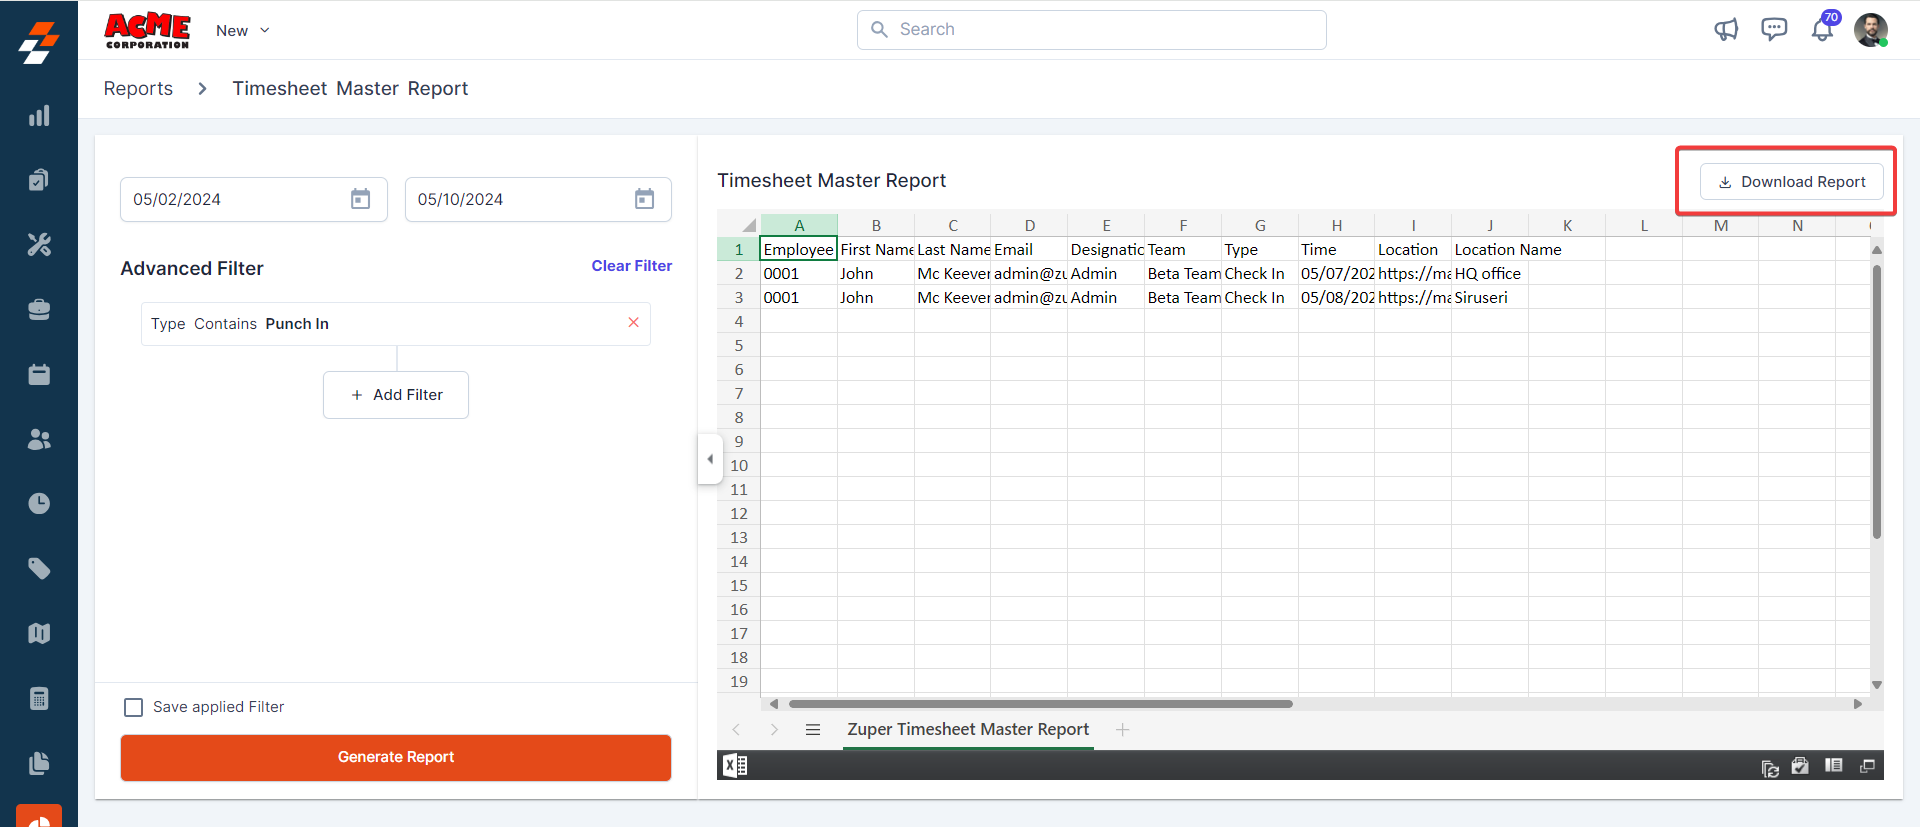
Manage timesheets approvals
Navigation: Timesheets--> More Actions--> Timesheet Approval
Timesheets approval in the timesheets module allows you to review and either approve or reject timesheets approval requests submitted by the user(s). Additionally, you can create a new timesheets directly from here.
View timesheets approval request
To view and approve/reject timesheets approval request submitted by the user(s), follow these steps:
1. Select "Timesheets Approval" under More Actions in the Timesheets module.
2. You can view the timesheets approval request submitted by user(s), which includes details such as approval period, total work hours, total break hours, current status and more.
3. To approve or reject the pending timesheets request submitted by the user, click the "ellipsis" icon under Actions and select "View Details."
4. You can view the detailed information, including:
- Total Work Hours: The total time worked by a user.
- Shift Hours: The duration of the assigned shift.
- Work Hours: The actual working time of an employee.
- Total Break Hours: The cumulative duration of breaks taken.
- Overtime Hours: The additional working time beyond regular hours.
- Time Off Hours: The duration of time taken off from work.
Based on these information, you can either approve or reject the timesheet approval request submitted by the user.
Note: The total work hours are calculated using the Work Hours + Overtime Hours summation.
Create new timesheets approval
To create a new timesheet approval, follow these steps:
1. Select "Timesheet Approval" under More Actions on the Timesheets listing page.
2. You can view the timesheet approval request submitted by user(s), which includes details such assuch as approval period, total work hours, total break hours, current status and more.
3. To create a new timesheet approval, click "+ New Timesheet Approval" at the top right corner. A small dialog box appears.
4. Enter the following details in the pop-up and click "Create" to submit a new timesheet approval.
- From Date*: Select the start date for the timesheet.
- To Date*: Choose the end date for the timesheet.
- Choose a team*: Select the team to which the user belongs.
- Choose User*: Based on the selected team, choose the user whose timesheet requires approval.
- Remarks*: Add remarks related to the timesheet approval.
Manage locations
Navigation: Timesheets--> More Actions--> Manage Locations
Manage Locations in the Timesheets module allows you to view existing and create new locations where employees can record their work hours or activities. Here's how:
1. Select "Manage Locations" under More Actions on the Timesheets listing page.
2. The Locations listing page shows the location names, radius in miles, location and more.
3. To create a new location, click "+ New Location" at the top right corner of the page. A dialog box appears.
4. Enter the following details in the pop-up and click the "Save Location" button to add a new location.
- Location Name*: Enter the location name.
- Location Geo-Fence Radius (in M)*: The exact geo-fence radius of the location.
- Address*: Enter the address details.
- Location*: Use this option to pick the location from the map.
5. Once the location has been created, you can edit or delete it. To do so, click the "ellipsis" icon under Actions and choose "Edit Location" or "Delete Location" as needed.
Manage enrollments
Manage Enrollments in the timesheet module allows you to view existing and create new enrollments for the user.
Navigation: Timesheet--> More Actions--> Manage Enrollments
1. Select "Manage Enrollments" under More Actions on the Timesheets listing page.
2. You can view details such as the user's name, work phone number, number of enrollments attached, and more.
3. To view the enrollments attached to the user, click the "ellipsis" icon under Actions and choose "View Enrollments."
4. To upload a new enrollment to the user, click the "ellipsis" icon under Actions and choose "+ New Enrollment."
Note: You can only attach one image with a maximum file size of 20 MB
Quick Actions
From the Timesheets listing page, you can also perform quick actions such as viewing defaulters, applying filters, searching for users, and more.
View defaulters
The defaulters are the users who have failed to submit their timesheets or have discrepancies in their recorded working hours compared to the expected or required hours. To view the defaulters, follow these steps:
- Click the “Timesheets" module from the left navigation menu and select “Timesheets."
2. By default, the list view displays attendance details of all users, including the authentication picture and the location where the activity was conducted, based on the selected date on the left.
3. To view defaulters, click the 'Defaulters' button at the top right for the selected date.
Apply Filters
The Filter option allows you to apply multiple filters based on a specific field type. To do so, follow these steps:
1. Click Filter>> + Add Filter from the list view of the Timesheets listing page.
2. Choose the specific field type (type, location, or team), apply conditions, and click the "+" icon to add this filter. You can also add multiple filters by clicking the "+ Add Filter" button.
3. After applying the filters, click the "Apply Filter" button to view the result.
4. To remove the applied filter, click Filter>> Clear Filter.
Search
The Search bar allows you to quickly search a specific user's timesheet from the listing by entering their name, email ID, phone number, and more.
Navigate and adjust the page display
1. The bottom panel allows you to navigate and adjust page display, i.e., you can choose the number of items to be displayed per page and navigate between pages using the left and right arrows.
2. You can also quickly navigate to a specific page instead of using arrows. To do so, enter the page number in the "Goto" option at the screen's bottom right corner.
Timesheets feature reduces administrative overhead and minimizes errors. This tool also allows for better resource planning and helps ensure compliance with labor regulations. Overall, Timesheets in Zuper enhance operational efficiency and provide valuable insights into workforce management.
Related Articles
How to access and manage your technician's shifts in the Zuper web app?
Shift management involves planning, tracking, and managing users' shifts. With Zuper, you can easily view user shifts, plan and schedule new ones and track existing ones in real-time. Navigation: Timesheets --> Shifts Viewing user shifts To view user ...How to access and manage timesheet in the Zuper mobile app?
The timesheet module in Zuper is designed to streamline the management of employee work hours. It allows you to efficiently track and document time entries, making it easy to monitor work hours for auditing purposes. This module is essential for ...How to access and manage time off requests in the Zuper web app?
Time-off requests are submitted by users when they need to take leave for reasons such as illness or personal matters. As an admin in Zuper, you can not only view and manage these requests but also submit time-off requests on behalf of users. You can ...How to manage your customers' assets / installed base in the Zuper web app
Any item purchased by a company as a product and, when distributed to a customer service location to fulfill a job, contract, or service agreement, is referred to as an asset. Additionally, the asset can either be owned by the customer or by the ...How to access and manage transfer orders in the Zuper web app?
You can manage Transfer Orders from the details page. Access the Transfer Order details page directly after saving an order or from the Transfer Order listing page by clicking the Transfer Order number, From Location, or To Location. Navigation: ...