The
Job details page lets you view the complete information of the job and all its
associated records in a single place. From the job listing page, you can click
any one of the Job’s title or Job No. to go to the job details page.

Navigation: Jobs -> Jobs Listing page--> Job Details page
Accessing job details page
1. Select the "Jobs" module from the left navigation menu. You'll land on the jobs listing page.
2. Click the "Job Title" or "Job No." of the job for which you need to view the job details.
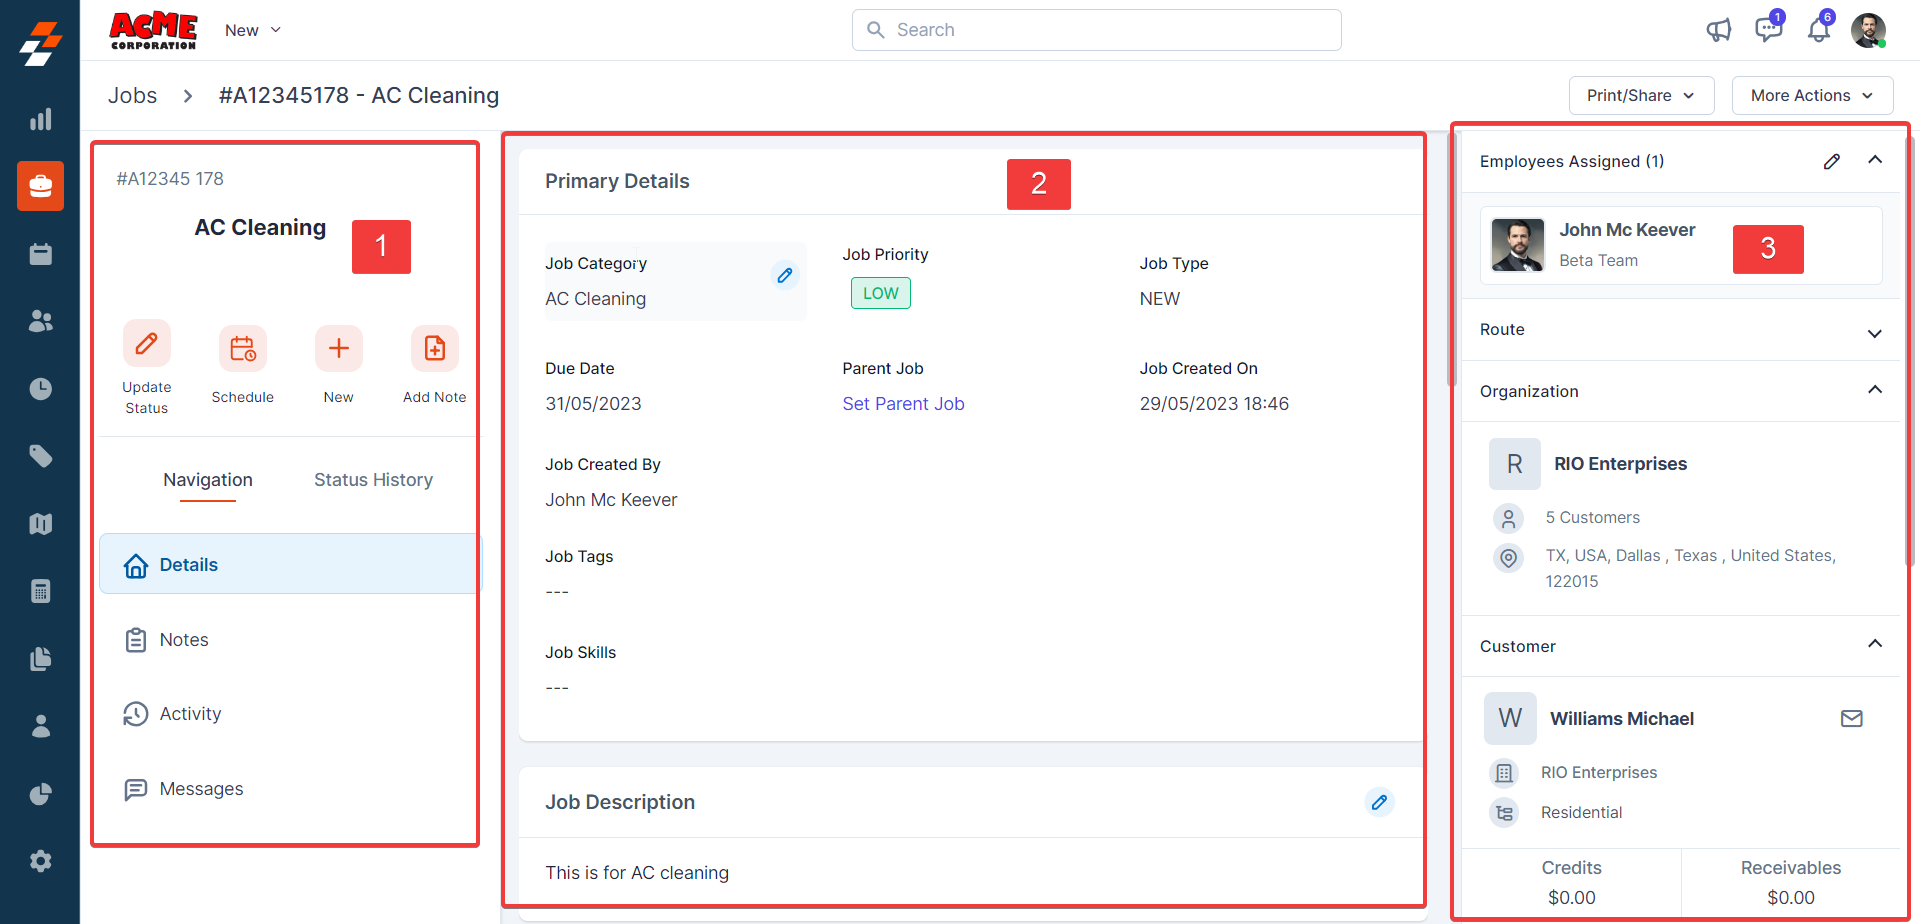
The selected Job details page appears with a three-column layout with information & actions available
in each pane for quick access.
Managing job details
Left panel –
The left pane contains the job/work order no., job title, scheduled date & time (if the job is scheduled). Following this information, you can notice the quick actions bar, which offers you
contextual action buttons such as Update Job Status, Schedule Job, Add a Note,
create a Quote, etc,.
Below
the quick actions bar, you can find the Job details navigation menu and the
status history.
Update job status
Job statuses are stages / checkpoints
within a job that can be updated by the Field Technicians and other back-office
users such as Dispatchers, and Supervisors.
Note:
Administrators can setup the master statuses, dependencies and associated
checklists from the Settings page.
1. Click the "Update Status" button on the quick action bar.
2. Select the status you want to update from the "Update Job Status" drop-down box.
3. click the "Update Status" button once you choose the status. You may be prompted with the
checklist to be filled in case it is configured under Settings.
4. Click the "Update" button to confirm the status update change.
5. The status is updated successfully.
6. If you want to delete the status, click the  icon and select the "Delete Status" option.
7. Enter the "Reason" and click the "Delete" button to delete the status.
8. You can also rollback the most
recent status update using the "Rollback" icon next to the status name.
9. Click the "Status History" to view the Job status history.
Update job schedule
1. Click the "Schedule" button, and a pop-up appears.
2. Schedule the job start and end date and time using the date picker, then click the "Update" button to update the schedule.
Note:
In case the job is associated with the route, you will also be prompted with a
“Remove job from Route,” which can be checked to dissociate the job from the
route.
Add new quote, invoice, and child job
1. Click the "+" button and you have the option to select and add "New Quote, New Invoice, or New Child Job."
View and update job details
Using the navigation menu, you can navigate to the various sections of the job, including Details, Notes, Activity, and Messages.
The project details section gives you an overview of all the job-related details. It includes primary information such as job category, priority, scheduled date, and tags associated with the job, along with job service/billing address and other details, which include job-specific custom fields.
1. C
lick the " " icon to modify any of the existing details.
 Note:
If you cannot access the edit icon, please check with your Zuper administrator
to ensure you have edit privileges for Job.
Update job notes
Job notes are comments or information that are added to a job over its course. These job notes add more context to the job. Your notes can be anything ranging from a simple text reminder to an image of the item service and video or document. All added notes can be viewed under the Notes Section in the middle pane of the Job Details Page.
1. Click the "+Add Note" to add the notes. You can use
the rich text editor to enter the note details. To tag a user to a note, you
can use @ and key in the name to tag the user.
2. You can attach various multimedia files such as image, audio, video, and document related to the job. Use the
“+” option to associate the notes with other modules such as customer,
property, etc,
3. You can also choose one of the following options for how you’d like the notes to be visible:
- Internal (Default) –
This privacy setting will help you make the note visible to all your Zuper
users in your account.
- Private – This note is visible only to
the user who created the note.
- Public - This privacy
setting will help you make the note public to all, including the Customer.
4. Click the "Post Note"
button to post the notes.
5. After posting the notes, you can sort them based on the newest or oldest.
Note: Job Notes can be edited or deleted only by
the user who created them.
View and write messages
The messages feature enables you to have real-time chat communication
within the job. The back-office team & the field executives can converse
without leaving the Zuper app. You can also add attachments such as images or
documents within the Messages section.
Messages with attachments:
Right pane -
In the right panel, you can assign user(s) to the job and associate this job with different modules including organization, properties, contracts and more.
Assign user
You can view the assigned users
/ field technicians or assign new users on the right panel of the job details page.
1. Click the "
" icon to modify the users assigned.
2. Click the "

" button to assign the users.
You can switch between "Teams" & "Users" to find the right technician. The search box lets you search
for the technicians using name, email, etc,. Incase the job has skillsets associated,
you can click on the filter icon to filter only the technicians who has the
required skills.
3. After assiging the user successfully, click the "Update" button.
View and update job timelog manually
You
can view and update assigned user(s) job time log manually.
1. Click the Job timelog entry
under "Timelog Summary." The timelog summary pop-up appears.
2. Click
the “+”
button to add the additional timelog entry.
3.
Choose the “Clock-in” and “Clock-out” entries from the Date and
Time picker. Click the “Create” button to add the time log entry.
4. The additional time log
entry is added successfully. You can also delete the entries, as needed.
View and link property to the job
1. You can associate a property to the job - either a new or existing property.
View and add child jobs
1. Click the "+" icon next to the "Child Jobs Associated" to create and associate the child job.
View and add quotes to the job
1. Click the "+" icon next to the "Quotes Associated" to create and associate the quote.
2. The job details will be copied automatically, and click the "Save as Draft" button to create the new quote.
3. The new quotation based on the job details is created successfully.
View and add invoices to the job
1. Click the "+" icon next to the "Invoices Associated" to create and associate the invoice.
2. The job details will be copied automatically, and click the "Save as Draft" button to create the new invoice.
3. The new invoice based on the job details is created successfully.
View and add contracts to the job
1. Click the "+" icon next to the "Contracts" to create and associate the contract.
2. The contract details will be shown, and click the "Choose a Contract" button to associate the existing contract.
View and add assets to the job
1. Click the "+" icon next to the "Assets Associated." A sidebar appears.
2. Choose the asset or you can
search & filter available assets and click the "Choose Asset"
button to associate the asset to the job.
3. The asset related to the job details is associated successfully.
Note: You can also associate the orphan assets with the job. Click on "X" icon next to the customer name to clear the customer
filter and choose the assets.
Print and Share Job Card
1. Click the "Print/Share" option from the top right corner of the job details page to choose the "Print/Save as PDF" action.
2. A "Print/Save Job Card" pop-up appears. Select the job template and click the "Print" button.
Note: Incase you are not view any templates in the dropdown, please ensure to create & map the Job card template to the respective Job category.
3. Similarly, to share the job card over the mail, click on “Share via email” from dropdown. The email field will be automatically copied from the Service address. You can also use the CC & BCC to add any additional recipients to the email. Click the "Share" button to share the job card via email.
4. The Job card is successfully sent to the customer.
More Actions
Under the More actions section, you can perform various actions including create a new child job, clone job, update description, update common fields, assign to route, and delete job.
Clone job
The existing job can be created as a replica using the clone job option. All the information will be copied in the new job page, and you can modify the required information and click on create job.
Update description
You can update the Job description using the "Update Description"
option. After updating the description, click the "Update" button to save the chnages.
Update custom fields
You can update the Job description using the "Update Custom Fields" option.
Delete
Note: The "Delete" option is only available to the Admin by default. If you would like to enable Delete access to any user with a Team Leader role, you can create a custom access role and turn on "Delete Job" permission in the Jobs module.
1. Choose the "Delete" option from the drop-down menu. A confimation pop-up appears.
2. Click the "Delete" button.
3. The job is deleted successfully.