How to access and manage contract details in the Zuper web app?
The Contract details page lets you view the
complete information of the contract and all its associated records in a single
place. From the contract listing page, you can click any one of the contract
names to go to the contract details page.
 Navigation: Contracts -> Contracts listing page
1. Select the "Contracts" module from the left navigation menu.
2. Click the Contract to view the Contract details.
3. The Contract details have a three-column layout
with information & actions available in each panel for quick access.
Left Panel
The Left panel contains the contract-related details. Following this information, you can notice the quick actions bar, which offers you contextual action buttons such as mailing the customer and add notes.
Below the quick actions bar, you can find the
contact details, notes, jobs, and activities
Quick actions
1. The Users can contact the organization or customer via the Mail button.
2. Click the "+ New" button to create a new Job or new quote from the contracts module.
3. Click the "+ Add Note" button to create a new note.
You can use the rich text editor to enter the note details. Contract Notes are comments or information that are added to an contract module over its course. These notes add more context to the Contract. Your notes can be anything ranging from a simple text reminder to an image of the item service and video or document. All added notes can be viewed under the Notes Section in the left panel of the Contract Details Page.
You can use the rich text editor to enter the note details. Contract Notes are comments or information that are added to an contract module over its course. These notes add more context to the Contract. Your notes can be anything ranging from a simple text reminder to an image of the item service and video or document. All added notes can be viewed under the Notes Section in the left panel of the Contract Details Page.
3.a. You can also associate the notes with different modules. Use the “+” option to associate the notes with other modules such as customer, property, etc.
3.b. Note Visibility:
- Internal (Default) – This privacy setting will help you make the note visible to all your Zuper users in your account.
- Private – This note is visible only to the user who created the note.
- Public - This privacy setting will help you make the note public to all, including the end customer through the Customer Portal.
Click the "Post Note" button to post the notes.
3.c. The note is created successfully.
3.d. You can sort the notes based on the newest or oldest of creation.
Contract details
1. Select the "Details" section to view all the contract-related details that cover primary details and other details (This will have Contract-specific custom fields).
2. Select the "Notes" section to view all the notes created for the contracts. You can also create new notes and manage them.
You can change the "Notes Privacy, Edit Note, and Delete Note."
Note: The edit and delete options are available only for the user who created the note.
3. Select the "Parts & Services" to view the parts & services linked to the respective contract.
4. Select the "Jobs" section to view all the associated Jobs with the Contract.
Note: You can click the "Job Title" or "Job No." to view the job in detail. 5. Select the "Activity" to view the list of actions performed within the contracts module.
Right Panel
The right panel contains the other module details that are interlinked with the contracts module.
View organization linked to the contract
1. You can view the organization linked to the Customer.
View & Add customers to the contract
1. You can view and add the customer here. To create and associate the contract with any of the customers of the selected organization, click the "+" icon next to the "Customer."
2. The "Choose Customer" side panel appears, From the "Existing Customers" section, Select the "Customer" to add the Customer.
Note: If you want to create a new Customer, click "New Customer" tab.
3. The customer details are added to the contract successfully.
View and add properties to the contract
1. You can view and add properties of an org/customer to the Contract.
View approval history
1. You can view the contract approval statuses.
View invoice history
1. You can view the invoice history statuses.
Once the invoice is sent as per schedule, the invoice status will be automatically updated to "Sent" and you can click to go to the invoice details
View & add assets to the contract
1. You can add and view assets associated to the contracts here.
To add an asset, click the "+" icon next to the "Assets Associated."
To add an asset, click the "+" icon next to the "Assets Associated."
2. The "Choose Asset" side panel appears. Select the "Asset" to be added to the contract.
3. The asset details are added to the contract successfully.

View and add new PPM to the asset
You can view the PPMs associated with the assets added to the contract or add a new PPM as needed.
To add a new PPM, click the "+" icon next to "PPM." A sidebar will appear to create a new PPM.
To add a new PPM, click the "+" icon next to "PPM." A sidebar will appear to create a new PPM.
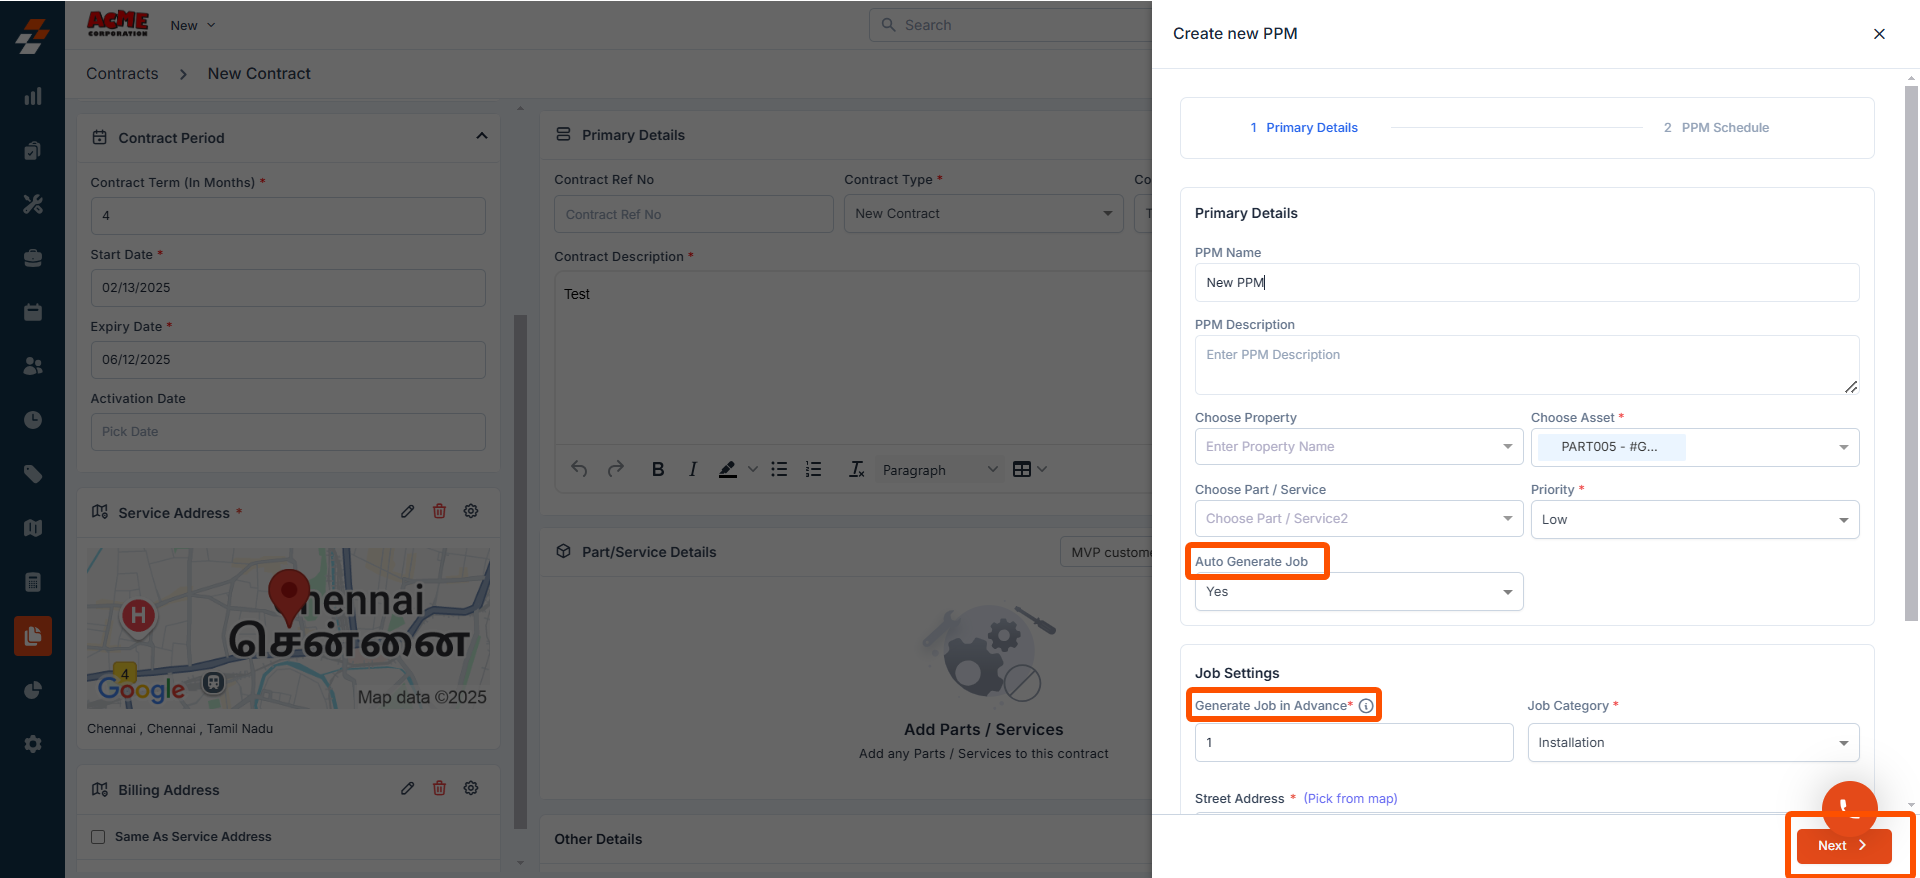
Primary Details
Fill in the following primary details:
- PPM Name: Enter a name for the PPM.
- PPM Description: Provide a brief description of the PPM.
- Choose Property (Optional): Select a property of an org/customer to associate with the PPM.
- Choose Asset (Mandatory): Select one or more assets for which you want to create a new PPM. You can choose assets currently associated with the contract or any other existing assets, as needed.
- Choose Part/Service (Optional): Select a part or service associated with the contract to include in the PPM.
- Priority (Mandatory): Select the priority from the drop-down list. Options include Low, Medium, and High.
- Auto Generate Job (Optional): By default, it will be set to "No." If you want to auto-generate a job based on the PPM, select "Yes."
Additional Details for Auto-Generated Jobs:
If you select "Yes" for “Auto Generate Job,” you will need to provide the following details:
- Generate Job in Advance: Set how many days before the scheduled date the job should be created automatically.
- Job Category: Choose the job category from the drop-down list.
- Street Address: Click "Pick from Map" to fill in the street address information.
After completing the primary details, click the "Next" button to proceed to the scheduling step for the PPM.
PPM Schedule
1. Provide the following details to schedule:
- PPM Start Date: Select the start date of the PPM.
- PPM End Date: Select the end date of the PPM.
- Recurrence: Select how often this PPM should occur—Daily, Weekly, Monthly, Yearly, or Custom.
- Schedule Dates: These dates are automatically populated for upcoming schedules (service dates) based on the chosen recurrence.
Once done, click the “Create PPM” button.
2. A new PPM will be created and added to the contract successfully. After creating a PPM, you can edit/delete as needed by clicking the kebab icon (three dots) next to it.
 Note: You can also create a new PPM directly under the "Asset Associated" column after adding an asset. Once the PPM has been created and associated with this contract, you can view it under the "PPM" section.
More Actions
1. You share the contract PDF via email or save as a PDF.
2. Under the More Actions section, you can perform various actions, such as- Edit Contract, Renew, Clone, and Deactivate.
Edit Contract
1. Choose the "Edit Contract" option to modify the contract details. After updating the details, click the "Save Contract" button to save the changes.
Note: When editing a contract, you cannot add a new PPM; you can only view the existing ones.
Renew Contract
1. Choose the "Renew" option.
2. Modify the expiry date date. Click the "Save Contract" button to renew the details.
3. The contract is renewed successfully.
Note: You can "Approve" or "Reject" the contract.
Deactivate Contract
You can deactivate the contract temporarily, and later, you can activate them.
Note: Once you deactivate the contract, you will get an option to either delete or re-activate the contract again.
Related Articles
How to access and manage the customer portal ?
How do you manage the customer portal settings in the Zuper Web App? How to enable / disable customer portal for individual customers? Enable Customer Portal Access by Default: It is now easy to provide access to the customer portal in a single ...How to create a new contract in the Zuper web app?
The service contract is the service agreement between the business and the customer, which lists down services that need to be performed, timeline, and other vital information. By choosing the "Contract Package" helps you to auto-fill all the key ...How to access and manage quote details in the Zuper web app?
The Quotation details page lets you view the complete information of the quotation and all its associated records in a single place. From the quotation listing page, you can click any one of the Quotation No. to go to the quotation details page. ...How to access and manage your AR invoice details in the Zuper web app?
The Invoice details page lets you view the complete information of the invoice and all its associated records in a single place. From the invoice listing page, you can click any one of the Invoice No. to go to the invoice details page. Navigation: ...How to access and manage asset details in the Zuper web app?
Any item purchased by a company as a product and, when distributed to a customer service location to fulfill a job or contract is referred to as an asset. It can either be owned by the customer or by the company itself. You can explore the asset ...