Dispatch board- Deep dive into dispatcher queue
A dispatcher
queue is one of the important layouts on the dispatch board that helps you (dispatchers) identify and prioritize
pending jobs/routes, assign them efficiently, and monitor their progress.
 Navigation: Dispatch Board --> Settings
In Zuper, the
dispatcher queue has been broadly
categorized into two dispatching streams – “Jobs”
& “Routes”. This provides the
flexibility to choose the stream that best suits your business needs.
The key
guiding factors are:
1. Jobs
Stream: Ideal for businesses primarily driven by the
availability of technicians, rather than technician travel. The objective here
is to directly assign/schedule jobs to
technicians based on their availability (drag & drop to the schedule)
and geographical location of the jobs e.g., proximity of a new job from the
existing ones.
2. Routes
Stream: Suited for businesses where technician travels are
extensive. The objective here is to directly assign the routes to technicians based on their availability (drag
& drop to the schedule), followed by assigning jobs to the scheduled route based on the route capability and proximity of a job to an existing route (drag
& drop to an existing route within the schedule).
Note:
When businesses decide on the “Routes” stream, scheduling or assigning a job
cannot commence without first assigning a route to the technician.
As a business user, it is essential to identify your specific
needs and select either the “Jobs” or “Routes” stream before
delving into the dispatching features of Zuper.
Assigning/Scheduling a
Job to an Available Technician
Assign jobs to technicians by balancing not only the technician's schedule but also, the geographical proximity of the job to other jobs - enabling your ability to cluster job assignments.
However, to assign the job to an Available Technician, you first need to identify the pending jobs. Here's how:
To view pending jobs and assign/schedule to the available technician, choose the “Jobs” dispatching stream.
However, to assign the job to an Available Technician, you first need to identify the pending jobs. Here's how:
To view pending jobs and assign/schedule to the available technician, choose the “Jobs” dispatching stream.
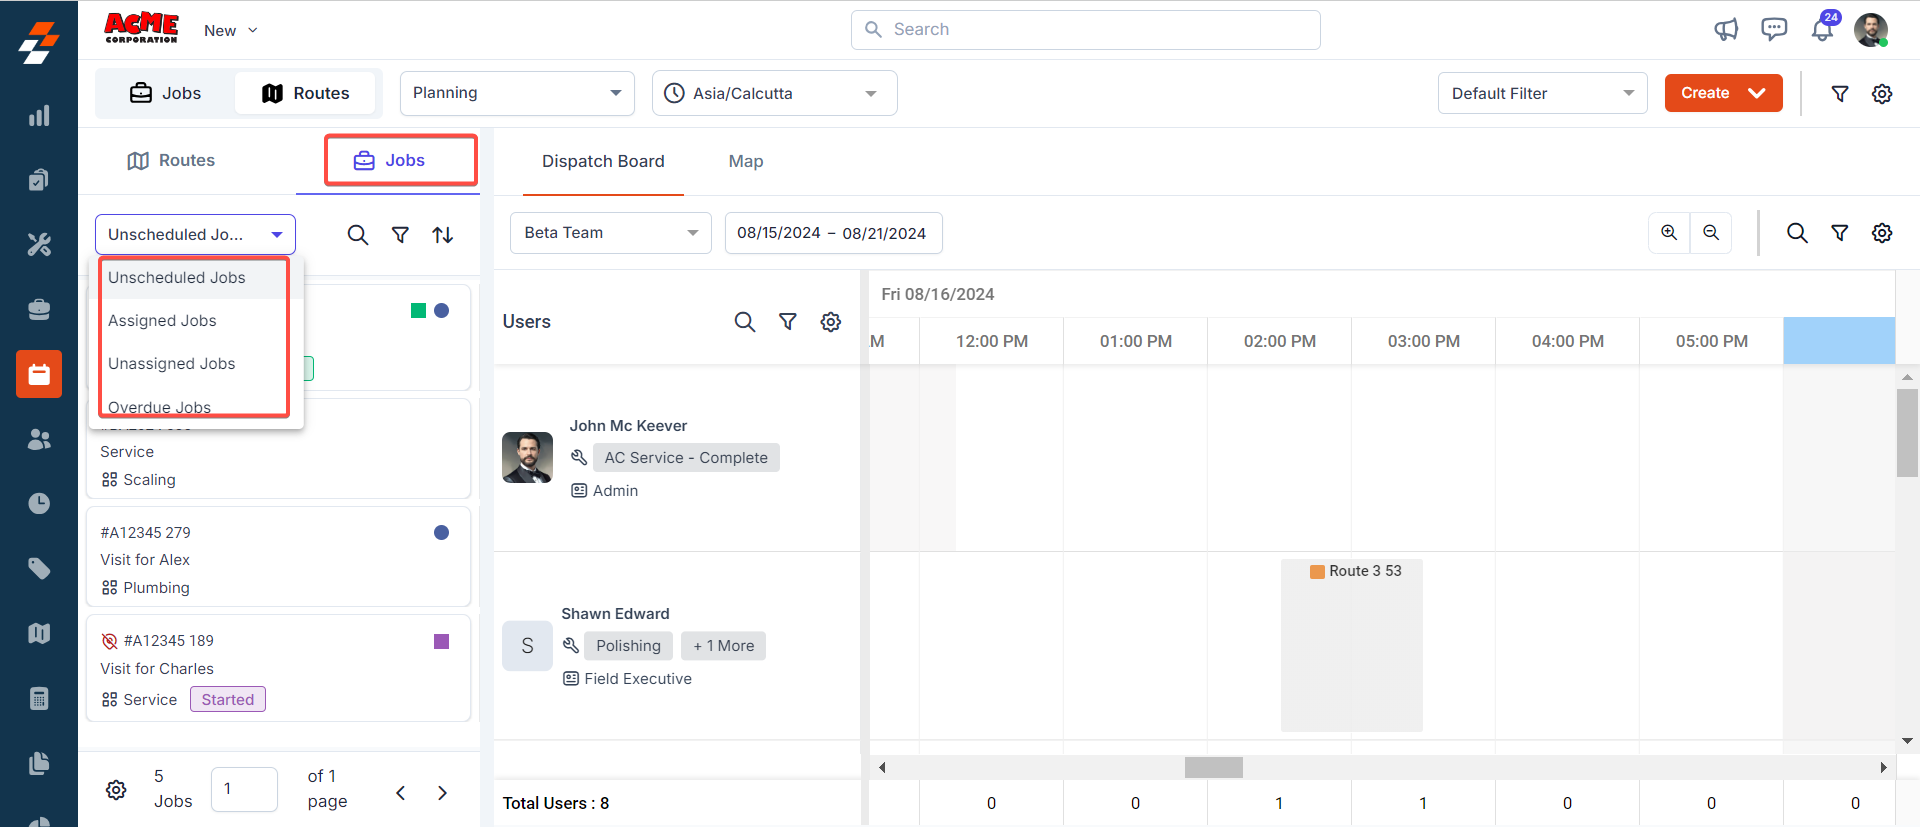
You can
view the list of jobs on the dispatcher queue based on the selected job type
from the dropdown menu. The job type includes:
Job Types | Description |
Unscheduled Jobs | These are the jobs that have not yet been scheduled, i.e., there is no start and end time for the job to be performed by the technician. |
Assigned Jobs | These are the jobs assigned to a specific technician at a given time. This contains jobs of all statuses, such as on my way, started, completed, and so on. |
Unassigned Jobs | These are the jobs that have not yet been assigned to any technician. |
Overdue Jobs | These are the jobs that have passed their due date and still need to be completed. |
Once the job has been shortlisted, you can assign/schedule
the job to the available technician. To do so, follow these steps:
1. Select the "Team" and "Date" when you need
to schedule the job. Based on the team selected, you can view the technicians within
the team and their availability for the selected date in the scheduler.
2. Depending on the technicians availability, simply drag and drop job from the dispatcher queue onto an available technician (from a selected team) in the scheduler, where you’ll be asked to provide the start and end date and time to schedule/reschedule the pending jobs.
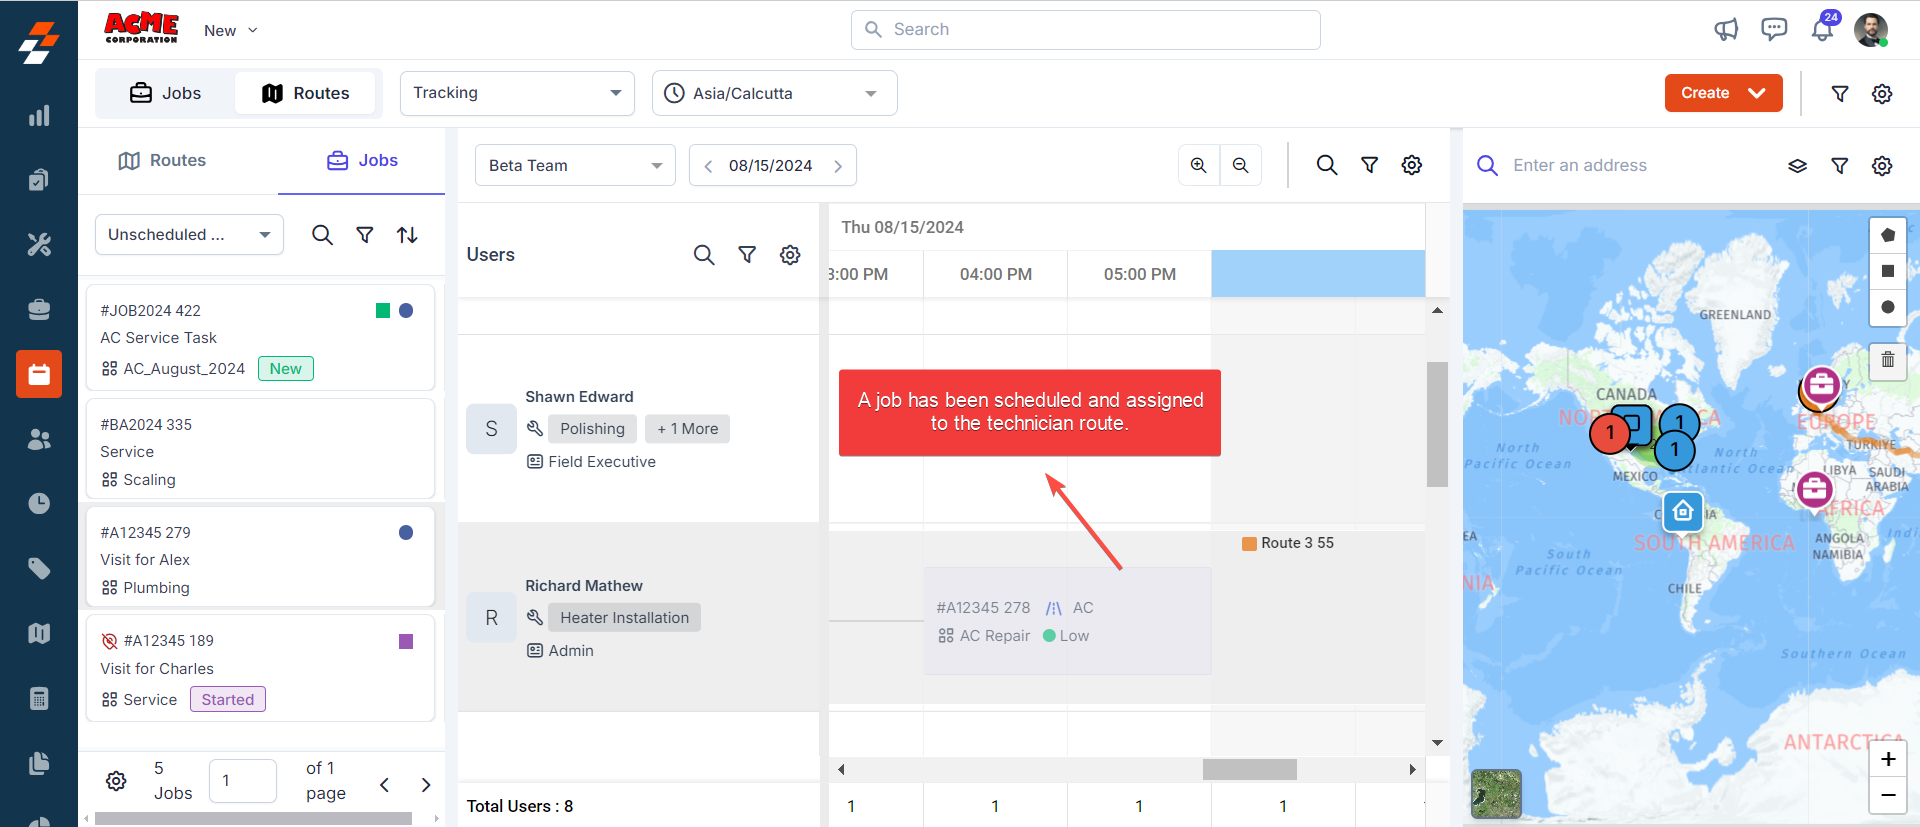
3. Once the job has been assigned, the
field technician gets notified to get the job done on the set date and time.
You can also view the job location on the map by right clicking the job in the
scheduler and selecting the 'Show on Map'
option.
Note: Simultaneously, you can view locations of shortlisted jobs from the Dispatcher Queue and jobs assigned to technicians in the Scheduler on the map. You can also assign the technician to the job directly from the map.
Assign Unassigned Route to the Available Technician (Tracking View)
Informed assignment of routes to the right technicians with consideration for their schedule viz., shift/business hours, time-off etc.
Unassigned Routes refer to predefined pathways that have not yet been allocated to a specific technician. From the dispatch board, you can assign an unassigned route to an available technician based on their availability and proximity to current jobs/routes for the selected date.
Unassigned Routes refer to predefined pathways that have not yet been allocated to a specific technician. From the dispatch board, you can assign an unassigned route to an available technician based on their availability and proximity to current jobs/routes for the selected date.
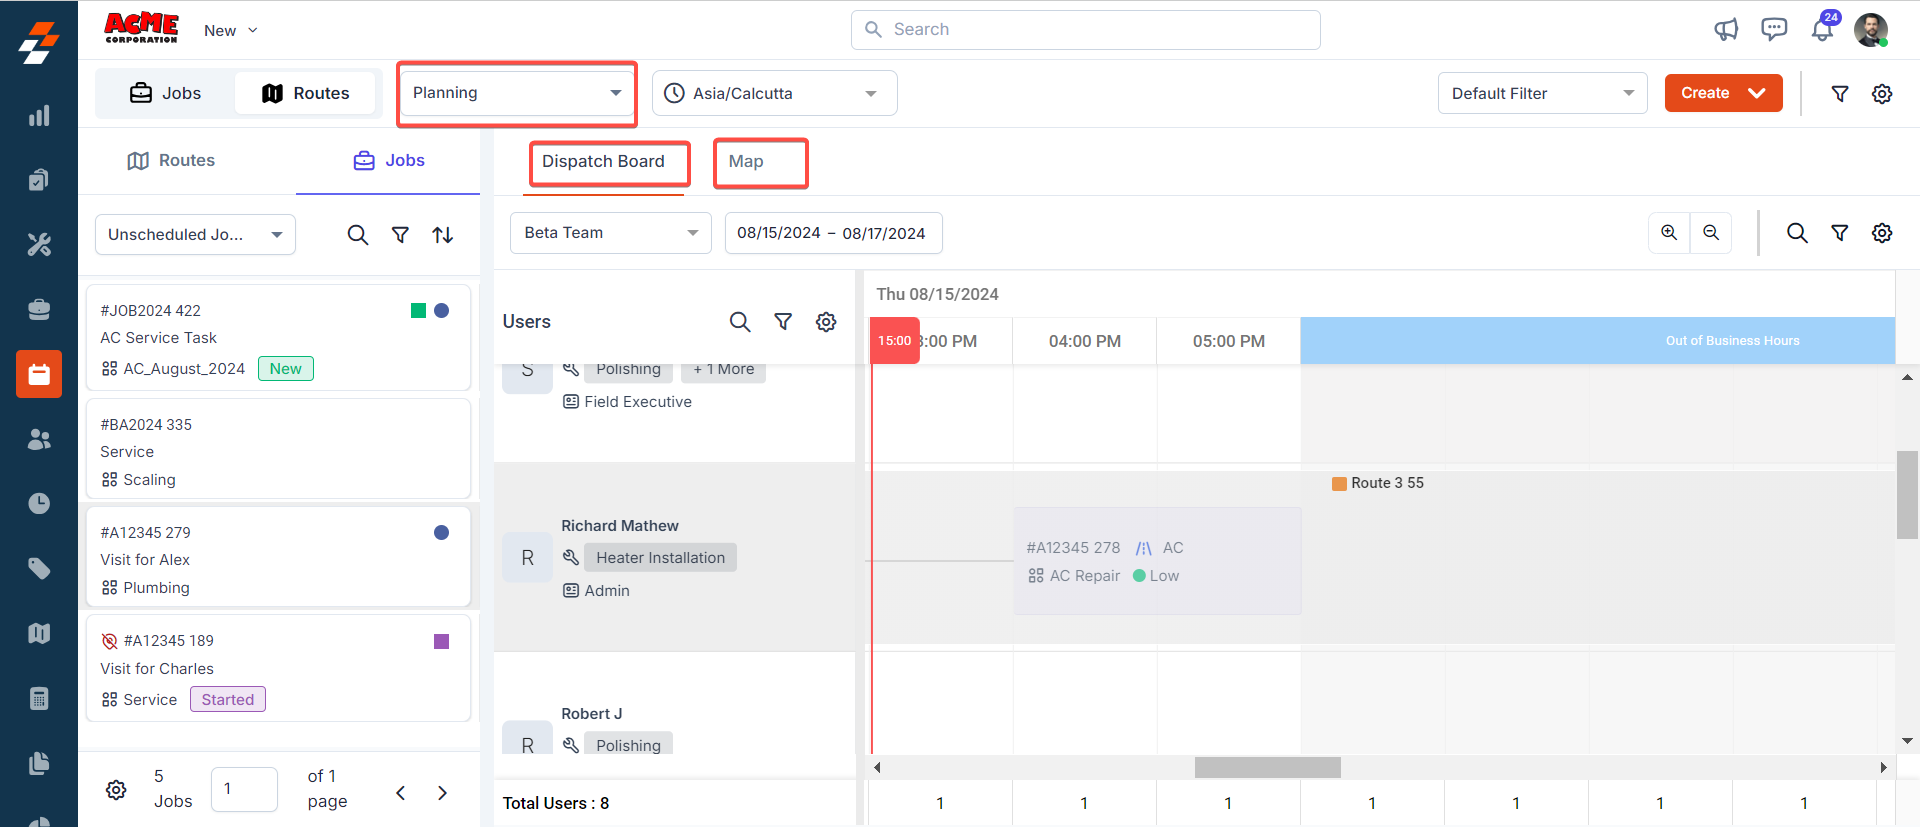
To view unassigned routes and assign to the available technician, choose the “Routes” dispatching stream.
This stream is divided into two sections: Jobs and Routes in the dispatcher queue. Additionally, you have dedicated options such as Tracking and Planning (available next to the Routes).
Tracking | Planning |
This is the default view when switched to “Routes” stream that enables you to track all the jobs & unassigned routes for a specific day leveraging the powers of both scheduler and maps in parallel. Note: In tracking view, you cannot select dates beyond tomorrow; you can choose and track until next day, today and previous dates scheduled routes and jobs within a route. | This allows you to plan routes well in advance. You can create a route for the future and assign jobs for multiple weeks/months in advance. Note: In planning view, you will have the flexibility to change the dates and months as needed. This allows you to plan and create routes well in advance. |
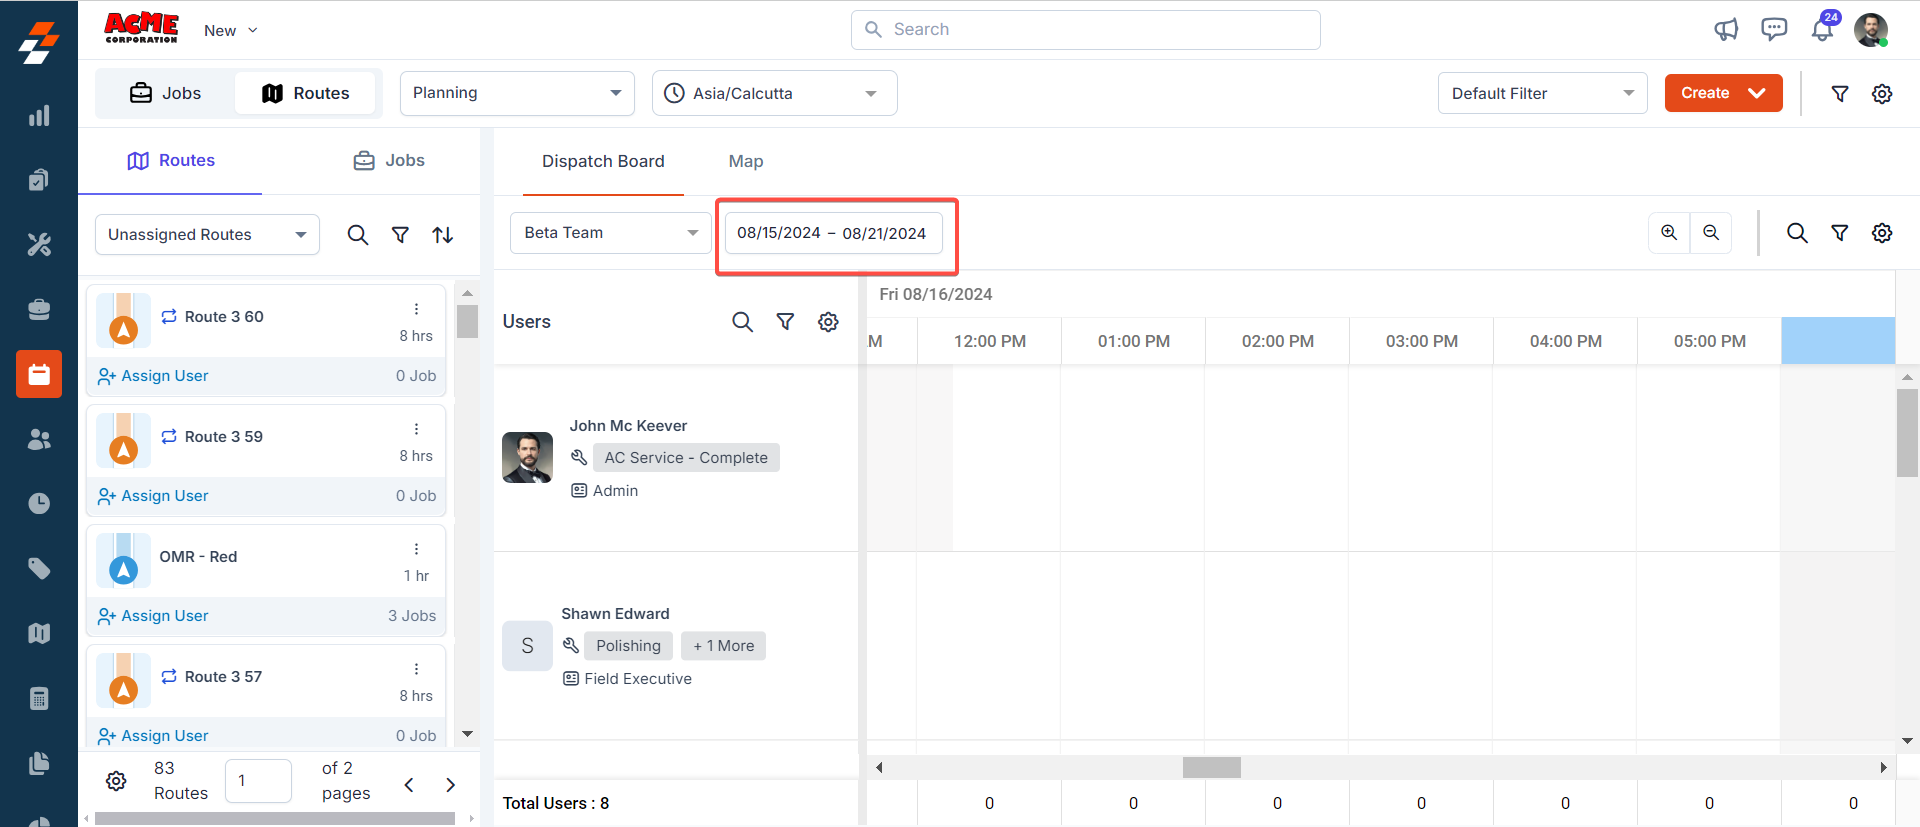
To assign unassigned routes, follow these steps:
1. Select the “Routes” section under the “Routes” stream in the dispatcher queue.
1. Select the “Routes” section under the “Routes” stream in the dispatcher queue.
2. You can view all the unassigned routes in the dispatcher queue and track their location on the map as well.
In addition to this, you can also track the following on the map:
|
3. Select the "Team" and "Date" for scheduling the route. Based on the team selected, you can view the technicians within the team and their availability for the selected date in the scheduler.
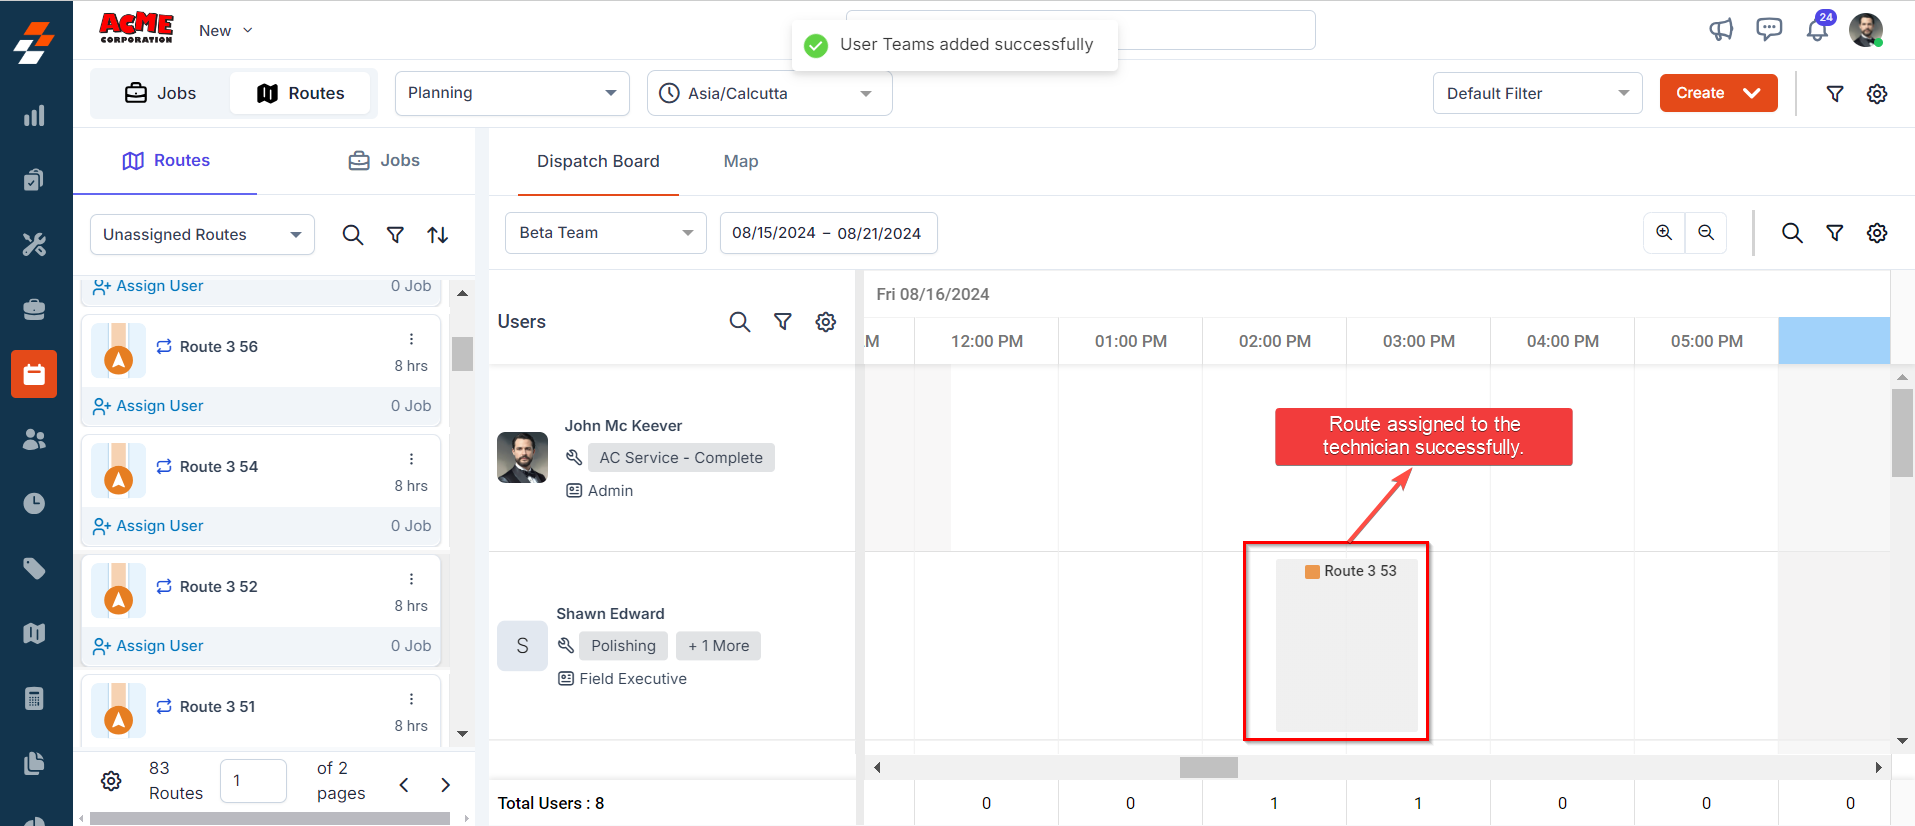
4. Depending on technician availability, you can assign any unassigned route from the "Unassigned Routes" section by either clicking "Assign User" in the dispatcher queue or dragging and dropping the route next to the technician in the scheduler with the right consideration of their availability and proximity to current jobs/routes for the selected date.
5. The Route will be assigned successfully to the technician for the selected date.
6. After assigning a route to the technician, you can reschedule the route, view the location of the route on the map and more by right clicking the assigned route in the scheduler.
7. You can also access various details by clicking on the route, such as:
- Primary Details: This includes the route color, mode of transport, route type, and no. of. Jobs were assigned to that route, technicians were assigned, and so on.
- Jobs: This includes the jobs that are added to that route. You can also choose to add/remove a job from this route and assign to another route.
In addition to viewing this information, you can also easily perform several actions by using the quick action icons located at the top right corner of this page. These actions include locking a route, assigning a user, editing, deleting, and cloning routes.
Note: When you lock the route, you won't be able to update it. This means you can't change the route location, reschedule, add more jobs to the route, or reorder them until it is unlocked.
Assigning Job to the Technician Route
Efficiently assign multiple jobs to a route by balancing key factors such as overall route duration, job schedules, and total travel time between jobs based on the mode of transport (e.g., car, truck, semi-truck). This can be done using either the scheduler or the map.
Using the Scheduler:
Once a route has been assigned to an available technician, you can add jobs to the route by dragging and dropping them. Prioritize jobs that are geographically close to minimize travel time.
To assign a job to a technician's route using the Scheduler view, follow these steps:
1. Under the Routes stream, click "Jobs" section on the dispatcher queue and shortlist any of the jobs from the dropdown menu.
2. Once shortlisted, choose an appropriate job that aligns with the route duration and drag and drop it onto the technician assigned route for the selected date.
Note: You can also reschedule the job duration while assigning to the technician's route.
3. The job will be assigned to the technician route successfully. The field technician will then receives a notification to complete the job on the scheduled date and time on that route.
4. Upon successfully assigning a job to the technician's route, you can perform certain quick actions such as rescheduling job, assigning job to another route, removing job from the route and so on by right-clicking on it.
Using the Map:
The map view allows you to directly see the locations of jobs and routes, making it easier to assign jobs efficiently by considering geographical proximity, overall route duration, and existing jobs on the route.
You can assign jobs to the nearest route by drawing shapes around job locations or using the arrow pointer. Here's how:
1. Navigate to the Map Layout
Go to the Maps layout on the Dispatch Board.
2. Job Selection Tools
On the right side of the map, you’ll find tools that help you select job(s). These tools include:
Note: The tools will be visible only when you select the "Route" layer from the map.
Arrow Pointer
The intent of this option is to selectively choose few jobs amidst a cluster, considering various attributes such as status, schedule, technician assignment etc.
A classic example is an attempt to associate one of a recurring job instance (repeating at the same address) to a nearby route (or) a case where jobs of various schedules and statuses are in the location, and you want to assign only a selected few to a nearby route
1. Select the arrow pointer located on the right-hand side.
2. During the arrow select mode, job details are displayed on hovering over the job cards – This will help choose jobs based on their schedule, status, technician assignment etc.

3. Manually select individual job(s) on the map by clicking on them.
4. The order in which you select jobs using the pointer will determine the sequence in which they are added to the destination route.
Note: To unselect jobs, click "Clear selection" at the top of the map.
Shapes
The intent of this option is to select multiple jobs at once and assign them to a nearby, existing route. It’s useful when you have several open jobs clustered in a specific location and want to optimize technician travel.
1. Choose a shape from the available options (Pentagon, Rectangle, Circle) on the right of the map.
2. Click and drag on the map to draw the shape around multiple jobs at once. All jobs within the shape will be selected.
Note: To switch to a different shape and clear the current selection, click "Clear selection" at the top of the map.
3. Assign Jobs to a Route
Once jobs are selected, either with the arrow pointer or a shape:
1. Hover over the nearest route, which will be bolded when hovered over.

2. Click on the Route of your choice (based on its proximity to the selected jobs) to view its details – Name, Start Date & Time, Consumed Duration etc.
3. Based on the route details, select the route and click the "Add 'n' job(s) to route" button. A pop-up will appear.

4. Review and Finalize Job Assignment
1. A pop-up window will appear displaying details about the selected jobs, including job name, status, assignee and scheduled date and time.
2. Review the information, select the jobs you want to add to the route, and click the "Add 'n' job(s) to route" button to finalize the assignment.
Note: When you use an arrow pointer to select jobs, the job(s) will be added in the order they were selected. For example, if there are already 3 jobs in the route, the newly selected jobs will be added as the 4th, 5th, and 6th jobs in the sequence.
Plan and Schedule Route to the Available Technician (Planning View)
Enable advanced planning of routes and potential technicians ahead of weeks by leveraging this option - Offers early insights into schedules of teams and technicians viz., pre-planned route/jobs assignments, time-offs, shift/business hours etc.
In addition to tracking past/ongoing routes and jobs within it, businesses can plan to schedule job/routes to future dates based on the requirement. To do so,
In addition to tracking past/ongoing routes and jobs within it, businesses can plan to schedule job/routes to future dates based on the requirement. To do so,
1. Switch to “Planning” view in the Routes dispatching stream.
2. Once you switched to planning, you have two dedicated views “Scheduler” and “Map.”
Scheduler | Map |
This view is intended to plan routes/jobs with the right consideration for schedule of various teams & technicians across a date range. Hence the scheduler view takes precedence while leveraging this option. | This view is intended for dispatchers to plan routes/jobs with consideration for the location covered by existing routes. The idea is to enable adding jobs to routes that are proximate enough to existing routes. |
Using the scheduler view (dispatch board), you can plan, and schedule routes/jobs based on the availability of technician belonging to teams across a date range. To do so, follow these steps:
1. From the scheduler view, click the "Date" tab and choose the future dates.
Note: Future dates can only be selected within a week in a month.
2. Once the date is set, you can easily/visually identify the technicians and their available schedules across the selected date range (including non-business hours & time-offs) in the scheduler view.
3. Choose any of the unassigned routes under “Routes” section and drag & drop it next to the available technician in the scheduler.
Note: When dragging and dropping the route from the dispatcher queue to the available technician in the scheduler, you can schedule/reschedule the route start & end date and time.
4. The route will be assigned successfully to the technician for the future date.
Plan and Assign Jobs to Scheduled Routes
Assign and schedule jobs into routes that're scheduled and pre-assigned to technicians by balancing - overall route duration, jobs already assigned to the route and travel time necessary between jobs.
In addition to scheduling a route and individual jobs directly to a technician, you can also assign any of the jobs (be it assigned, unassigned, or unscheduled jobs) to a technician's route well in advance if the job is intended to be part of a route a technician is planned to carry out (this typically includes jobs that needs to be performed in the future or moved to future dates). This can be done using either the dispatch board scheduler or the map.
In addition to scheduling a route and individual jobs directly to a technician, you can also assign any of the jobs (be it assigned, unassigned, or unscheduled jobs) to a technician's route well in advance if the job is intended to be part of a route a technician is planned to carry out (this typically includes jobs that needs to be performed in the future or moved to future dates). This can be done using either the dispatch board scheduler or the map.

For instructions on how to assign jobs to a scheduled route, refer to the steps above. Please note, in this case, you will need to select the "Map" section next to the Dispatch Board to complete the activity.
Using Scheduler
1. Click "Jobs" on the dispatcher queue and shortlist any of the jobs from the drop-down menu.
2. Once shortlisted, drag and drop the job (job should be within the route duration) onto the technician's scheduled route for the future.
2. Once shortlisted, drag and drop the job (job should be within the route duration) onto the technician's scheduled route for the future.
3. The job will be assigned to the route well in advance.
Plan and Create Route Using Map
Using a map, you can locate all unassigned routes and plan routes/jobs based on location proximity of a job to an existing unassigned route or vice-versa. There are multiple ways through which Maps helps a dispatcher plan. Here’s how:
Note: You cannot schedule from this view. To schedule, you must switch to the schedule option in the planning section.
Map-based Route Planning:
The map-based route planning enables you (dispatcher) in more than one way:
- Create new routes by clustering jobs that are geographically proximate to one other, leveraging simple polygons drawn on a map surface - A perfect means to create routes that are extremely efficient; reducing technicians' overall time on road.
- Plan and associate jobs to existing routes that are nearest to it - Minimized travel & detour for a technician assigned to the route; thereby increasing the overall efficiency (no. of jobs per route/day) and customer experience.

From the image above, it's evident that the "#JOB2024422 AC Service Task" job is located near the "Job Route 405" route. With this recognition, you can efficiently plan and create a route to complete the job.
Map-based Route Creation:
As mentioned above, you can create new routes by clustering jobs that are geographically proximate to one other, leveraging simple polygons drawn on a map surface. here's how:
1. Choose any shape (circle, rectangle, pentagon) to plot an area on the map.
2. Once the shape has been chosen, drag and select the job(s). After selecting the job(s), click the “Create Route” button at the top right corner.
3. Provide route details such as route name, color, route type, star location, end location, etc., and click the "Create" button. The route will be created successfully for the selected job on the map.
Note: You can also delete the jobs or add more jobs to the route by clicking "+ Add Job" button.
By optimizing the scheduling and dispatching processes, this feature improves service delivery, reduces downtime, and ensures that technicians are deployed to the right locations with the right tools and information. Ultimately, the Dispatch Board in Zuper streamlines operations, leading to better customer satisfaction and increased productivity.
Related Articles
Overview of dispatch board
The dispatch board module in the Zuper web app provides a centralized overview of unassigned routes and all jobs, including those that are unscheduled, assigned, unassigned, and overdue, in one place, allowing you to act on them with a single click. ...Dispatch board settings
The Settings section in the Dispatch Board allows you to customize and optimize the dispatching process to meet your business needs. Navigation: Dispatch Board --> Settings Key settings include: Dispatcher Queue Settings The settings allow you to ...How to create and manage recurring routes in dispatch board?
The 'Recurring Routes' feature in Zuper enables dispatchers to create multiple instances of routes with predefined frequencies and associate them with recurring jobs of the same cadence. This means you may have repeated jobs that need to be done at ...Detailed overview of users, scheduler, and map layouts in dispatch board
In addition to the dispatcher queue, the dispatch board includes several other interconnected layouts: Users, Scheduler and Map. These layouts work together seamlessly to provide a comprehensive view of operations and enhance the efficiency of task ...Understanding job visibility on the Dispatch Board
Managing and overseeing jobs effectively is crucial, and understanding why certain jobs appear on your Dispatch Board can be challenging. This article clarifies how specific settings influence job visibility, helping you understand what you see and ...